The front end of my 64 cab is setting low. I was told that you adjust the height with the allen head screws on the tubes. I can't seem to get a straight answer from any of the usual suspects. Any ideas?
Original Post
 Speedster Owners - Automotive Enthusiast Community

The front end of my 64 cab is setting low. I was told that you adjust the height with the allen head screws on the tubes. I can't seem to get a straight answer from any of the usual suspects. Any ideas?
Replies sorted oldest to newest
The big allen head screws there are just to hold the torsion tube center donut in place.
IF you have height adjusters installed, they should look similar to this and allow the center donut to be rotated a bit to allow the height of the pan to go up and down. If all you have is the hex bolt with no adjuster you can't do any adjusting on it.
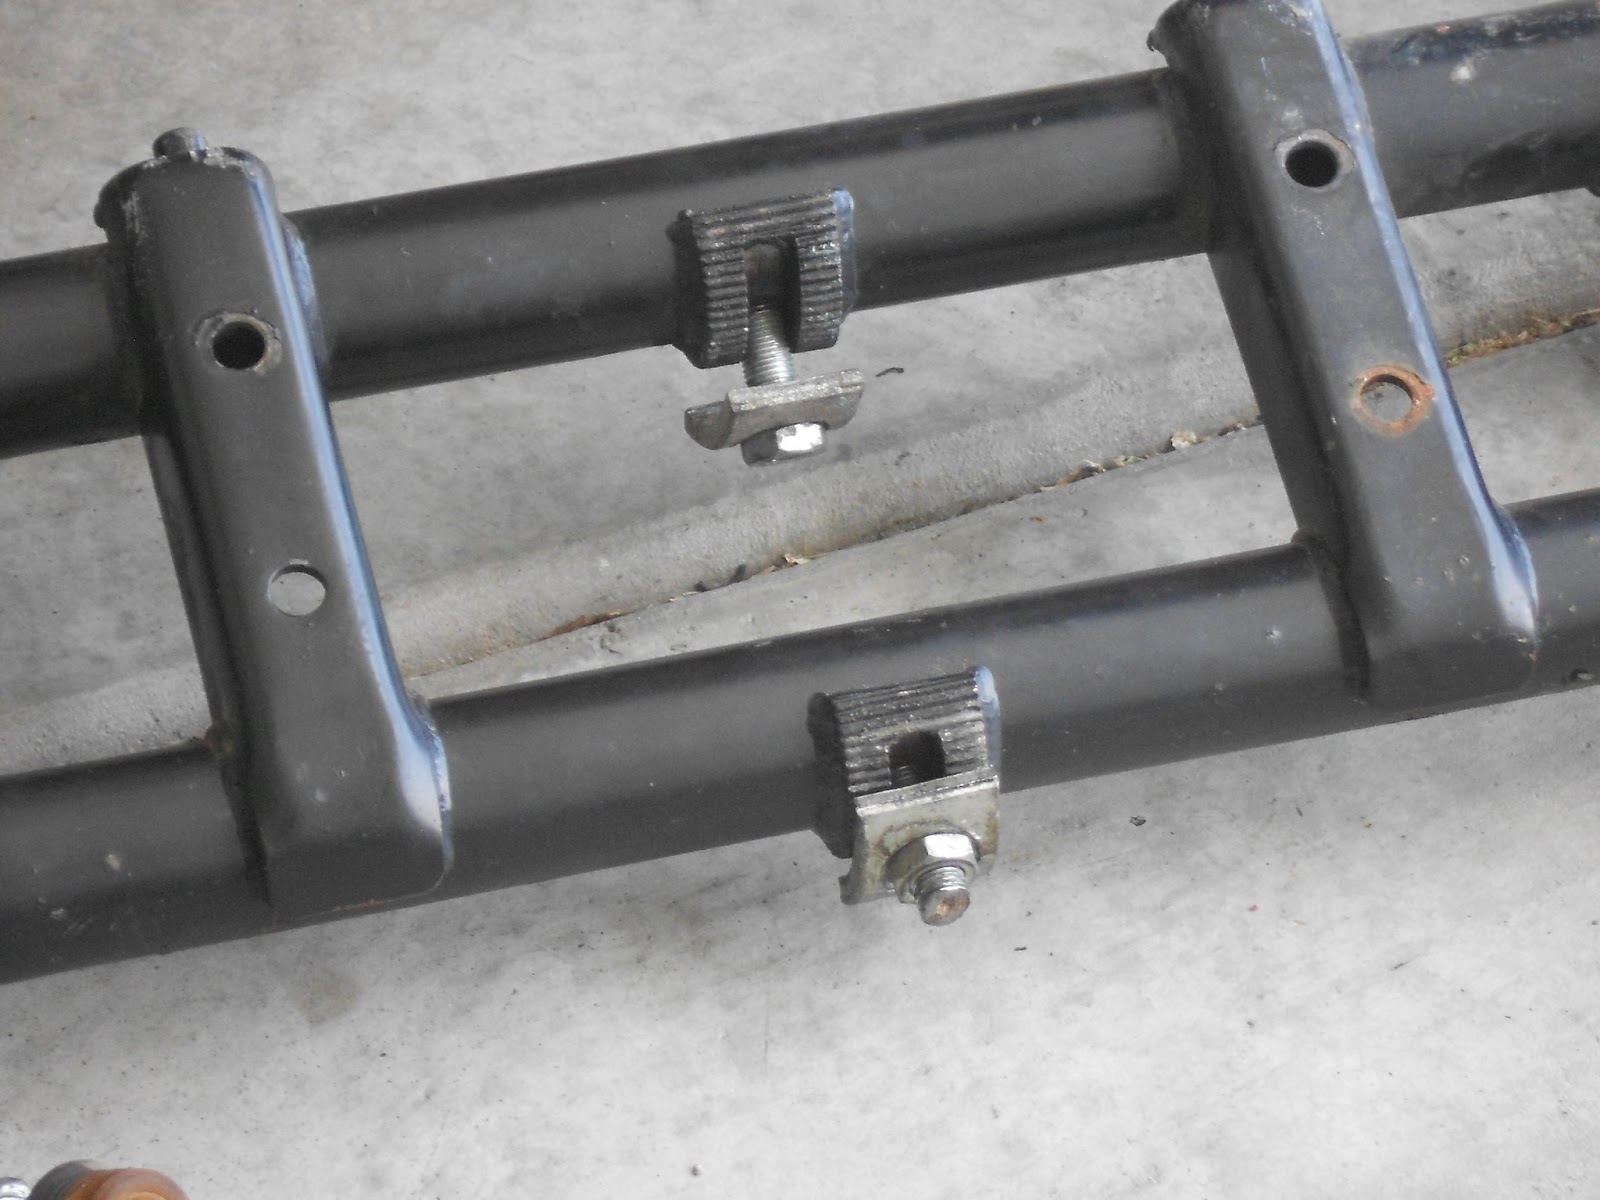
Also this style which is easier to adjust

Fantastic,
The lower pic is what there is on the Porsche. I had already tried to adjust the bars by turning the upper set screw as far as I could. It didn't seem to help, and thats when I cried out for help.
I have worked on a lot of 356's and V.W. and have never had this problem. Someone mentioned a broken torsion bar, has anyone seen this happen? Any suggestions?
Thanks Wolfgang for that picture.
Good point on how to adjust - from SOCAL web site where full installation instructions are available.
http://www.socalautoparts.com/...d/beam_adjusters.pdf
ADJUSTING HIDE HEIGHT: Loose all lock nuts(4) except screw (s) in the adjuster block. Turn the set screw to the desired position and retighten lock nuts (4); !f both tubes have been fitted, adjust the both at same time. The set screws (5) should be torqued to 30 lb/ft..and the lock nuts to 5 lb/ft. NOTE: Do all ride height adjustments with the weight of the car supported on a jack or jack stands. Never adjust with the weight of the car on the adjusters as this can damage the adjusters.
Can we get a picture of the part installed on your car? I feel like a photo might be incredibly helpful here.
If you look at the upper adjuster, wouldn't make sense that by screwing the top setscrew in,it would twist the bar down,therefor putting more of a load on the bar.
I hope I can explain what i'm doing, and find out there is something I am missing.
What I did was, loosen all four lock nuts. Turned the upper pin as far as I could, which to me would turn the horizontal pin upward. That didn't seem to help.
Does that sound right?
Why does the CMC, in the build process, only instruct you change the anchor nut position on the top torsion tube? Where as these adjustable systems, shown here use both?
Also my chassis is a Super Beetle, so do I assume, if built correctly my front suspension is from a 1965 and earlier, since my top anchor nut is in the horizontal position?
Art- A super beetle has a MacPherson strut front suspension, with the top strut mounts as part of the body work, and is not readily adaptable to a Speedster without major reconstruction and bracing in the trunk area. This is a pic of a super with the fender and strut off; you can sort of see how the tops of the struts mount in the bodywork. There is no beam, like in a beetle. It's not the pic I was looking for, but it was the only one in the Samba gallery. The top center leaf spring anchor on your beam has probably been turned (to lower the front) and welded. Does it have ball joints ('66 and newer) or king and link pins ('65 and older)?
PS- if your pan is from a super beetle, then the front frame head has been removed and a beetle frame head welded in.


Ashcreek are you talking about a '64 Porsche or a Replica?
This is for lowering the car, so the adjustments and optional clearancing are the opposite of what you are doing. IE, turn adjustment screws clockwise to raise car.
Thanks Justin
Now that I've read Justins' link - I have it 180 degrees backwards.
Justin -thanks for the clarification.
Ted
Thanks everybody.
I hope I didn't mess up the car I was talking about.
It's my 64 356. The weather is a little iffy here tomorrow, so I might not be able to drive the car to work. The top is 20 years old, and shrank a bit. As soon as I get the thing down there I will try turing the pins the other way. After all these years of working on these cars, I've never run into a problem like this. I also have my IMC speedster back at my shop, I can't wait to start on the again.One problem I had before I put it away, was getting it in third or fourth. I ordered a new shift bushing, and have my hopes up. There doesn't seem to be any side to side movement.
One other thing. Whats the best gear and engine nowadays?
One other thing. Whats the best gear and engine nowadays?
I had a list of smart alec responses to this, but an honest answer is just better.
The "best" gear and engine I ever drove in a speedster was a 2.7 Porsche 6 with PMOs and a 915 with a WEVO shifter. Rich Drewek has a nice engine and transaxle- 2.6L Type 4 with a re-geared VW box. I like mine: 2276 Type 1, twin-plug, dry-sump, VW box completely re-geared. All of these combinations are nice, and all of them are north of $20K, all said and done. Some of them are WAY north of $20K.
However, unless you are Bill Gates or one of the rolling Stones-- all of us live with some compromise ever day. "Best" with an engine/transaxle is a compromise between cost and benefit. If I were doing this again, I'd probably do a big-displacement Type 4 with a 915-- but I've decided that I'm in this for life, and I'm willing to spend more on it than most guys.
This summer I'm running around with a 2110 Type 1 (while I was waiting on the twin-plug stuff to get finished). That little engine is pretty darned sweet. I'd say it pretty evenly matches the capability of the rest of the car (without going nets there as well). I've driven Terry Nuckel's 2110/ 5-speed. It's pretty close to perfect for 99% of the world.
One other thing. Whats the best gear and engine nowadays?
Stan covers it pretty well- build the engine as big as you can afford, and then a little bit more. A 5speed (Berg or 901) is the ultimate, but if that's not in the cards, a long legged (3.88 or 3.44 r&p) 4speed with otherwise stock gear spacing is pretty close. Al
The best, depends on a honest evaluation of what the job is.
A car is no different from any other appliance or tool or any other choice.
The best for me is what I ordered, a air cooled 1776cc mexicrate 4 with about 70 hp and a 4 speed.
There no best for everyone even in a discreet group, that is why Baskin and Robbins has 31 flavors.
I blew it! I was asking about gear and engine oils, synthetic, racing straight or multi viscosity Some of the old world Porsche guys still recommend a straight weight oil.
I should proofread my stuff.
Al;
My front beam is 1966 and newer, see photo of ball joints. Then my anchor nut on the top torsion bar is in the correct position for a ball joint beam. Note that the lower bar, anchor nut is in the original position for a ball joint. Is this appropriate?
Also, do caster shims go on the back side of the lower torsion bar, in line with the mounting columns shown in the photo. Or do they belong outboard by the "U" bolts?
Thanks
")
")
")
")
The caster shims go behind the bottom tube, between the frame head and the lower front beam. Mine are in line with the vertical bracket that holds the beam to the pan/frame head.
Ted
Thanks, Ted. Just to clarify, as I'm not knowledgeable in automotive terms, "vertical bracket", you mean the bracket in my first photo, with the 2 bolt heads showing? The idea is these push the bottom beam and wheels forward for better stability?
thanks, Art
Ted,
Thanks for all the help.
Art
Art,
The lower beam looks similar to my 356, but i don't see any adjusting points.
As far as all the other ideas, I just haven't had a chance to try them out.
One thing I discovered is that how sensitive the shifting is to a slightly bad clutch.
I had to take the motor out to fix the clutch cable and figured I should look at the clutch.
My clutch was good and had plenty of meat on it. When I talked to friend he asked when
did I have the flywheel turned, which was never. I had it turned, and the result was incredible. The car feels like has a new tranny.
Ashcreek; the nuts to the left of the vertical bracket, are the anchor nuts for the lower and upper beam torsion bars. Nothing more than than that, they just anchor the torsion bar in place; if adjustment joints have been installed & welded in, none in my case, then adjustment can be accomplished from these same positions, see pics above of adjusting nuts. In my case the one and only adjustment is made when the anchor nut is cut & welded into the new position. Typically 45 degrees from original position.
Peace, Art
We are back on the ghia,I know it's hard to beleive.
Where can I get a rebuilt trans, for a 64 ghia conv.
Rancho Transaxles, Fullerton, California
800-304-8726
Ask for Sam Shakelford.
Gordon,
Thanks
Access to this requires a premium membership.
Supporting members have donated about $4.00 a month ($49.00 US per year) paid annually.
AUTO RENEW: You membership will auto-renew after 12 months. If you prefer not to auto-renew, you can cancel your premium membership at any time and it will remain in effect until the end of the 12 months. To cancel, sign in at SpeedsterOwners.com and navigate to: (Your User Name) > Premium Membership.
PLEASE NOTE: Your credit card will receive a charge from CROWDSTACK PAY, the payment processor, not SpeedsterOwners.com.


