Replies sorted oldest to newest

Looks like a std VW bug tank maybe with relocated filler.  You could pull the tank and maybe grind some of the fiberglass around where the tank mounts.  Remember gas weighs 8# per gallon so you may need to add some reinforcement.  I'd look underneath the tank to see how much room you have for steering/suspension.  I wouldn't take a hammer to it as that is where the welded seam for the 2 piece tank is. 

@MichalM  That is the tank that is in our cars, except for what Wolfgang had mentioned about the relocated filler.

Do you have any pictures of your tank installed in your car? That might help diagnose your problem.

Has this been a problem from day one of you owning the car?

There might be some padding under the tank that shouldn't be there???

I just had my tank out and the tank sits on a shelf with no padding. It's supported by the lip that surrounds the tank.

Fuel tank 123

Attachments

Images (1)
  • Fuel tank 123

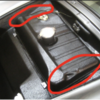
Thanks for the responses!   Yup, thats the tank I have too and sits exactly like you have in the picture.  I have a project; and would like to make a "cover" for my tank.  But, the tolerances on the side of the tank (in red) are sooo tight, I just need to make a little bit of room on those sides.  The gas never sits that high; so I'm not worried about losing any space there.    Hope that helps define where I am trying to adjust the tank.

@MichalM posted:

Thanks for the responses!   Yup, thats the tank I have too and sits exactly like you have in the picture.  I have a project; and would like to make a "cover" for my tank.  But, the tolerances on the side of the tank (in red) are sooo tight, I just need to make a little bit of room on those sides.  The gas never sits that high; so I'm not worried about losing any space there.    Hope that helps define where I am trying to adjust the tank.

No picture.

“Do you think its ok to do that while the tank sits in the car?”

Hmmmmm……..   I wouldn’t go beating on the tank with a hammer with the tank sitting in the car.  First of all, there is not a lot of room under there to get a good swing going and second, the tank sits on a relatively thin shelf of fiberglass that might fracture a bit from the impacts to the tank, not to mention possibly stressing the fiberglass at the bolt locations.  

If the tank is empty, it’s pretty easy to pull it out, beat the crap out of it, put it back and see how it looks, then rinse and repeat until it looks like you want it to.

I agree with Gordon, but for different reasons. Remove the tank, beat it into shape, put it in and out until you're happy, clean out all of the junk you've knocked loose inside, and seal the tank.

I used the POR 15 tank sealer, but there are others.

I’m not a fan of tank sealers. I restore antique motorbikes. I’ve seen a lot of tanks sealed, I’ve also seen a lot of peeling sealers.  If a new tank is unavailable, sometimes you have to do what you have to do. With these cars, new tanks are available.  YMMV.

When I removed my tank, I removed everything that was attached to it, filler neck, fuel sender, and drain pipe with the mesh screen. There was some debris in it, but it didn't look bad corrosion wise. I made sure it was completely empty then I let it sit out in the driveway for a few hours in the hot sun. I then poured some degreaser with hot water and swished it around. Some people will pour in a hand full of nuts, or something similar to get a more aggressive clean, but I didn't. I rinsed it with hot water, then let it sit out in the sun for hours until dry.

I made another drain pipe to get more clearance.  https://www.speedsterowners.co...-intrusion-reduction

When I reinstalled the tank, I propped up the front of mine with some shims under the lip. This, with the shortening of the drain pipe, probably gained me a few cups of more useable fuel. I know, madness. I could check the clearance of the top of the tank and boot lid by using a mirror to look into the hole in the hood without the filler neck installed. It's close, but does not touch.

I did not have to beat my tank. FWIW. If you don't hammer it, it will still look nice later if you decide to remove the cover.

My advice:

Make the cover out of thin metal (thinner than the car hood I used).

Fashion it so it rests on those high spots, not an eighth inch above them.

Make it a little flexible for initial fitment and screw or rivet it together—don't make the ends "flip up for storage" like I did....*

It will fit like that, with the real tank un-molested. A little painter's tape to keep the rubbing down.

But it would be better—and require less fussy fitment—to make it shallower as a one-piece design at the outset.

DO: Roll a bead on each lateral edge.

DO: make the skirts "too deep" and fold or trim them down later for final fit.

DO: remember to flange the area around the filler and the sender

DO: Remember to leave some depth for the hold-down straps.

DM me with any questions.

*There's not enough storage to be had and flipping up the sides is not practical in real life.

PS I used Por-15 and just followed the directions. My tank was new old stock and had no rust to start with.

Last edited by edsnova

The inner tank support on a spyder is a secondary bonded item and location and height can vary based on how it is trimmed as well as how it is located.  I've seen tank height differences of 1/2" within the same manufacturer, as well as locations fore and aft change by about the same, so just because a tank will fit from one person, doesn't mean it will fit for another.  I've made several custom tanks over the years for Beck clients as well as owners of other brands and while some have been very close, I'd venture to say no 2 were exactly the same.  I have patterns for a very nice alloy tank, but have never offered it for sale for this reason.  The few times I've tried to make one "custom" overt the phone, the headache has been more than the project is worth to me...

Back to the question at hand: try and look underneath and see how much room you have from the bottom of the tank to the shaped fiberglass insert.  It may be easier to recess the tank down slightly if you're handy with glass.

If you roll your car up on some ramps, you might be able to slide under it, depending on your bulk, and remove the aluminum access panel, 6 bolts. Then you can use a mirror and a light to see under the tank and such. You'll have to access this area anyway if your going to remove your tank.

This is the access panel. While your under there, there are many things that you can check and or replace anyway.

front access panel

Attachments

Images (1)
  • front access panel
Last edited by Carlos G
Post Content
×
×
×
×
Link copied to your clipboard.
×
×