Classified postings do not allow for discussion (replies are not allowed).  Direct message the member if you would like to discuss the item.
The Classified section is open to any individual (non-commercial firms) posting of items for sale. Members posting commercial advertisements must be enrolled in a Supporting Merchant program. 
Postings without relevant details (PRICE, location, condition, etc.) will be deleted.

The design I have would make the garage ceiling about 10' high and it would have a 12/12 pitch roof which would give me an 8' x 24' attic space up top with 8' ceiling.  Plan is to put the steps up to it on the inside of the garage in the back, but some people in this thread have put them outside, which has me thinking about that.   

I'm going to stretch the dimensions as much as the county will allow me with septic reserve setback exceptions, but from what I'm seeing, 25' wide by 26' long is probably the upper limit unless I want to dig up and replace my septic system... at that point you sell the house and start over.   

Attachments

Images (1)
  • 20210207_155914

Conventional stairs take up a huge amount of space-- space you can't possibly have in a 24 ft square building.

You can't get anything but yourself up a spiral stairs, and spiral stairs are not inexpensive. They still take up a space 6 ft square.

When considering how to use the space above the shop for storing large and seldom used things in the big-house barn, I looked to old barns with haymounds for inspiration. Most of then had a ladder and small access on the gable end of the building (near the peak on an outside wall) then a large access hole with an insulated panel in the center of the space. The hay barns had a block and tackle arrangement hanging from the ridgeboard at the peak, allowing a person to lift heavy things through the large access. I had a scissor lift to use, but a simple Harbor Freight winch would lift everything you needed up into the "haymound".

I'd recommend a short extension ladder for the "man hole" access, rather than a straight vertical ladder on the wall, but either will work. Both access holes (man hole and cargo hole) can be drop-in insulated panels. This is much, much less expensive than any kind of staircase, and allows very large things (seats, spare engine shrouds, etc.) to be stored "up".

Whatever you build, plan on maximizing every square inch of the space, because you'll need it.

Last edited by Stan Galat

I may have mentioned this before, but my neighborhood was built and, years later the town came through and added a neighborhood sewer system.  That system has a “T” between my house and my neighbor with the mainline to the local pump/treatment center going between and behind our houses through a vacant field out back.  Everyone in the neighborhood connects to the sewer line right in front of their house.

I submitted the plans to the building dept and got a go-ahead for a garage next to the house and set back about 30 feet to allow access to the 1-bay garage under the house and was OK’d by the BI because there was no sewer interference.  So the next week I get a guy in to dig the trenches for the foundation and he starts doing a great job.  After getting the front and sides dug he started  across the back.  Suddenly, this pickup truck comes tearing into the driveway and some guy jumps out and comes running over to the excavator, waving his arms and jumping around and yelling “STOP!” until the operator stops.  

Then he tells us that he’s the Health Inspector and just checked the sewer drawings and my house is the only one in the neighborhood that doesn’t connect going out through the front yard - My house’s sewer connection goes out the back, across the back yard and connects to the main line between us and the house next door, kinda-sorta right where we’re digging.  

So, now that everything’s stopped he goes back to his truck and comes back with a “pipe sniffer” and starts at the back of the house, finds the exiting pipe underground and follows it across the yard and right behind where we’re digging.  The pipe is, quite literally, six feet behind where the guy was digging.  Normally, nothing should be closer than 8’ from a sewer line but he let us go because (1.) we had already finished the other three walls and half of the back and  (2.) it was only a garage and we weren’t going down more than 6’ for the footings, anyway (his drawing showed the pipe down 8’).

I’ve seen Mike, the HI, from time to time (he’s retired now) and we both get a good chuckle out of this house being unique in a neighborhood that has a lot of other eccentricities, too.  Just another day in the life of a small town.  

Great story, Gordon.

Sewers came through in Central Illinois farming towns in the late '50s/ early '60s, and are generally a mess. Many, many places just took the seepage bed line off their septic tank and connected it to the sewer (it was far less expensive and easier than removing the tank and doing it the right way).

The net/net of that is that eventually the tanks all filled up with sediment and plugged the laterals connecting to the mains running down the alleys. It often took 40 years, but we were still digging up long buried septic tanks and laterals across people's back yards in the 90s. I think I helped a friend with his in the early '00s.

Sewer work is why I never went into dad's (very successful) plumbing business. I just couldn't do it.

Last edited by Stan Galat

Sometimes those sewer pipefitters become heroes.  Chris Etre was the guy running the excavator for me that day, and he also does most of the sewer or water works all across town.  He's now a local hero.   I always buy him and his crew a "Box o' Joe" at Dunkies when I catch any of them in there.

https://www.wcvb.com/article/w...ng-vehicle/30230407#

Last edited by Gordon Nichols

I've got a hatch into my rafters. The space above is small and cramped by trusses, but the PO—who was a head taller and 100 pounds heavier than me—did store several items up there "long term."

One such item is a stainless (or polished aluminum?) diamond plate locking pickup truck box, sized for an unknown make and model of common American Monster Truck (my guy had both Ford and Dodge parts strewn about the place when we moved in). I've never touched it in 10 year's residence but I probably ought to haul it down and put it on Craigslist.

Not absolutely sure how I could do that. The thing is big, if not heavy, and the slot in the ceiling is narrow. I foresee terrible trouble if/when I try to wrestle it down, even as I envision the PO having put it up there as easily as I might stow a box of facial tissues on top of the fridge.

The other great find up there was an engine hoist. To get it down, in pieces, I parked my pickup truck under the hole and bolted a comealong to the ridge beam. It did take some doing.

All of which is my long way of endorsing @Stan Galat's advice re big, outdoor hatch access with a built-in carrying beam above, with a smaller, ladder (or pull-down ladder! why not?) access inside.

It's easy and classic and inexpensive it just works.

But consider one other option, if you will:

The common 4-post lifts do not require bolting-down to the floor and, in the case of my Direct Lift, came with a snap-on caster set which has allowed me to roll it around inside the garage and even, on one occasion, out on the the driveway.

If a 4-post is in your plans, you will have what amounts to a built-in freight elevator—albeit a somewhat balky one.

I have seen people build a platform on Ytube to lift stuff to the second floor, it takes up essentially enough wall space.  Mind you, you could have rolling counters, or work bench under it but you will lose the height.  I also have seen stairs that are lifted in the air and locked in place when unused and depending on the location it might work to allow for workspace on the side of the car is it is on one of the walls.

Many ways to do it. but the more complexities the less you will like having to move stuff around to do anything.

"All of which is my long way of endorsing @Stan Galat's advice re big, outdoor hatch access with a built-in carrying beam above, with a smaller, ladder (or pull-down ladder! why not?) access inside."

Agree.  When I had my replacement 'barn' built, I specified an external lift beam at each end, and a swing door just below.  I haven't used them much, but they are there when needed.

Attachments

Images (2)
  • 707
  • 708

To be clear, you don't have to put a large exterior door and extended beam in the gable end (although that works).

You can put a hole in the center of the ceiling of the building, and create a panel that lays in the hole. Then simply secure a cable hoist to the ridge board inside the building and lift up through the hole. This method is 100% weather-tight, and super-simple.

@Stan Galat posted:

To be clear, you don't have to put a large exterior door and extended beam in the gable end (although that works).

You can put a hole in the center of the ceiling of the building, and create a panel that lays in the hole. Then simply secure a cable hoist to the ridge board inside the building and lift up through the hole. This method is 100% weather-tight, and super-simple.

A very neat solution!  That's similar to how I get into my attic, without the cable hoist that is, although that might be an idea...

I have a pull-down stair to my garage attic and it is very difficult to get stuff up and down. What I take up and down most often is wheels with tires mounted when I do the summer/winter switch.  It is hard to fit me and the wheel through the opening at the same time.  One time I dropped a wheel when I was squeezing through the opening.  Maybe I should consider the added hatch scheme.

@Sacto Mitch posted:

.

Ed, this reads like one of those FaceBook IQ tests.

How did Bob get both the truck box and the engine hoist out of his garage loft?

I'm betting he used the engine hoist to lower the truck box through the narrow opening, but it sounds like it's too late to do anything about that now.

When you sell the house, just list the truck box as an upgrade.

.

Nope. The hoist cannot fit in the space when assembled.

That's a cool video, Rick.

I have an insulated plywood door in the end of my garage ceiling. It hinges up and leans against the gable end, and is about 4 x 3 feet. On the main beam down the center of the garage I have a ladder hinged to the beam. I simply unhook the ladder and drop it to the floor, then climb up two steps and push the door up. Then I climb up to my "loft". The hole was there, the garage was built in 1950 by my Gramps. I merely made the door and hinged the ladder.

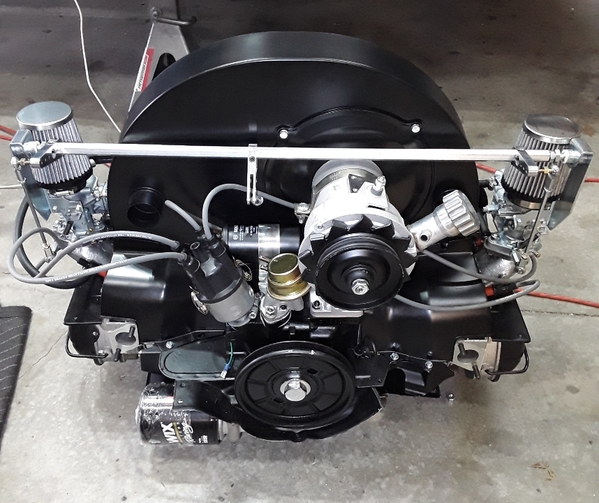
I have a chain hoist and have attached it to the main ridge in the past. I had both a 2.2l Suby motor up there as well as an extra Vanagon motor up there. Easy peasy. It's now full of cut-up Spyder body pieces, extra wheels and tires and a lot of JUNK that needs to be thrown out.

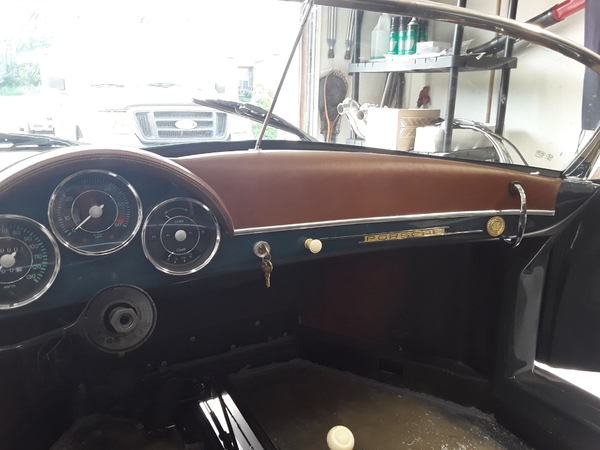
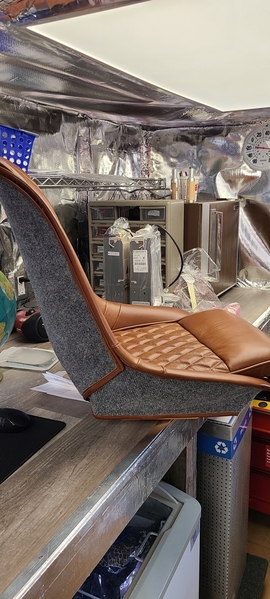
Alan is making great progress on my speedster and doing an absolutely beautiful job.   I decided I wanted a different interior from the beige that came with the kit, and also wanted to do at least some of the build on my end, so I partnered up with my friends mom who is a master seamstress and 2 amazing leather hides (butternut rum from leatherhidestore) to do baseball glove color leather and gray carpet.  Such a nice color combo with aqua marine paint.   Here are some pictures as we get close to finishing.

20210623_204903123_1[58)123_1[59)20210627_11115420210627_111148123_1[36)

Attachments

Images (7)
  • 20210623_204903
  • 123_1(58)
  • 123_1(59)
  • 20210627_111154
  • 20210627_111148
  • 123_1(38)
  • 123_1(36)
Last edited by MarylandGuy

Some parts that would normally be a simple bolt in  CMC's and FF speedster builds is not the case with the Thunder Ranch Speedster. The clutch pedal hook shaft, accelerator pivot cable arm both had to be extended to pass through the 1-1/2" square tube frame. I had to change the cable routing to make that function correctly. The pedal assembly sits 9/16" higher off the floor them normal that was a challenge too. Two new but slightly different VW gas tanks the bottom sections did not right into the molded fiberglass "Frunk" well so I'm having one of the two tanks reconfigured at a shop here. The firewall is 1-1/4" forward from the stock position so that moved the master cylinder forward that had... a pop in brake fluid reservoir so on the first turn of the assembled suspension it brushed the left tie rod against the reservoir just enough to make a brake fluid mess, went to Plan B installing the remote reservoir  in the Frunk, that's where most are located.  A lot of different challenges but everything is now coming together w/ all electrical done,  sound insulation material in and now working on the carpet. Even with the resolved quirks this TR Speedster is very well designed. The final door gaps, blocking and awesome Aquamarine Blue paint (done at Moorfield Collision here in WV) is stunning. The Arthritis and Emphysema have slowed my pace some ( I'm not letting the old man in so to speak) but a few more weeks and some sorting miles, it will be ready :~)

Last edited by Alan Merklin

It has been a fun experience working with Alan on this, and luckily I'm only about 3.5 hours away and have been able to make a few visits throughout the process to kick the tires.   Alan truly is a master of the craft and a great guy in general. 

I will hopefully be able to show the finished product off to all of you at Carlisle next year, or maybe sooner if we can organize a local drive here in the Maryland/DC/Virginia area. 

Post Content
×
×
×
×
Link copied to your clipboard.
×
×