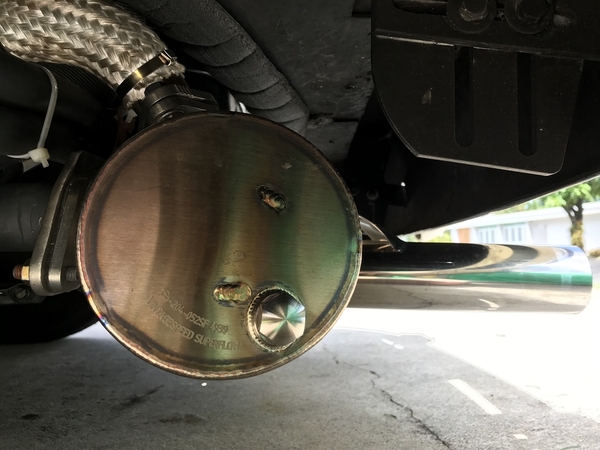
I got my new VS exhaust and am installing it today. I have the headers tight to the manifold but all other bolts are slightly loose. The left pipe only has about 1/16 clearance from the plastic bumper and the right pipe has about 3/8". Is there any trick to adjusting these so there is proper clearance from the bumper?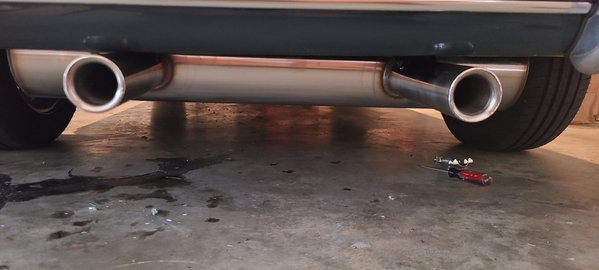
Replies sorted oldest to newest
What happens when you tighten all nuts down?
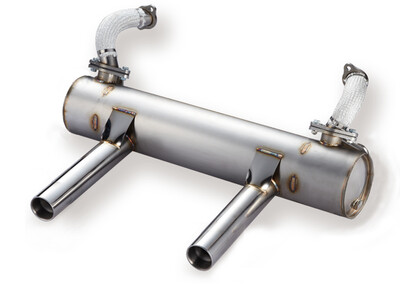
That looks like the exhaust for a VW bug with the apron cutouts? They make one with lower exhaust tips for replica Speedsters. If it clears the rear apron ok - you can move the rear bumper up a bit by elongating the mounting holes. Replica one is below.
https://store.vintagespeed.com...ca-Exhaust-c33996769
uhmm, deflate the left rear tire10 psi.?
I bought the Porsche replica version 155-204-05200 with the pipes lowered in comparison to the VW version. Its just a little too close for comfort given that they flex a little when the engine is running and I don't want to melt the bumper.
I'll try tightening everything down, but it doesn't look like that will change the position from where it sits. I'll see if the bumper can move a little up too.
If you are able to get all the bolts snug, then wrap a rag around the tail pipe, push down on it a bit with your foot.. sound less than craftsman like but will work.
What Alan describes above I term "English". Sometimes a little force to bend things into place is the only way.
I don't know guys. I have everything snugged in now and the driver side is now touching the body and bumper. There is about 1/4 on the passenger side.
The tips on this one actually sit about an inch in from the bumper unlike the tri mil that protruded out pretty far. Therefore no way to get any leverage to push down on it with my foot. See the pictures below.
Is there any way to lower the engine slightly or anywhere else to adjust to make this work? Clearly not an option to have it touching and melt my beautiful bumper.
Attachments
I'd try to move the bumper up just a bit. If that works, you can carefully cut out a crescent shape in the body to clear the bumper.
you could also try putting a pipe in the end of each of the pea shooters and lay a 2x4 across the pipes and carefully apply some of your body weight.
But if do what Lanes suggested, I think it would still look good with crescent cut outs. I had the Trimill and the pea shooters would rub on the ground going in and out of driveways. I like the shorter ones on the VS.
Paul, what I described is what I had to do on your exhaust when I installed it .. your Thunder Ranch bumper mounting is different from CMV VMC etc and would require some fabrication.
To protect the chrome surface of the exhaust I would apply the english to it in the following manner: Make a loop with a nylon strap and drape it over the exhaust tip where it rubs on the bumper. Insert a length of wood or metal pipe into the open/hanging part of the loop making sure nothing touches the chrome. Press down on the wood or pipe with your foot and see if that moves it enough.
I had a similar problem with my VS exhaust. Before you start trying to tweak it as described above, contact MT at Vintage Speed. He supplied me with spacers, gaskets and longer bolts to put between the flanges on top of the muffler and kick the muffler down a small amount. I'm sure you could use different thickness spacers to adjust the side to side difference also.
Email MT at Vintage Speed, he responds quickly and I have found him to be very helpful.
James
Thanks everyone.. I've tried everything suggested here (except cutting fiberglass) and it won't budge. These VS exhausts are built like a tank. I'm going to message VS as James suggested and see if I can get the spacers. I would feel much better about that then cutting out the body.
The guys at VS will take care of you
I heard back from VS and the spacer solution that @James has will cost me $60 with 1 week shipping. Looks like something I could source locally since it is just 2 spacers and longer bolts. Does this just go in the connection between the headers and the exhaust so it pushes it down some? Amazon has stainless steel 8mm kits for about $22 + shipping an will probably be faster than coming from Taiwan.
The spacers are basically the same flanges that are welded to the exhaust pipes. SS flanges that are laser cut to the same shape and ID as the flanges. He also supplies another set of gaskets to match the flanges. You will need one on each side of the spacer.
You are correct, it simply pushes the muffler down a small amount. If I recall correctly, the spacers were about 1/4" thick and moved my tailpipes down about 1/2" from the body.
You could make or buy the spacers, but I don't think they are a standard shape/size and require his gaskets to match. Check the dimensions on the ones you linked to make sure they match. The bolts are easy to get. However, for 60 bucks, his makes for a really clean installation and work great. Just my opinion.
James
A muffler shop could cut the angled tabs at the top of each tailpipe, apply heat and move both tail pipes down then tack the cut tabs back in place, that would be the easiest fix.
It seems like your bumper may be lower than it should be. On my CMC the bottom of the bumper is about 1" above the bottom of the body. I did cut a notch in the body for my exhaust but it clears the bumper.
The bumper on Paul's Thunder Ranch can only be installed at one location as TR has specific placement anchors at that point.
MarylandGuy: A lot of the fixes suggested are "KISS" type and should be considered before getting too clever. You are going to be okay because you instinctively went to modifying the part to fit the car not vice versa. Modifying the part usually means you can go back if something doesn't fit/work
I have a lowered Thunder Speedster. For future reference, I found the VS lowered bus setup worked well for me. It tucks up underneath, single out pipe runs parallel to the muffler. There still may be a picture on the Aircooled site. I'm a VS fan, I like their stuff well made with good hardware.
Keep the shiny side up, and stay between the ditches.
 My 10 year old son Henry and I took a 2 hour adventure today to a muffler shop and Napa + Advance Auto and got the parts for $25. Not as clean as the exact VS matching parts, but enough that I will be able to put in spacers and lower it to fit without modifying my car.
Getting a gasket with a 1.75 diameter hole proved a fools errand locally so I just got a sheet of gasket material and will cut to match tomorrow. I'll post some pics when I get it all setup and will do a separate detailed post on the full VS install for future adventurers.
Side note that Henry isn't into cars like my older son Brady (12, below in picture removing the Tri Mil) and was a bit aggravated that I dragged him along, but he is 10 and doesn't get a vote yet. I have to believe he will be positively impacted by my madness and quality time with Dad doing stuff that really is cool.
Attachments
This is awesome; I believe this was a wise decision and you'll be pleased with the results.
It ain't local, but Summit has them.
"Getting a gasket with a 1.75 diameter hole proved a fools errand locally so I just got a sheet of gasket material and will cut to match tomorrow."
I hope you're not talking about gasket paper. That would probably burn up pretty quickly. You'll need a metal gasket like the one Danny provided the link for.
NAPA and others sell exhaust gasket material in a sheet, 12” X 16” or so.
i usually cut the hole with a hole saw for neatness and the stud holes can be cut with a drill set on slow. The outline can be cut out with tin snips as it has a layer of metal sandwiched in or is some sort of high temp material like glass fiber.
What I got is a metal sheet that looks exactly like the VS gaskets, but it has a layer of paper on the back that the Napa guy said can stay on when installed. I will send pictures later this evening when I get it all setup.
x 2 ...no thick paper gasket on the exhaust.
Well I'm feeling a little defeated. I got it all back on with the spacers and it is hardly and different... maybe 1/8 inch lower. I'm done for the night and need Miller time.
I will loosen everything up again tomorrow morning and see if something can. Move around to get it lower.
Here is a picture of the gaskets I made and the flanges/spacers. The metal sheet is what I cut them out of.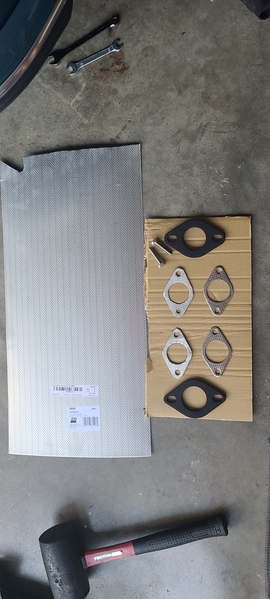
Attachments
You probably tried this already, but loosen the connections on the front of the car exhaust to see if it will let the top gaskets push it lower. Are you close or do you need a lot more clearance?
I loosened everything again this morning and got it to reposition down about 1/4" from the fiberglass, but not feeling great about it. The point of contention is the connection to the heater boxes. The exhaust wants to mount level with them and they are rock solid mounted and won't give any downward angle. The way I got the extra 1/4" was to have everything loose and then mount the heater box seal bracket first with a bend in the connection. Then I tightened everything else. I'm not sure that position will hold after I drive it a while though. Here are some pictures.

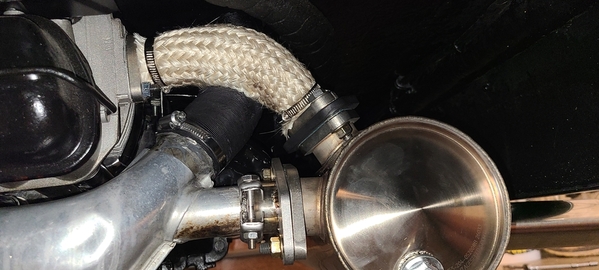
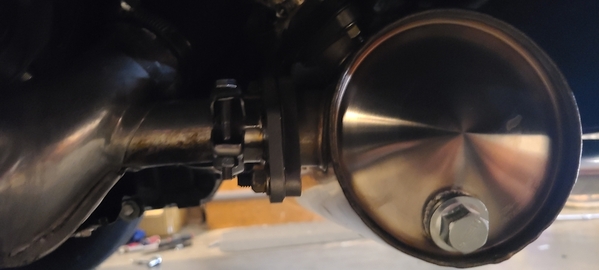
Attachments
Since you can drive it now, I would take it to a muffler shop, maybe tweak it a bit at the heater box and flange areas with heat. It wouldn't take much to make the adjustments permanent.
I agree with Alan; some heating up and tweaking should get you there. Like I said before the one in my car hangs down for some reason (see earlier post with photo); the tailpipes are not fully horizontal with respect to the ground but I believe I’ve seen these units on other cars with varying degrees of levelness. Not sure if it’s due to inconsistencies on the car builds themselves or the adjustability of the muffler. This is how mine looks from the back.
Attachments
I think you all are right. At this point, there is no more basic adjustment to be had, so the shape will need to be modified... VS has my latest pictures and is going to have their engineer look at it, but not sure what they can really do at this point except for maybe create a custom set of spacers or headers that give it a different geometry.
I have to see what local muffler shops I have around... Alan seems to have "a guy" for everything, but I do not in my area.
If you can't find a muffler shop that can do it, find a welding shop.
A precise application of an oxy-acetylene torch will tweak it permanently.
I'd stick a heavy pipe INSIDE the tips, heat at the tip/muffler connection and bend. No damage and permanent adjustment accomplished.
I would try googling "Custom Car Exhaust Shops near me" and see what pops up. I just did that here and I know all of the top three are used by the Hot Rod guys because they ALL need custom-tweaked exhaust systems - Their cars are even more custom and weirder than ours are. Your area is no different than Massachusetts - Hot rods are everywhere.
I've been looking at your photos and we both realize that a spacer alone isn't going to drop the exhaust tips AND keep them level. There's going to have to be several steps taken to drop the muffler and keep the exhaust tips horizontal and a custom exhaust shop deals with this stuff all the time. They'll know what to do.
@MarylandGuy The spacers worked well on my car, however the difference could be that you are running heater boxes and I have J-pipes. The J-pipes allowed the muffler to move down easily. I got about 1/2" drop at the body with the 1/4" spacers. Also, the exhaust gasket material from VS is a little thicker and allowed more compliance at the connections.
As others have suggested, it may be time to tweak it a little with some heat. Just be careful, stainless moves a little differently than carbon steel when heated. As Gordon stated above, the tips will probably not be perfectly level when you finish. Mine have a slight angle, but are not noticeable unless you crawl under the side of the car and inspect carefully. Looking good!
I agree with @James that my main issue is having heater boxes since they are mounted to the back of the engine and have zero flex.
This morning I did some driving around my town because not all of these places have websites or show up on google. I was able to eventually find a place on a backroad only about 10 minutes away who has a whole car fabrication shop where they specialize in japanese imports and racing modifications (fast and the furious). I talked to a younger guy named Justin and he is going to free up a lift for me tomorrow morning so we can take a look and do a little heating and bending to get it in place. He showed me his project car where he is custom fabricating a drag car from the ground up using parts of an RX7 body, Honda engine, miata suspension and full custom tubular frame and roll cage that he built himself. I think I'm in good hands, but told him not to expect me to race him in my speedster when he is done his project.
I'm hoping this will be the end of my drawn out saga and loss of prime driving weather.
You’re golden with this guy; he’ll be able to help you out.


