It's been a few years since my last post. I acquired a CMC speedster from the 80s that was never built. Not a single hole drilled. It came with a shortened super beetle chassis and the CMC front-end conversion kit to use a standard beam. Long story short, I've decided to not use that and start over with a shortened standard IRS beetle chassis. A local VW bus restorer, Jeff Gagnon, is willing to modify a pan for me with "Flat Out Custom" shortened floor pans he has that are meant for a buggy.

My question is what should I consider adding or modifying on the chassis at this stage? Is there anything you guys wish you'd done to your chassis if you could do it over?

I understand that the tunnel can be difficult to access once the body is in place and that the speedster doesn't have the shift rod access hole/cover that the beetle would have had. I've also read that some of you have had to add access panels for the shift rod coupling behind the seats.

I want to go with an under dash e-brake when the time comes, is there anything that needs to be done to the frame at this point to accomodate that?

I have an original copy of the CMC assembly manual which I will be following but I really appreciate the experience and knowledge of this group.

Thanks guys!

This was my original post when I brought it home but the topic is long closed. old topic

Attachments

Images (1)
  • CMC virgin speedster
Original Post

Replies sorted oldest to newest

They are still out there unmolested!  I know of nothing wrong with the Super Beetle conversion kit other than maybe a few extra pounds.  If you have a good title and the pan is accurately cut/welded I see no advantage to going to another std pan.  Yours already has IRS and suspect a late transmission.  Why spend extra $?  If you are 6'+ you may want to lower the pan seating area - with either pan.

I'd replace the shift rod $1 nylon bushing - believe there is a permanent brass one available.  There is a removable OEM plate to access the shift rod coupler that is still there after shortenening.  (It can be slightly obstructed by the lower rear seat fiberglass - but not big deal).  You'll want to lower the rear a few clicks before attaching the fiberglass body - best done with trans & engine weight applied.  You'll need a front adjustable front beam - might as well go with lowered disk brakes/spindles.

I see from old post you do have the front H-beam - but maybe with out dual beam adjusters welded in.  The photo of transaxle show the mold number 113 - that isn't the serial # which is stamped in by the factory.

Last edited by WOLFGANG

Be aware that a dune buggy is shortened a different amount than a Speedster and Jeff will have to know the Speedster dimensions (From your CMC manual)

Front and rear disk brake conversion (which to use depends on the body style - classic side or wide body)

Decide whether you want 2” drop front spindles or stock height

Decide whether to use “Avis” style height adjusters or the bolt-style and on one front torsion bar or both.  

Consider adding adjustable rear spring plates to help fine-tuning rear ride height and balance.

If you are tall (6’ or taller) now is the time to consider whether you need to lower the seats a couple of inches in the pan.  Search on here for lowered seats.

You can spray the pan with truck bed liner as part of the rebuild process to make it pretty and durable.

Be aware that CMC bodies aren’t true and you’ll have to mess with it, especially at the rear, to get it even left/right on the pan so that the tires are equi-spaced between the rear wheel well lips.  Lots of patience here will pay off in the long run.  Make sure it’s true before final assembly and sealing body to pan.

CMC bodies also seem to droop starting right behind the doors.  This causes the vertical seam between the rear of the door and the body to get wider as it goes up.  You can’t see this until the body is mounted.  The cure is to drill out the rivets holding the body’s inner wheel well wall to the body frame, gently/slowly jack up the rear corners of the body, and when the door rear seam is evenly spaced top to bottom, re-bolt the body to the frame.  Search on here for CMC body droop fix or something like that.

Make sure you find the front body support.  It mounts to the top of the front beam and supports the body just in front of the gas tank.  Super important.   It prevents spider-web cracks between the headlights and the frunk.  

Don’t get too excited over the access to the shift rod coupler.  Most of the cover is easily accessible and you may or may not need to cut a small (6” wide by 2”-3” deep) piece out of the shelf behind the seats for more access - I never needed to cut the body for more clearance.   You’ll know once the body is on and then cutting a piece out isn’t a big deal, anyway.

Consider cutting an inspection port in the passenger side of the tunnel opposite the pedal cluster.  This allows access to the clutch cable inside as well as the tube and its bracket that the cable slides through.  That tube sometimes breaks the front weld right behind the pedal cluster and the only way to fix it is to open a port on the tunnel.  Some on here my feel that this weakens the central structure but I have a port and have not noticed any weakness since opening it up.  

Also consider getting a clutch pedal shaft with a bearing conversion on the cable end - They work really well (I have one).

Don’t bother setting the ride height until the car is assembled with everything in it and THEN set the ride height.  It’s a pain to set ride height and balance right.  Why do it more than once?

Research the under dash umbrella handle e-brake systems available and find the cable-lever-version one that is most effective - Not all are.

Decide whether you want front and/or rear anti-sway bars and the size you want and add them before the body goes on.  

Don’t use gas shocks either end.  Find a set of stock, oil-filled shocks.

The body style defines wheel width and dish so you can figure out what fits for wheels after the body is on.

I’m sure there is more, but this is a good start.

@WOLFGANG posted:

They are still out there unmolested!  I know of nothing wrong with the Super Beetle conversion kit other than maybe a few extra pounds.  If you have a good title and the pan is accurately cut/welded I see no advantage to going to another std pan.  Yours already has IRS and suspect a late transmission.  Why spend extra $?  If you are 6'+ you may want to lower the pan seating area - with either pan.


My main issues with it are that the welds are not done very well and that front end conversion kit is a boat anchor. If I'm going to go to all the trouble to build this thing, I want to start with a chassis that is as good as it can be.

A few of you have mentioned lowering the seats. I'm 6'1" with long legs so I probably should do this. I'd also like to have the seat be fore/aft adjustable.

The Speedster wheelbase is 82.7" according to Google.  The Manx is 82" according to the same source.  I thought they were 80".

I've given him the wheelbase specs as well as my extra copy of the CMC manual. The car also came with the 2x4's with bolts set to the correct wheelbase dimension, per the CMC manual, so he'll have those to reference. I imagine he can tweak the buggy pans to fit.

Thanks Gordon, I'm going to add all of this to my build list as things to consider.

20240818_13104020240818_135716I've got 2 more questions for guys after dropping the car off at Jeff's. What's this thin piece of steel gor that's welded to the frame under the door sills? It's stitch welded all along and looks like it would be in the way of seats, carpet, etc. Looks like we should just remove it.

I read somehwhere on here that one builder lowered seat pans by 1" for tall drivers. Does anyone know the best dimension? I'm 6'1".

Attachments

Images (2)
  • 20240818_131040
  • 20240818_135716
Last edited by Adrian Tayne

Yup like Stan said.  After affixing the body to the pan, I was able to cut the excess (maybe an inch) with an angle grinder before fiberglassing the 2 halves together.

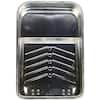
Pans are lowered by making what looks like a steel "paint roller tray", cutting big hole in the pan and welding in the "paint roller tray."  You can see where VW lowered it a little in the OEM pans (after seat tracks are removed).  Best you can do is about 2" before your butt might impact a high manhole cover!

Image result for lowering seat in a vw with a dropped panmetal-paint-trays-and-liners-rm435-64.0

Attachments

Images (1)
  • mceclip0
Last edited by WOLFGANG
@WOLFGANG posted:

Yup like Stan said.  After affixing the body to the pan, I was able to cut the excess (maybe an inch) with an angle grinder before fiberglassing the 2 halves together.

Pans are lowered by making what looks like a steel "paint roller tray", cutting big hole in the pan and welding in the "paint roller tray."  You can see where VW lowered it a little in the OEM pans (after seat tracks are removed).  Best you can do is about 2" before your butt might impact a high manhole cover!

You glassed the body to the pan? We were planning to bolt it on with either silicone (per the CMC manual) or a rubber seal which is what Jeff wants to use.

So the recommendation is drop it 2 inches. Does the car basically sit at stock height to make that work?

Jeff suggested either welding in the whole pan lower (we had discussed 1" lower) or spacing the body up off the pan with spacers. He had done this to another kit car he's trying to finish for someone who couldn't fit.

The paint rollers seem like quite a clean option. Are these available or something we'd make?

You would make a steel box that looked like a cheap paint roller tray and weld it in to make it watertight.  A paint roller tray is only like 12" wide.  I can't find a photo of a pan that someone did.  Like I said VW did the same idea - but if you are using a flat dune buggy flow you'd lose even that. You want your butt lower so your head isn't above the low windshield.

Yes - after bolting the body to the pan with lots of silicone in between, you scuff up FG sill and metal floor pan and apply a band of FG to make it watertight --- per the build manual.

I lowered front and rear of my CMC about 2".  You don't want it looking like an off road rallye car????

Attachments

Images (1)
  • mceclip0
Last edited by WOLFGANG

Perhaps, but not all that noticeably.  You can always bend the existing VW-style shift lever back to make it more comfortable.   There are a lot of shifters out there.  Some, like the VW versions, are pretty cheap (avoid the el-cheapo Asian ones) and others which are more custom and much better quality can be expensive (buy once, cry once).  I have a Berg shifter that I like a lot, and lots of people on here have CSP shifters from Germany.  

http://www.geneberg.com/cat.php?cPath=17_475_2971

https://www2.cip1.com/csp-shifters/

Right up there with those are the levers from Vintage Speed, offered in a variety of lengths and bend angles.

https://www.heritagepartscentr...57Twy9gaAjFLEALw_wcB

Last edited by Gordon Nichols

I would like to go IRS with the pan. It was pointed out to me by another user that IRS trailing arms have to be shortened to work with the speedster. Is it that the IRS setup is wider than swing axle, or that the wheel travels more vertically and hits the fender, or some other reason? It sounds like they also need to be used with a shorter axle, specifically a left-side automatic Type 3 axle. Is this all sounding right?

I had been thinking discs front and back but would be fine with drums in the back. I have my eye on a set of Vintage 190 alloy rims, 15" x 5.5.

If you do IRS (and you want to), and you want to use Vintage 190 5.5s in wide 5 (and you want to), you'll need narrowed trailing arms and T3 axles. Getting the trailing arms narrowed is not common, so there's only a few places that will do it, and it's not cheap.

Rom Lummus Racing does them, as does Valley Autowerks. I've got no experience with either of them, but Valley Autowerks is listing the price to narrow yours (they don't supply the trailing arms, they modify trailing arms you send them) at $400 on their website. Ron Lummus sells them outright in 1" and 3" narrowed for $1200. You still need axles as well.

There's nothing cheap about this.

Last edited by Stan Galat

I have a CMC with IRS. I didn't alter the trailing arms.

I trimmed the edge of the wheel opening to about 3/8"

I have 4-lug 5.5" steel wheels with a backspace of a bit over 5". The distance from the wheel mounting surface to the outside is the same as that of a 4.5" wheel.

I run 175/70R15 tires.

I have AC Industries (Socal) rear disk brakes. They are the only ones I found that claim to not increase the track. Even so, they milled a little off the hub.

Add Reply

Post Content
×
×
×
×
Link copied to your clipboard.
×
×