Should you have to drop the motor replace the intake manifold nuts with the tall type so that you can get a bite on them.
Alan,
I was able to get to them. However these CBP manifolds have the #3 nut right up against the manifold wall. I could only get a stubby open ended wrench on it and tighten it a little. #4 I got a socket on tightened it down. I also check to make sure the spark plug was tight. I ran the test again and still have a leak down there somewhere. I might have to pull the manifold off and take a closer look. I am not sure I have ever seen the tall nuts you are referring. I wonder how much of the outside of the manifold I could grind down by that nut to allow a socket to fit over it?
If you don't go overboard you can take a little off the manifold, but remember that with the curve/shape of the manifold there just may not be room for a socket on both sides. An alternate solution is an 8 mm (thread) nut with a smaller wrench size. Gene Berg Ent. sells these-
http://www.geneberg.com/produc...amp;products_id=1409
and there are others.
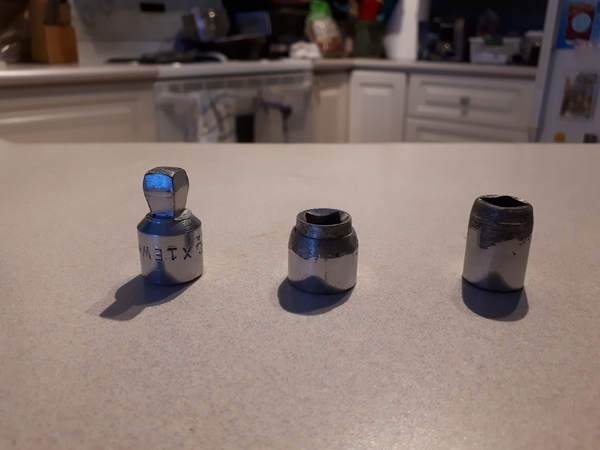
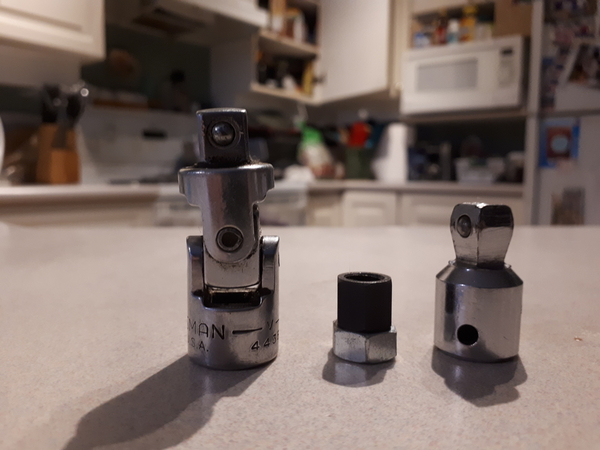
The 2 sockets below have been modified- the 1 on the right is 12 mm, for some taller intake manifold nuts I have (not sure where I got them) and is shortened as well as the top profiled. The center socket is 15 mm, again, shortened as well as profiled, and other than tightening head nuts, the exact reason for all the custom work to it (all done by grinder and file) escapes me at the moment. The thing on the left is a wobble extension and is much more compact than a normal universal joint, which you can see in the 2nd pic.
A wobble joint makes removing and installing intake manifolds SO MUCH EASIER! EVERY aircooled owner running dual carburetors should have one. Also a 13 mm (wrench size) nut vs the longer 12 mm. And don't be afraid to buy a socket just for the intake manifolds- grind and file as much as you need to. And I can see in the 2nd pic I've left cupboard doors open again!
Attachments
Al
I got the manifold off. The gasket looked pretty bad. Once the manifold was off, I has able to grind down the side of the manifold so I can get a socket in it. I will be reassembling it later. I have some spare gaskets.
Bobby D posted:Al
I got the manifold off. The gasket looked pretty bad. Once the manifold was off, I has able to grind down the side of the manifold so I can get a socket in it. I will be reassembling it later. I have some spare gaskets.
Double check that the face of the manifold is flat and not warped so you know it is making positive contact with the heads.
Success! New gasket, check the manifold for flatness with a plane of glass on 1200 grit sand paper. Reinstalled, check timing and reset mixture screws. #3 is now pulling the same air as the other cylinders and mixture screw now affects the RPM.
I took the car for spin, no popping and it pull right to 6K with no stumble. Running great.
Thank you all for all your help. I greatly appreciate it.
That's great news, Bobby. Nice job!
New gasket, check the manifold for flatness with a plane of glass on 1200 grit sand paper. .....Old school !
Yeah, we’re gonna make Bobby an “old school” mechanic, yet!
Welcome to the 1950’s, Bobby!
Great to hear you got it figured out, Bobby.
Using the plane of glass with sand paper sprayed glued on came from my father in-law. A retired GM master mechanic.
So now you owe him both a ride, and some of his favorite brew!
Yeah, he always helps me out. I am in Ohio and he is Michigan. He has been my corvette mechanic for 15 years. He installed a procharger in my 2002 ZO6. He has driven our speedster a few times but it does nothing for him. He is spoiled from power of the corvette.
Glad you have it sorted. FYI, if you used the mushy CB gaskets, you'll be doing this again. I went through 3 sets until I figured it out. Buy some hard and stiff gasket material and cut your own. I had one set on for 35,000 miles, and only took them off to redo the heads.
DannyP posted:Glad you have it sorted. FYI, if you used the mushy CB gaskets, you'll be doing this again. I went through 3 sets until I figured it out. Buy some hard and stiff gasket material and cut your own. I had one set on for 35,000 miles, and only took them off to redo the heads.
And also use a tiny bit of grease on the gaskets when reinstalling; it helps seal everything up.


