You can't spin that nut because everybody figures we all use the special reduced head nuts that cost about a buck per. I've given up and just use them for everything, since nothing fits without them (headers, intakes, etc.). As for the rest - you're a regular Renaissance man, @Michael Pickett.

I can't think of a single guy here who wouldn't be excited about a low-cost EFI solution. I think it'd keep a lot of guys in air-cooled mills if it became more common-place.

Also, I picked up the inlet air temperature sensor from WTMTronics for $15 including the connector and pigtails.  

I got a deal on eBay for my fuel injectors - new in battered boxes 4 Accel 150117 for $115. 

I got a cheap regulator and a few 6AN connectors for $45 from Amazon - Bettercloud Universal EFI regulator.

I bought 20ft of 6AN stainless braided fuel hose and 10 assorted 6AN connectors from Amazon for $60. 

25 ft of vacuum hose from Amazon for $25, misc fittings were in my junk box.

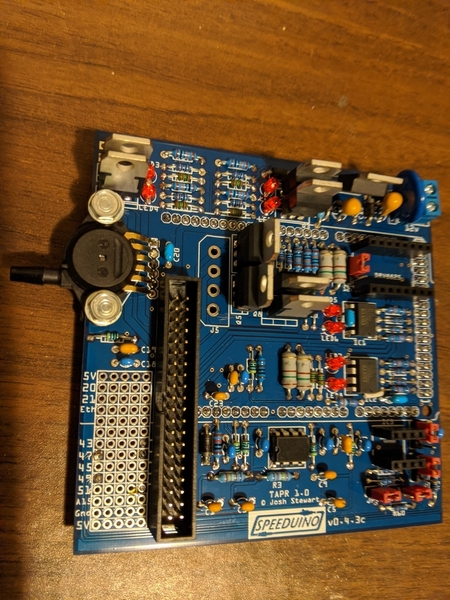
From WTMTronics: Speeduino v04.x with 250 kpa MAP sensor installed and the board prebuilt was $150. I added Bluetooth for $8 and a Hammond case for $20.

Hall Effect crankshaft position sensor from DIYAutoTune for $38.

CB Performance crank trigger kit $170

@Stan Galat posted:

You can't spin that nut because everybody figures we all use the special reduced head nuts that cost about a buck per. I've given up and just use them for everything, since nothing fits without them (headers, intakes, etc.). As for the rest - you're a regular Renaissance man, @Michael Pickett.

I can't think of a single guy here who wouldn't be excited about a low-cost EFI solution. I think it'd keep a lot of guys in air-cooled mills if it became more common-place.

Back in the 90's when I was living in Denver, I had to get an insurance quote from the Kennedy tool dealer and discovered they were an Au-VeCo dealer. After running all over town looking for two of those 12mm bolts for my 912 in vain, I bought a box of 100 and a box of 100 copper exhaust crimp nuts. Ever since, I've been able to "single use" those exhaust bolts like you're supposed to and I never have to run to the hardware store looking for those unicorn bolts. 

I've  still got about 30 of the copper ones left and 50 of the others. 

Last edited by dlearl476

Yeah, about those nuts.....

I use the brass 11mm nuts for the exhaust. They can be re-used a number of times. I use steel ones for the intake manifolds, backed up by a THICK washer so the manifold doesn't get galled. Blue loctite on the intakes.....no leaks, no loosening. Also, the gaskets: are they mushy or stiff? Mushy gaskets for intake are a failure in the near future.

The crank sensor wiring is I think the only wiring where shielding is really important. Only ground the shield on the ECU end, and run the shield as close to the connector end as you can. 

Mike, keep it coming.

Also, I picked up the inlet air temperature sensor from WTMTronics for $15 including the connector and pigtails.  

I got a deal on eBay for my fuel injectors - new in battered boxes 4 Accel 150117 for $115. 

I got a cheap regulator and a few 6AN connectors for $45 from Amazon - Bettercloud Universal EFI regulator.

I bought 20ft of 6AN stainless braided fuel hose and 10 assorted 6AN connectors from Amazon for $60. 

25 ft of vacuum hose from Amazon for $25, misc fittings were in my junk box.

From WTMTronics: Speeduino v04.x with 250 kpa MAP sensor installed and the board prebuilt was $150. I added Bluetooth for $8 and a Hammond case for $20.

Hall Effect crankshaft position sensor from DIYAutoTune for $38.

CB Performance crank trigger kit $170

0-100 regulator? Where did you get the fuel pump? Anything for engine temperature?

Interesting, EFI pump for Evinrude 40-225hp motors, $35:

https://www.amazon.com/ROP-Sho...728151_t1_B07NQW1XV6

Connector assortment:

https://www.amazon.com/Waterpr...TG9nQ2xpY2s9dHJ1ZQ==

Looks like the ones Mike is using:

https://www.amazon.com/MUYI-Wa...QX2SQSB79DQQYPB1AAPE

I'd buy these, Deutsch style connector kits, many different assortments available:

https://www.amazon.com/dp/B085...TG9nQ2xpY2s9dHJ1ZQ==

A really cool bus-bar pair, especially for fiberglass cars:

https://www.amazon.com/dp/B07C...aWNrPXRydWU&th=1

P.S.: I'm totally happy to help anyone spend their time and money LOL!

Last edited by DannyP

The regulator is a 0-100 psi. Buying a little bit better regulator and pump certainly could be a good idea.

The Deutsch style connectors that Danny found are very nice. I started with just a couple of 6 pins for spark but now have 5 connectors (using 25 out of 30 connections plus a couple of spares). You could reduce the number of connectors and make it cleaner. The last time I did this, I used a pick-and-pull 50 pin behemoth and a wiring bundle the size of Marianne's wrist. I went the other way this time because I wanted it simple. Two 12 pins would work. I'm using one port/wire to turn off my AC compressor at idle. I doubt any of you would need that 25th wire.

As an old electronics tech, I personally would rather build using solder and heat shrink with pigtail connectors than to have to crimp a lot of pins to build the connectors. Just my preference.

For wires, I bought a couple of 10 ft long, 11 color 22g automotive wiring bundles $16 each. https://www.ebay.com/itm/22-aw...10-FEET/292158875171


I'm using a version 0.4.3 Speeduino board that uses a 40 pin IDC connector. These evidently are mostly used to make it easy to plug a converter cable that goes to an OEM wiring harness (lots of Miata users out there). Here's a pic, the IDC connector is the black rectangle on the left. IMG_20200715_075533

Doing it again, I'd probably go with the previous version (v0.3.x) that just uses screw down connections to the board. The differences otherwise are negligible.

IMG_2668-1024x701

There are other options now and coming soon, but probably worth talking to Weaver Markel at WTMTronics if you want more insight. 

Back to IDC/Dupont connectors, I bought a big 20 piece pack of female 40 pin IDC shells from eBay via China. I still have 19 of them and would be glad to send you one for free if you need it. If you want to wait for a big pack: https://www.ebay.com/itm/20pcs...a:g:AdkAAOSw7XZXhGru

As I said previously, I hate building crimp connectors so I bought a bunch of precrimped pigtails that I plugged into the IDC connector attached to the Speedy and routed them through a hole drilled in the end of the case that had a rubber grommet. Here's the link to the pigtail jumper wires I used: https://www.amazon.com/gp/aw/d...s_sparkle_scm_asin_0

Like I said earlier, doing it now, I'd probably go with the V0.3.x board with the screw down connections.

Attachments

Images (2)
  • IMG_20200715_075533
  • IMG_2668-1024x701

All of the computing power for the Speedy comes from a standard Arduino CPU board. The Speeduino units plug directly into the Arduino board. Use the Arduino 2560 board to avoid heartache: 

https://wtmtronics.com/product/arduino-mega-2560/

I highly recommend using a Hall Effect crankshaft sensor rather than a Variable Reluctance (VR) sensor because of the vastly reduced susceptibility to ignition interference. If not, you'll need a small daughter board called a VR signal conditioner:

https://wtmtronics.com/product...gnal-conditioner-vr/

Last edited by Michael Pickett

@Stan Galat, for coolant temperature, I use either the VDO 323064 oil relief sensor or the sump plate oil drain VDO 323055 sensor. They seem to be equivalent although you'll get slightly different readings depending on your oiling setup. That's ok, you'll just be using the temperature reading to compensate fueling and that's just a relative relationship, not an absolute thing.

Last edited by Michael Pickett

Very good info, Mike. I was thinking the same thing, go with version 3, buy pigtails and tin the wire ends under the screw terminals.

But version 4 and a IDE connector from you would work too. I did find those 6 pin Amazon connector pigtails you used.

If I do this, I'll go VR pickup and signal conditioner, as the wheel is already on my crank pulley and the VR sender is there already.

I was going to use a temp sender in the head, as that more closely follows the transition from cold to warm in my engine. It takes a while to warm the oil, only a few minutes for the heads. There has to be a reason the VW engineers put the temp sender in the heads on type3.

0_IMG_20200401_085832@DannyP, sounds like a good plan. You are absolutely right about cylinder head temperature being more accurate for EFI than oil temp. If you want one or two of those IDC headers just PM me your mailing address. Be careful with the placement of your Speeduino and the location of your coil. I had to put steel between the two no matter how much shielding I had on my VR or Hall Effect crankshaft sensors.

Attachments

Images (1)
  • 0_IMG_20200401_085832
Last edited by Michael Pickett

Thanks Mike. My Megajolt is behind the passenger seat in my Spyder, that's where I'd put the Speeduino. My Ford type coilpack is mounted above the trans/engine junction, so almost 3 feet from ECU.

Is your Hall/VR cable shielded AND twisted pair, shield grounded to ECU ONLY? Is your ECU in a metal case? I used leftover Subaru VR sensor wire for my install. The ground and shield really matters from what I've read. Mine worked out-of-the-box, no troubles or interference.

@DannyP, I really struggled to get a clean crankshaft sensor signal last fall. I used to be a research electronics tech and built probes and amplifiers to measure the signals inside a single kidney cell, so I was careful to shield and ground the VR/Hall wiring properly (to no avail). I finally discovered the problem when I wrapped a wad of aluminum foil around the Speeduino and grounded it. The problem was drastically reduced. Turns out that a small bit of fiberglass does not a Faraday cage make. The end caps of the Speeduino case are plastic and the interference was leaking into the box there. My coil was mounted on the firewall then, so I moved it to the other side of the shroud from Speedy and the problem was solved (switched to resistance ignition wires along the way). This may just be a noisy coil, but I'd make sure that there's some grounded metal between the coil and Speeduino. I never had this problem with the Megasquirt units, but the old 911 was a steel tank. I don't think a 50 caliber Desert Eagle would do much more than dent it.

Making slow but steady progress on the installation. Found out that the left side air cleaner was going to collide with the rear relay/fuse box, so it had to move. IMG_20200719_165215IMG_20200719_165210

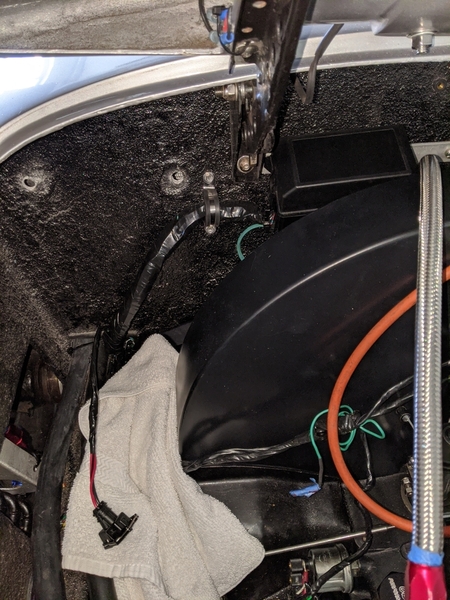
Finished building the fuel and vacuum lines, too

IMG_20200719_165142

Passenger side wiring with throttle position sensor harness, fuel injection harness and intake air temperature harness

IMG_20200719_165148IMG_20200719_165154

The throttle bodies equipped with sensors, connectors and vacuum lines ready for installation

IMG_20200719_165130

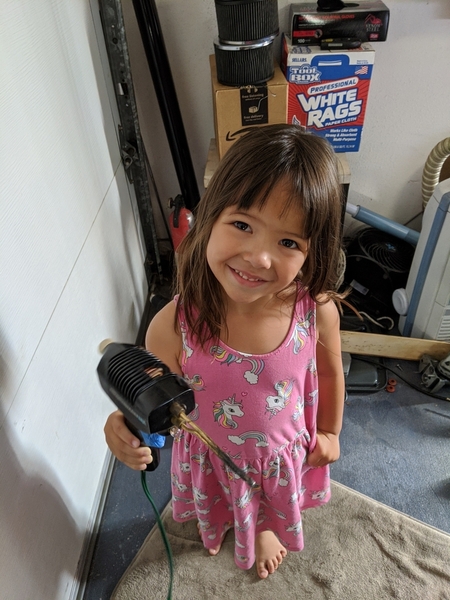
My able assistant and apprentice

IMG_20200719_165254

Attachments

Images (7)
  • IMG_20200719_165142
  • IMG_20200719_165215
  • IMG_20200719_165210
  • IMG_20200719_165154
  • IMG_20200719_165148
  • IMG_20200719_165130
  • IMG_20200719_165254

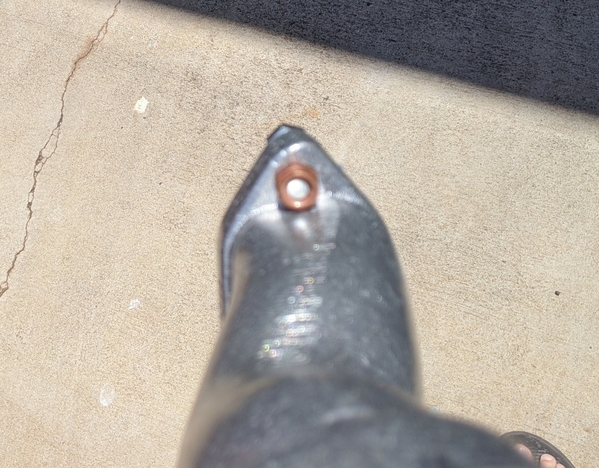
More plugging away. I'm still having clearance problems with the CBP Panchito manifolds. I bought a bunch of 12mm exhaust style nuts and there still isn't clearance to put a socket on the short side of the manifold 'Y.' 

IMG_20200720_113125

I decided to make my genuine, made in the galldurn US of A manifold more like the cheap Chinese one I got off of fleabay. Me and my trusty grinder took a smidge off of the 1/4 inch thick manifold wall to allow a socket to just barely fit. Sorry if it sounds like I'm complaining, but to me, there's no excuse for this kind of lousy design/QA on a premium product. 

IMG_20200720_113510

Ok, got that off of my chest, again, and @Stan Galat, I don't want to hear "No, we all use the even SMALLER special nuts!" 

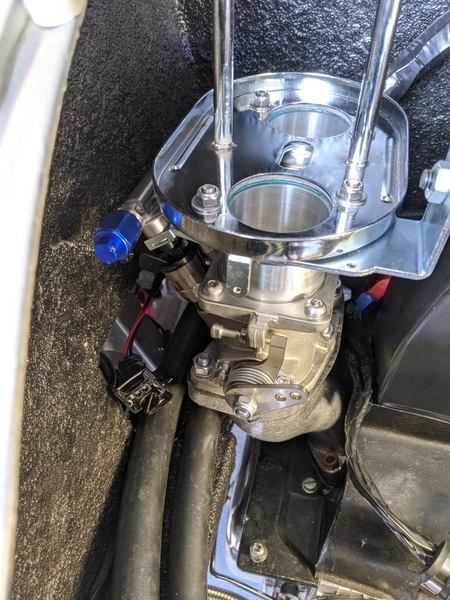
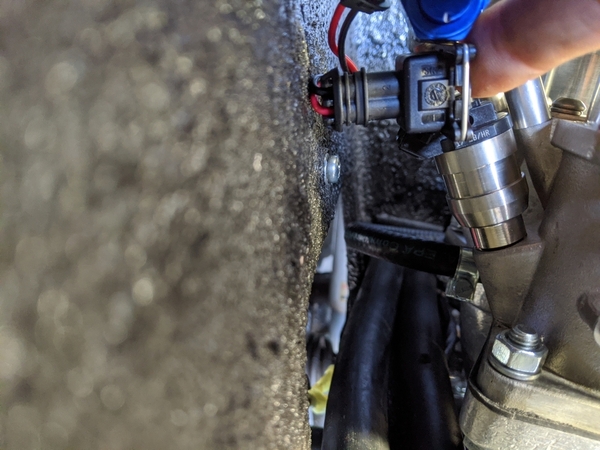
So, now I could actually attach the manifolds and throttle bodies I could see another clearance problem. The type of injector plugs I bought a just a bit too long to clear the engine bay walls. It looks like about 1/4" needs to be shaved or clearance holes need to be cut. As you may remember, I went with the injectors in the throttle body because I was worried that putting them lower in the manifold might make it hard to change the spark plugs. Pay me now or pay me later. I'm still not sure what I'd recommend, but either one will work, both have drawbacks, but they aren't showstoppers.

IMG_20200720_115259IMG_20200720_115115

Time to get some lunch and to decide what kind of fiberglass dust I'm going to make.

Attachments

Images (4)
  • IMG_20200720_113125
  • IMG_20200720_113510
  • IMG_20200720_115259
  • IMG_20200720_115115

I don't see a big deal with those manifolds.  I clearanced mine, too, although mine might have been the CB Perf. “El Cheapo” versions.  And then I went for the super-slim nuts, too.  IIRC, mine take an 11mm wrench.  Three of them will accept a box end on the wrench Or a socket, but the fourth has to be either a Super-slim-wall 11mm socket or an open end stubby wrench (my personal favorite for turning the nut one flat at a time).  It’s part of the price for the fame of having a “racing set-up” like the PCA guys have.

Last edited by Gordon Nichols

I channeled ALB and drilled some 1.5" holes so the injector connectors wouldn't run into the sides of the engine bay. The car's .73 ounces lighter now, so there's that. Perhaps more importantly, the injectors have plenty of clearance. 

IMG_20200720_141440

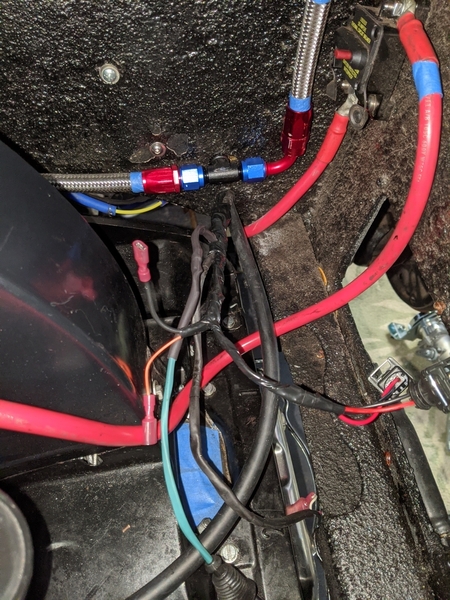
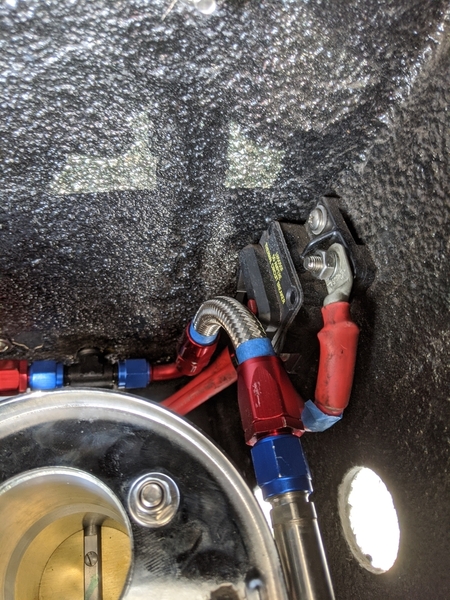
Just like on the driver's side where the rear relay box was in the way of the air cleaner, I discovered that a previous decision was incompatible with the ITB plan.  I had a 50 amp circuit breaker that protected the alternator from a major short somewhere forward in the chassis. Turns out that the 'test' button was pressed with exquisite precision by the fuel rail hose on the passenger side. 

IMG_20200720_145721

Well, that won't work. How many of you have circuit breakers on your alternator anyway. I just relocated the output to the input terminal and bypassed it all. Maybe I'll relocate the breaker later.

So, after tweaking the ignition coil location slightly, I had room for the new ITF linkage. However, having never had ITFs before, I was in learning mode as I installed the cross bar, again, again and again. Three time's the indicator that it's time to take a shower, dress comfortably for the evening and pour a nice glass of whiskey. Life is good.

Thanks to all for your guidance. 

Mike

Attachments

Images (2)
  • IMG_20200720_141440
  • IMG_20200720_145721
Last edited by Michael Pickett
@DannyP posted:

I agree, the casting could be made a little smaller in the area of the flange. I do recommend a thick washer under those small nuts to spread the load and prevent galling the manifolds.

Ok, got that off of my chest, again, and @Stan Galat, I don't want to hear "No, we all use the even SMALLER special nuts!" 

Actually... I didn't post before, because you said you didn't want to hear it, but everything can be solved with different nuts. Smaller socket, no need for a separate washer to drop into the nether regions of your engine when trying to remove the manifolds when you do this again.

From the EMPI catalog:

nuts

or:

nuts 2

They can be purchased almost anywhere that sells EMPI stuff (which is to say, every single VW shop).

Sorry...

PS: The manifolds are always going to be as big as they can possibly be, because they don't cast separate manifolds for every port configuration. The manifolds for the Panchitos are the same casting as those for Super-Pros or Ultra Wedge-Ports, which get a LOT of material cut away inside the runner when port-matched. Lots of hand-porting guys end up welding material onto manifolds, so they can cut the ports even bigger. Your casting is as big as it is to reduce the need for that. It's not a flaw or a QC problem, it's making one part that works for all applications, rather than 15 for each individual port. CB doesn't do everything right, but this is not one of the top 10 "wrong" things.

Grinding a bit on the outside of the manifold so we can use 13 mm (or 11mm, as the case is) headed nuts and a 3/8" drive socket instead of aftermarket 10 mm headed nuts and a 1/4" drive socket doesn't seem (to me) like an excessive amount of modification, especially for a guy building an entire EFI/crank-fire system from scratch.

I know it's frustrating, but there is a reason for it.

Attachments

Images (2)
  • nuts
  • nuts 2
Last edited by Stan Galat
@Stan Galat posted:

Grinding a bit on the outside of the manifold so we can use 13 mm (or 11mm, as the case is) headed nuts and a 3/8" drive socket instead of aftermarket 10 mm headed nuts and a 1/4" drive socket doesn't seem (to me) like an excessive amount of modification, especially for a guy building an entire EFI/crank-fire system from scratch.

I know it's frustrating, but there is a reason for it.

Yeah, I know, I just needed to vent. CB Performance is one of my vendors of choice. I just got grumpy because both the EMPI Kadron manifolds and the cheap Chinese manifolds had the clearancing done already. I was tired of having to redo things and special order nuts felt like a bridge too far. Still, if I were running a business and selling a product like this, I'd probably throw a few of the nuts that would fit them into the box just as a customer service. Wait, I I may not be over this issue yet.

Yeah, I know, I just needed to vent. CB Performance is one of my vendors of choice. I just got grumpy because both the EMPI Kadron manifolds and the cheap Chinese manifolds had the clearancing done already. I was tired of having to redo things and special order nuts felt like a bridge too far. Still, if I were running a business and selling a product like this, I'd probably throw a few of the nuts that would fit them into the box just as a customer service. Wait, I I may not be over this issue yet.

I get it. But look at it like this: you could always have Ed's problems, or Carey's since working on Anand's Spyder.
Post Content
×
×
×
×
Link copied to your clipboard.
×
×