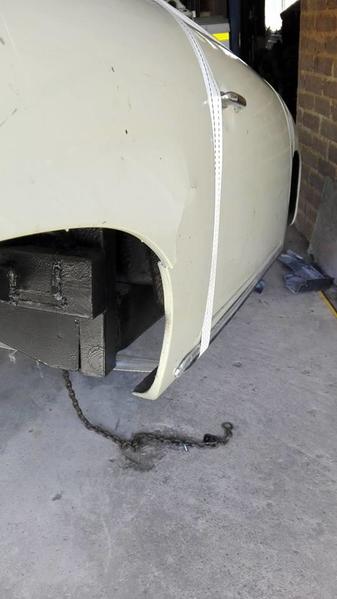
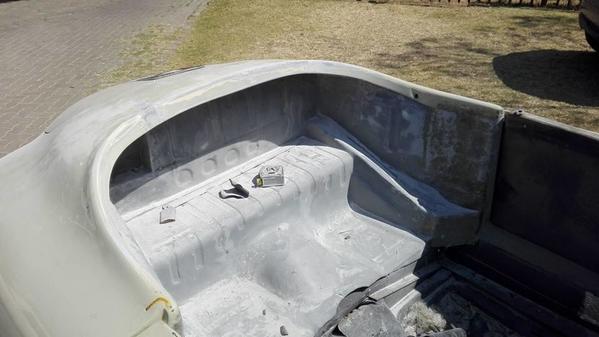
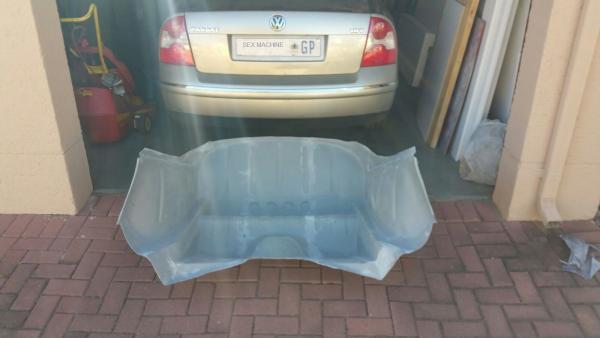
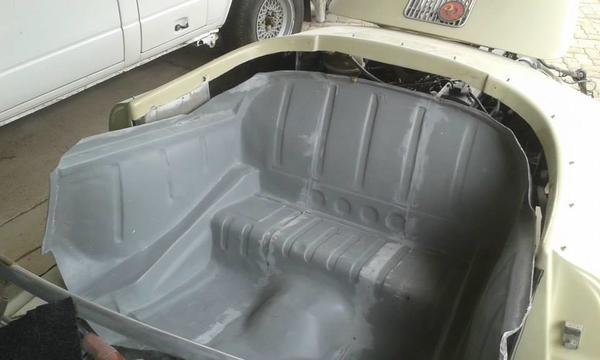
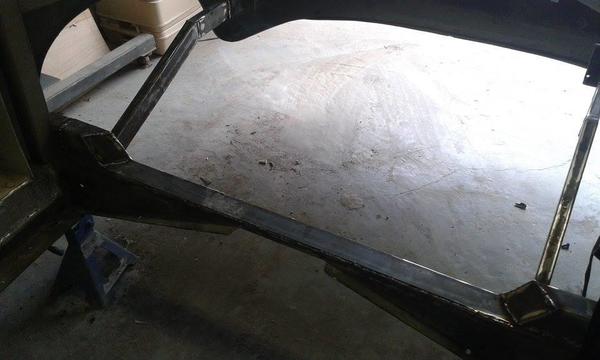
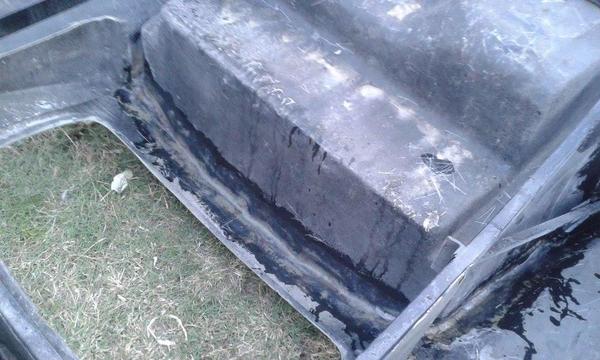
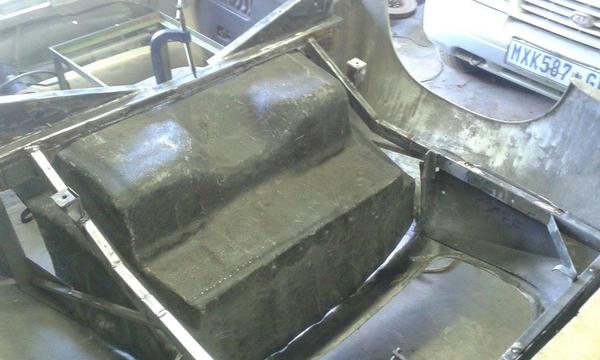
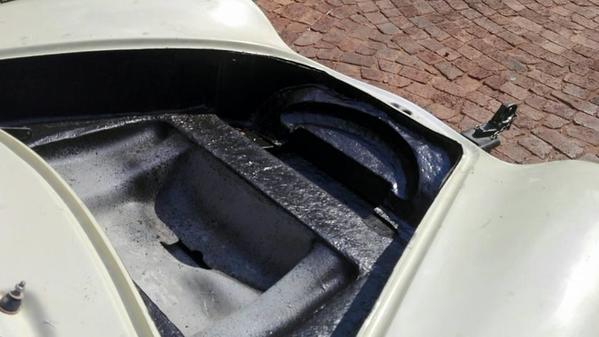
So we've got to the stage, where we are just tying up the loose strings on the project and getting ready for final under-coating and stone chip. 

Step one was to finish off the back area. 

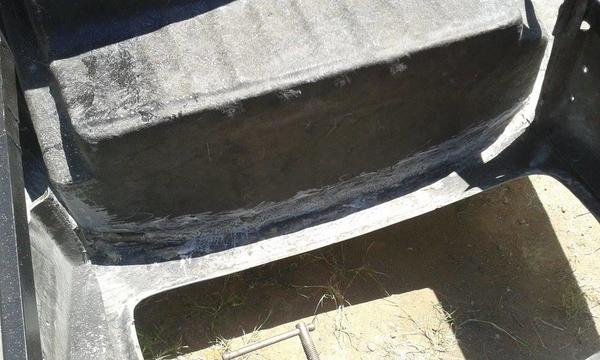
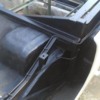
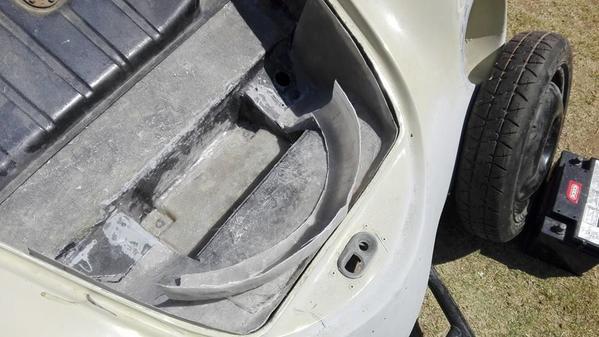
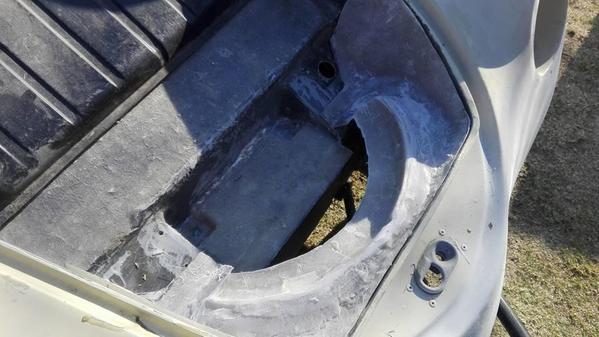
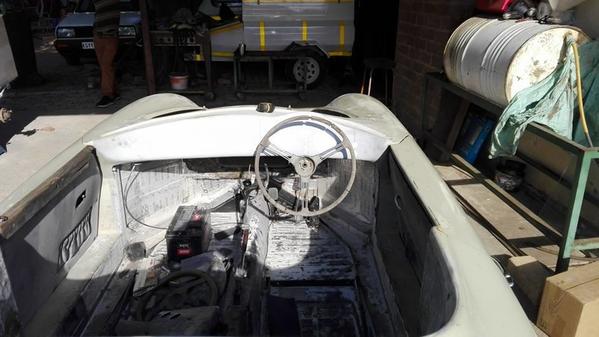
The ridge is now totally gone from the jacuzzi area and it's all been trimmed down all the way around. The Seating area has now been cleaned up and sanded down and if all pans out well, this weekend we will be able to give a slight skim to that area and one or 2 other spots and we can sand that down and also shoot with some spray filler. 21317608_10159294426175357_8688658850549245719_n

21231864_10159294427150357_811421411463184252_n21270916_10159294427280357_102593229667766586_n

Attachments

Images (3)
  • 21317608_10159294426175357_8688658850549245719_n
  • 21231864_10159294427150357_811421411463184252_n
  • 21270916_10159294427280357_102593229667766586_n

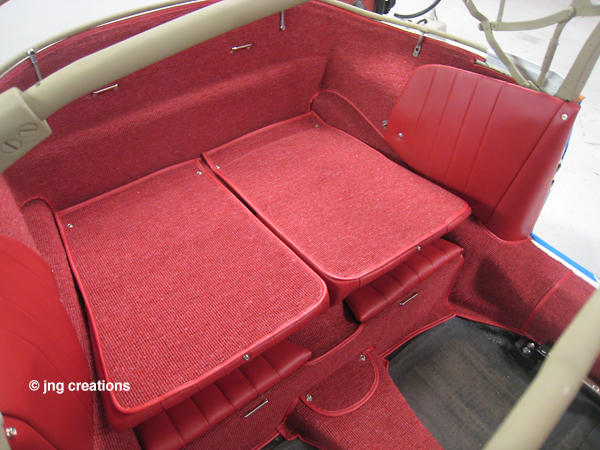
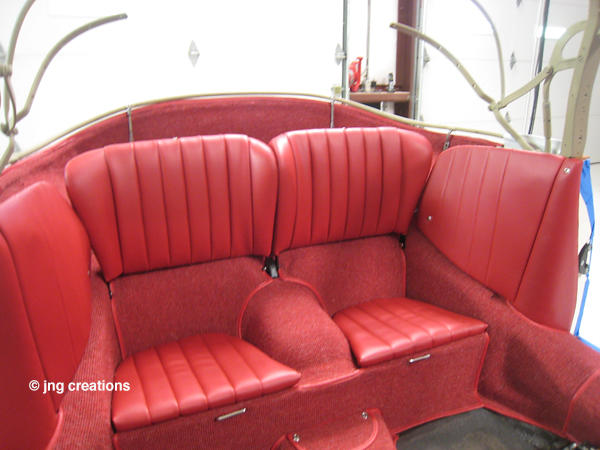
Many have actually asked how I got to where I am now on the story of the backseat....so here goes. It's been molded from a 356 coupe and was modded to fit the speedster. This part was a bargain at about $80 and was bought from a local shop, Universal Products. 

Let me get this clear though, This is not a drop in part. We had to cut the rear beam down to get it as low as possible, otherwise the backseat area sits about 3 inches too high. We also had the body off and flipped so that we could do other repairs, so we decided to do this swop the right way. You can do it without taking the body off, but that has to be a total cow and also you're going to be glassing and grinding upside down. 

Collected by my buddy Roger and then I loaded it up in my Isuzu and brought it home. 

img-20150717-wa0001img-20150717-wa000011755899_10155788399980357_1657218088943313400_n

Began the cutting away of the old back seat area, this was the point of no return. 

10393980_10156134232780357_5294390539676717741_n

All gone and trimmed away. 

12096103_10156134232665357_6404015145183277352_n12096629_10156134232915357_8181874688173209825_n

The rear beam that has to be cut down and boxed up again to get it sitting about 3 inches lower. 

11046332_10156252790640357_5633230048895545515_n

Body flipped over with us being able to glass it from the bottom. 

12803063_10156551297385357_8566518657073650114_n13567054_10157057551100357_8465337353773446705_n

12111928_10156551297940357_6657875304108006501_n

Attached with cotton flocks and glass fibre chop mat. This whole area was stone chipped before we flipped it back over. 

12790957_10156581483615357_5811496176601565284_n14344200_10157414959365357_8683603765079106749_n


Attachments

Images (12)
  • 12803063_10156551297385357_8566518657073650114_n
  • img-20150717-wa0001
  • img-20150717-wa0000
  • 11755899_10155788399980357_1657218088943313400_n
  • 10393980_10156134232780357_5294390539676717741_n
  • 12096103_10156134232665357_6404015145183277352_n
  • 12096629_10156134232915357_8181874688173209825_n
  • 11046332_10156252790640357_5633230048895545515_n
  • 12111928_10156551297940357_6657875304108006501_n
  • 12790957_10156581483615357_5811496176601565284_n
  • 14344200_10157414959365357_8683603765079106749_n
  • 13567054_10157057551100357_8465337353773446705_n

Next on the line was front area. Spare wheel trim section was added to the front and glassed in and next will be the smaller area below it to box it all in. I have actually got a lot of flack from people about taking this much effort in making this modification and I'm losing all my packing space in the front of the car, (what packing space???) and why even bother with a spare wheel anyway as AAA will save me or a fart in a can will save the day or something similar. 

Firstly. I'm from South Africa. Our roads are damn dangerous, hijackings, robberies and basically not very nice people want what you have and will kill you to get it. People getting killed for a cell phone (damn cheap one too) or a few bucks is not uncommon. I'm not sugar-coating things, cause this place (as beautiful as it is, it's also dangerous). If you run into problems along side the road, then you need to either have friends who are on call 24/7 or be at least able to get yourself out of trouble. I have awesome friends, but I'm a firm believer or option #2. 

As for space that I'm losing....space for what? My lunch box and a pepsi. My backseat area allows for loads of storage. This is what It'll look similar to.

porsche-356-1600_interior_15

Porsche_1960_356_1600super_finrearseats001 [1)

Next on the line was front area. Spare wheel trim section was added to the front and glassed in and next will be the smaller area below it to box it all in. I have quite a bit to do next week, but at least it's all small things.21231828_10159294427395357_7320030428463213487_n

21231091_10159294427510357_3003795970786081600_n

21314408_10159294426820357_6489330848547523115_n21272374_10159294427020357_5133903332856964087_n

Next steps are to finish off the front and if all goes well, I should be able to undercoat the front next week and call that job done. Before I do that though, I have to lift the body up one last time. One of my bolts broke off that attach to the pan, this is located under the battery, so the only way to drill this out is by lifting the nose off the body. I have the 3 new mounting points to undo as well as the two new mounts on the back on each side and then the 4 bolts between the pan and the body. I want the body back on the pan and bolted down properly. Once this has been done work can start on the headlights and finishing off what needs to go where and what needs to be trimmed away. Then work can begin on the dash layout and also the task of cutting all the holes and slots in the car. 

- Horn grills need to be cut out
- Indicator holes need to be cut for the front
- Bumper slots for the new brackets front
- the whole dash......work will also start on my new guages at this stage as all of the parts have been sitting in a box for the better part of 3 years. 
- Holes for all the wiring that will go through to the engine bay
- Rear light holes as well as licence plate light
- Holes for rear reflectors
- Holes for rear bumper brackets. Once again, I'll be making my own brackets that will mimic the old ones, but will fit my mods in the nose. 

Stay tuned. Loads more to come. 

Attachments

Images (6)
  • Porsche_1960_356_1600super_finrearseats001 (1)
  • 21314408_10159294426820357_6489330848547523115_n
  • 21272374_10159294427020357_5133903332856964087_n
  • 21231828_10159294427395357_7320030428463213487_n
  • 21231091_10159294427510357_3003795970786081600_n
  • porsche-356-1600_interior_15

Gary:  Coming up on Spring - you gonna be on the road for this coming Summer Season??

When you cut the horn grill openings, be aware that the Pre-A and A are at different heights.  If you've gone this far into the Pre-A world and you haven't made the cuts yet, then you might as well get them right.  

The Pre-A horn grill upper frame rib sits 1-1/2" down from the headlight

An "A" version sits 2" down from the headlight.

Got that from one of Rich MacKoul's comparo tech sessions.   He would be happy to see your finished product so I'll keep feeding him photos - don't think he'll be making the trip to SA  

Do you need locations dimensions for the rear Bee Hives?  I can probably get those, referenced to the engine opening bottom lip and the vertical centerline (or some other place, just let me know).

gn

Last edited by Gordon Nichols
Gordon Nichols posted:

Gary:  Coming up on Spring - you gonna be on the road for this coming Summer Season??

When you cut the horn grill openings, be aware that the Pre-A and A are at different heights.  If you've gone this far into the Pre-A world and you haven't made the cuts yet, then you might as well get them right.  

The Pre-A horn grill upper frame rib sits 1-1/2" down from the headlight

An "A" version sits 2" down from the headlight.

Got that from one of Rich MacKoul's comparo tech sessions.   He would be happy to see your finished product so I'll keep feeding him photos - don't think he'll be making the trip to SA  

Do you need locations dimensions for the rear Bee Hives?  I can probably get those, referenced to the engine opening bottom lip and the vertical centerline (or some other place, just let me know).

gn

Gord..........my main melon......

I had a feeling that I was going to be finding out a lot of things that differ from the pre-A to the A model. 

Beehives are actually sorted as I found a write up on beehive placement way back in the beginning of the project. 

I'm dreading the bumper cuts as a LOT will depend on them. 


"Firstly. I'm from South Africa. Our roads are damn dangerous, hijackings, robberies and basically not very nice people want what you have and will kill you to get it."

@flatfourfan Gary, sounds like you need the 'Combat MG Midget' in your neck of the woods. 

681411_51953383b628_low_res

Your project is coming along very nicely. Really excited for you to finally drive your finished product. It will be awesome! 

Attachments

Images (1)
  • 681411_51953383b628_low_res
MusbJim posted:

"Firstly. I'm from South Africa. Our roads are damn dangerous, hijackings, robberies and basically not very nice people want what you have and will kill you to get it."

@flatfourfan Gary, sounds like you need the 'Combat MG Midget' in your neck of the woods. 

681411_51953383b628_low_res

Your project is coming along very nicely. Really excited for you to finally drive your finished product. It will be awesome! 

where'e the machine guns?????

I remember driving from Cape Town to Worcester with an EMC sales guy back around 2000.  We were driving because I wanted to "see the country" (Don't laugh, Gary) and we were headed to a customer's data center, driving in the sales guy's Audi A4.  Suddenly, this VW Bus passes us like we're sitting still, like Whoosh!, so I tell Barden to keep it in sight.  It pulls off into a service area, we follow it and I get out to ask just what the hell he has for an engine in that thing.  "I dunno - whatever came from Volkswagen!" says the guy, so we open the back and there sits an Audi 5-cylinder, transverse engine.  

Sure wish we had those in the US......

This was actually from the 27th of September. I updated it on the local site, but totally forgot to do it here. 

Was limited to what was done on Saterday because we had to sort out some issues with the clutch on my bakkie. I did however manage to get the nose clip cover for the radiator done and I couldn't be happier. I do have some trimming on the lower side of the front as the gap is a little bit bigger than I would of liked. 

312


Attachments

Images (3)
  • 3
  • 1
  • 2

The plan of action this weekend was to finish up the nose as well as the engine bay where I've made all the changes. I stone chipped everything as this will be a high traffic area and the spare wheel will also be bolted down to the top of the battery mount. The radiator trim panel will have dzus fasteners that will attach it to the nose of the car, so that it'll be sealed up and solid. 

All of the old holes have been cleaned up and there's a nice new clean canvas to work on. I should hopefully have the fuel tank back next week from silverton radiators with the new fuel cap and neck, cleaned inside and out, blasted inside as well as new 90 degree outlet line, new overflow point because the tank has been flipped as well as a return line behind the fill up. They've also trimmed up the fuel tank a bit on the sides to make it a little smaller. 

front stone chipped 1engine bay stone chippedfront stone chipped

Stay tuned. 

Attachments

Images (3)
  • front stone chipped 1
  • engine bay stone chipped
  • front stone chipped

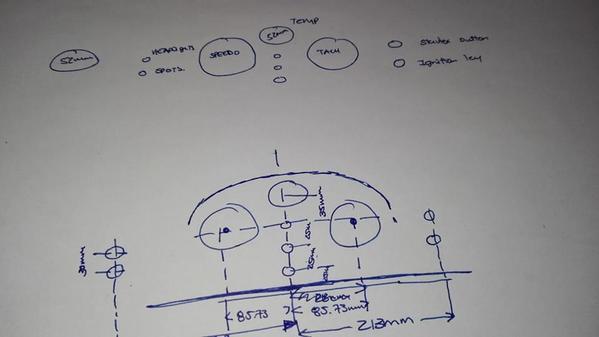
This was always going to be an issue with the dash, but thanks to Gord, he managed to get every little measurement for me (in inches....cheeky). 

So stage one was to draw it all out on paper. 

dash layout

Started the layout. Got my handy inches to mm ruler as my phone went dead just before I wanted to start. 

dash layout 2

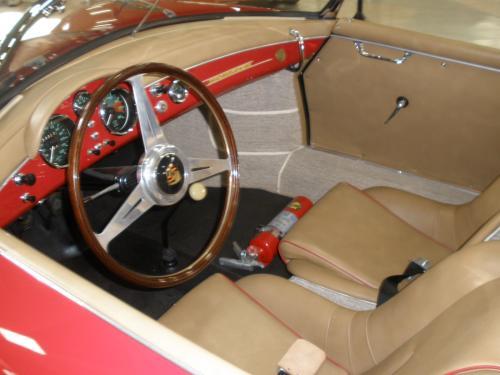
And after about an hour of measuring and cutting on paper, it started looking like something. I was always going to wonder where the heck I was going to mount my fuel gauge and my water temp gauge. I was thinking about both in the center of maybe the fuel gauge under the dash, but then after looking at a picture of a barn find 55 Carerra, I found that dealerships used to mount clocks on the far side next to the wipers and headlight switch. I'll just reface the gauge so that it looks like a clock. 

Carrera+speedster+dash1309133928

dash layout1

I will have to double check the measurements on m speedster as it appears that the dash is about 10mm lower than a stock speedster, so I may have to change some of my measurements a bit. I do need to get an eyelid made up so that I can mock that into place and then start getting everything visually right. 

Also getting this far took me the better part of an hour as the instruments fit level on the dash, but the dash itself is off to one side, so level to the car, but not level to the dash. If you look at the height of the speedo to the tach, you'll see that they're not the same height from the bottom of the dash. The inner one seems to sit lower than the outer one, until you realise that the bottom of the dash isn't level. 

Slide2


Attachments

Images (5)
  • dash layout
  • dash layout 2
  • Carrera+speedster+dash1309133928
  • dash layout1
  • Slide2

Soooooooooo, the day started off crap and just went worse and worse. 

We had started making plans to get some smaller things tied up on the car so that I can start the wiring and also get the water pipes sorted out. So first things first was to start the mounting point holes for the front of the car. In total we had added 7 extra mounting point that go between the body frame and the pan. I could of just said stuff it and use just the one, but I went to this much effort and I wanted all the new mounting points working 100%. 

The two holes that will be under the battery were never cut out, so first things first was to get onto that. Only to realise that the one bolt had broken off a while back and we never bothered to check, were were suspecting a quick tap out, but nooooo, that would be too easy.

23472412_10159602132885357_4973138488336996400_n

So up goes the body which is hopefully for the last time. 

23376593_10159602133120357_619997279862844959_n

Then...........all hell breaks loose. The strap slipped from the B-pillar and went back and next thing I'm hearing is the dreaded shearing, cracking sound of the fibreglass tearing loose. The rear quarters started bowing in HEAVILY and Willem knew what was coming, we couldn't just drop the car he said, the damage would be worse and all we could do was watch it happen in slow motion. Damn this was heart-wrenching knowing that I couldn't do anything except limit the damage to the 1 rear area.
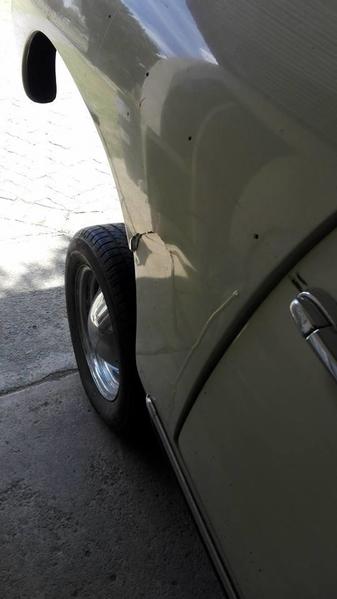
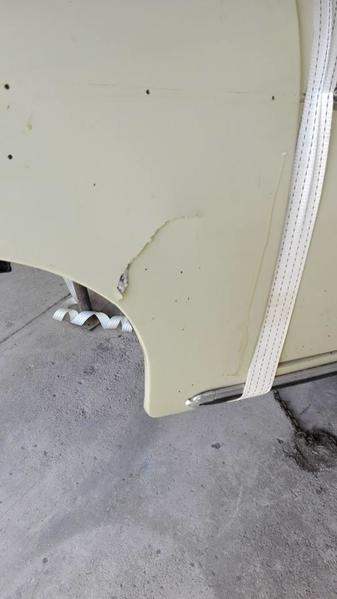
23376273_10159602132710357_3552817849339417504_n 

23473045_10159602132570357_6498359383788719016_n

23517832_10159602132325357_1918014517600652650_n

The other side had started bowing in just as deep, but luckily it didn't tear the shell and at the end of the day, we got the damaged side looking like this. 
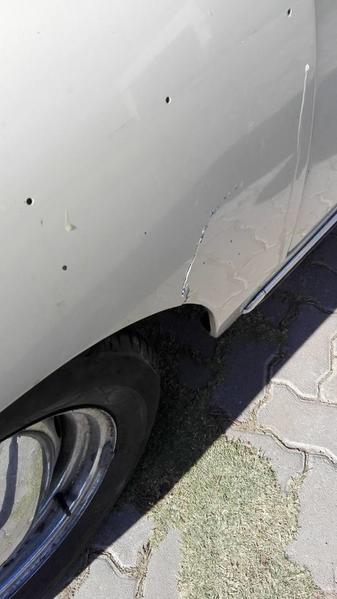
23376076_10159602131040357_1019654487708019560_n

Willem being always cool, said that I've fixed the front and built up a nose from nothing as well as done way more body work to the car, this will be an easy fix and he's seen my work and is confident in my ability to make it 100%. So We'll fix up that area when we gut the car for body work. 

Anyway, we cracked on. Body off the pan, pan pulled out and managed to weld a nut onto the broken bolt and got that off in under 5 minutes. Reattached some chassis rubber and in under 20 minutes, we had the body off, repair done and body back on the pan. 

23473148_10159602132125357_4779781402644047578_n

Holes cut and ready for fibrewashers to be flocked in. 

 23380326_10159602131530357_7744825929009696817_n23379925_10159602131300357_157813800492662802_n

Front of the car is damn rock hard and the body has ZERO movement. 

The plan on the car has changed a bit. I want to get it running and soon, so the steering needs to go back on, the collapsible part needs to be extended as does the outer tube. I've decided that I'm going to use the post 67 column that the car came with and make that work as buying a 67 or older column would put me back about $200.

After the steering, the rest of the chassis bolts needs to go back in, the gauges all need to go in this week (roughed up) and then my mods to the fuel tank should be done by the weekend. Hard lines need to be hooked up as well as fuel pumps and filter. 

I am planning on driving Bernie for a good 2-3 months while I still work on him and do the last of the details and make sure that everything fits before doing the last push for body work and paint. 

I've already sourced someone who will do my interior and damn, this guy does nice work, but the interior will be the better part of $1000 and that's me supplying him all of the materials. 


Attachments

Images (9)
  • 23472412_10159602132885357_4973138488336996400_n
  • 23376593_10159602133120357_619997279862844959_n
  • 23376076_10159602131040357_1019654487708019560_n
  • 23376273_10159602132710357_3552817849339417504_n
  • 23473045_10159602132570357_6498359383788719016_n
  • 23517832_10159602132325357_1918014517600652650_n
  • 23379925_10159602131300357_157813800492662802_n
  • 23380326_10159602131530357_7744825929009696817_n
  • 23473148_10159602132125357_4779781402644047578_n

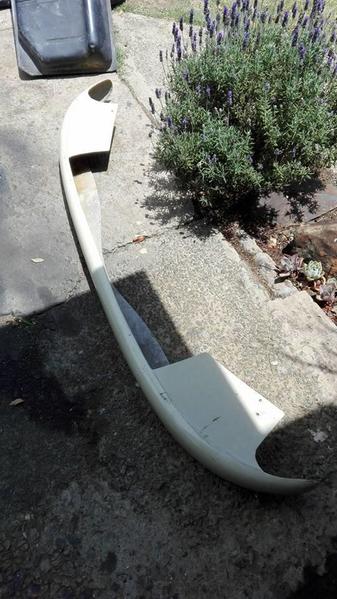
Next job today was the damn bumpers. I have always hated the South African take on the 356 bumpers and there are several issues. 

The rear one has the cowl that was added to hide part of the exhaust and honestly, all this does is collect 4 tonnes of garbage behind it and is a leaf trap of note, so it was marked out so that it could be chopped off. 

Our "bumper brackets" are basically tubes with bolts that pass through the body and then bolted on the other side. They don't fit right, they are not secure and also, they look crap. 

23559480_10159602133505357_5576321921592118265_n

Here you can see the section that's added on and it makes you look like your speedster is carrying a poo in a diaper. It has to go, but then that means that I need bumper brackets. I bought some flat bar stock a while back that I thought would be great for this. Damn I was right for a change. 

Bench vice, hammer and Robert's your mothers brother. The bumper mount design will be changed to have 2 indentations for the brackets on each side instead of one, so these things won't move at all. I'm going to use the same idea for building my rear seat frames, but more on those later. 

23380331_10159602131865357_1131887460605475866_n

The front bumper is actually easy than the rear. These wings added to the bottom are used to mount the bumper to the nose of the car as the tubes and mounting points used, don't do a good enough job. Plus, the local speedsters have an issue. 

When they did he head light lift for local safety standards, they lifted everything. The indicators, the horn grills and also the bumper. If you do the headlight drop like what I've done all of the stuff below it, has to be moved down about 30mm. 

You can see where they have to be cut, I just didn't get a chance today. 

23559857_10159602133755357_3312805323202467595_n

Attachments

Images (3)
  • 23559480_10159602133505357_5576321921592118265_n
  • 23559857_10159602133755357_3312805323202467595_n
  • 23380331_10159602131865357_1131887460605475866_n

So last thing today was to get the steering column on and in, so that I could make sure that I was going to be cutting in the right place and I had to made sure that everything was dead centered, I had a feeling that if I was going to be off with my measurements, then it would only be by a smidgen.

I'm using an early 70's unit that needs to be extended by 130mm as well as the inner collapsible part as well. This will allow me to use the same column and just change it to suit my needs. A local guy in South Africa did it a while back, so it's possible http://356speedster.co.za/forum-topic/steering-column

23472780_10159602130900357_7629091936920625662_n [1)

I'll show some more detail tomorrow, but it lines up perfectly and you can't see it from this picture, but the speedo and tach are perfectly visible. Next week once the mod has been done, we should be able to hook up the steering again. 


Attachments

Images (1)
  • 23472780_10159602130900357_7629091936920625662_n (1)

So we have a development....went to the GP about 3 weeks ago complaining about massive headaches that I've been having lately. After going all whole hog on tests and EKG's, it's come down to my eyes. I suffer from pretty acute Keratoconus in very advanced stages in my right eye that's just getting worse and now it seems that my left eye is following suit. So tomorrow I'm off to get my left eye cross linked to stop it getting worse.....**** it is so sore!!!!!! and come February next year I have to undergo a cornea transplant on my right eye and that means ZERO work on the porsche for the recoup time, pretty much get old and relax, for about a year. 

So the way I see it is, that I have about 2 months to get the car finished........lol. 

Hold on tight I'm gonna go ape on this thing. 

Sorry to hear about your eyes, but it sounds like they can treat it.

I had lens replacement on both eyes about eight years ago and my sight improved from 20/800 with severe astigmatism to 20/20, no astigmatism and, of course no more cataracts.

 Had a severe tear in my left retina down to and involving part of the maccula.about a year and a half ago. Emergency surgery the same day it was diagnosed, recovered complete vision at 20/25.

Now the right eye has developed a milky substance behind the replaced lens because not all the errant cells in the lens compartment were removed at the time of the original lens replacement surgery. So that will be treated with a YAG laser the first of the year and I'm told that that curtain I feel like I am looking through should immediately disappear.

My point is not to complain or seek sympathy but to let you know that opthamology is able to do wonderful things now! 

I have implants and they are spectacular!!! You don't hear that from many guys.

Hardcore Seinfeld fans know the line paraphrased above as: "By the way, they're real and they're spectacular".  In the episode in question, Teri Hatcher played a g/f of Jerry's who had noble appendages.  Lorraine tried to devise a plot to validate their authenticity.  The plot failed, and Teri gave Jerry the boot, taking her noble appendages with her.

Well operation one is done and all went OK. As for the transplant, my situation is a little bit different as the actual attach area from mine to the new cornea is very thin and so the sutures will be touch and go and chance of failure is already up to 20 percent. Second opinion is on Monday with a research specialist and then I'll start the ball rolling with my medical insurance to aim to have it done in March. I don't want to get it done later than that. Update on saterday on the speedster as I really have to pull finger now. Thanks for all the well wishes guys. 

Update time......No need for an op. Second opinion was yesterday as they got me in earlier and the head of ophthalmology has said I've been spooked and that if I can live with what I currently have, then he wouldn't recommend any sort of operation. So after about an hour of talking and chilling, I'm all smiles.....no work yesterday on the speedster as I had drops to dilate and I couldn't see anything for most of the day. 

Massive horns to be given on Saterday.   

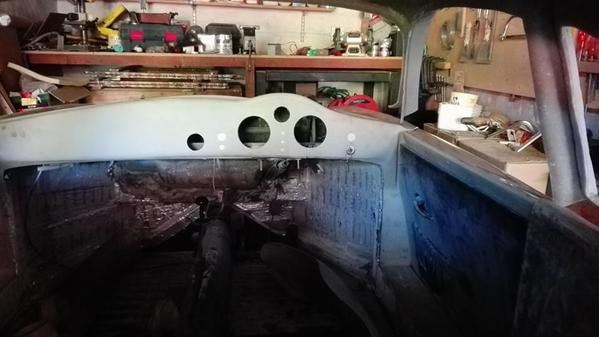
So work started this weekend with actually growing a pair and cutting the dash. I have been measuring and plotting and measuring about 500 times and eventually.

I decided to drill......

I got the speedo hole and the tach hole cut as well as the holes for water temp and the fuel gauge too.

Ignition is in too. I have some stuff on order and will only get hem later this week, mainly the ignition button and the head light switch. Both coming from a local supplier and I had to hold out a bit because he KNEW that he had ivory knobs somewhere.

The good: I'm happy with everything and I'm waiting for the last 2 switches so that I can drill the last holes. When measuring the 2 x 100mm holes, I had to constantly remind myself that the gauge that is located closest to the drivers door appears to be higher...but in fact they are level, it's the dash that's not level. Damn trick to the eyes and head. 
The Bad: The lowest section of the tach and speedo cracked....this was always a concern to me and I thought that if it was going to happen, then it would happen there as I was never able to get behind it to glass there properly.

I have to do a bit of glassing this weekend on some side projects as well as repairing the gash in the back, so it'll be a quick 10 min to repair and with the weather that we've been having, it'll cure in about 30 minutes. It was in the mid 90's F here today. 

So the list of things to do. 
1) In order to start the wiring, I need all my gauges in as the wiring is on order and arrives tomorrow. (In South Africa pretty much all main businesses shut down from Dec 15th until the second week in Jan). So I've had to wait. I also have to pull finger and finish building the housings. 

2) Water lines need to be done and for that I'm waiting for my new radiator and that arrives tomorrow. When that's fitted I'll be able to have new lines bent and fitted and also bolted to the body. I want the new water lines to be perfect and also have zero joints. 

3) Fuel lines need to get hooked up and for that to happen i need my fuel tank from the shop. They're fitting a new outlet line, new neck and cap as well as trimming the tank and also making a return line for the EFI set-up. The fuel filter and fuel pump can now be hooked up and the pump needs to have the wiring run for that as well, so fuel lines will probably go in first. 

That's it..........for getting the car running again, that's all i need. I behind schedule for numerous reasons, but I've been trying to balance home life, work life and car life and car life has come off the worst......But first...some pics. 


The dash: 

26169812_10159852705435357_2278401536355364211_n

Idiot lights still need to be cut, but I'm waiting for just the right sized holder and I know it's out there. Ignition in, tach and speedo, water temp and fuel gauge cut.

Fuel gauge will be made to look like a clock, it's location is on the far left.The correction position is over the tunnel.


 images

What gauges will you be using Gary? I hear you say? 

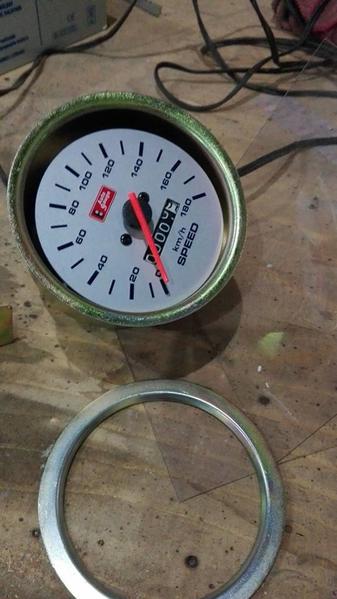
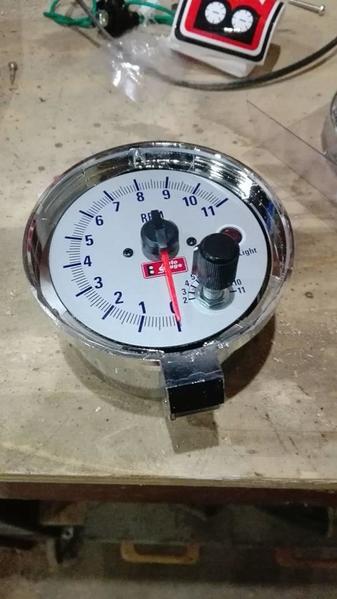
I could not bring it upon myself to spend a months salary on something that comes from China and has to be kept in a cool place, so the decision was taken to make my own using decent quality Auto Gauge units that come from Taiwan....lol. But the kicker is, they are huge locally and don't break....plus, everything cost me about $60. 

26169333_10159852705120357_641899607937255224_n

26229372_10159852704630357_3873882116061402668_n

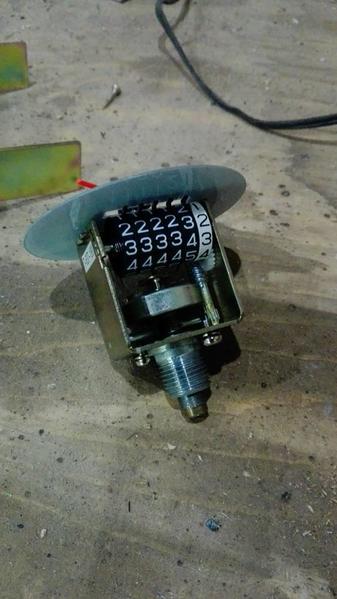
So bought a simple speedo that works off a cable like the beetle and gutted it. The downside is that all of these units are not the 100mm that the VDO units are. So I gutted them as in the end, I just want the internals. speedo diameter was 90mm.

The tach will be made to look like a vintage racer type of thing withe shift light and setting knob still being retained. tach diameter is 80mm. 

26168778_10159852705320357_6307875089548703867_n

I literally just have to make this part..........and a new bezel and glass..........and a new face. Oi vey. 

26169266_10159852704275357_7138978222150904122_n

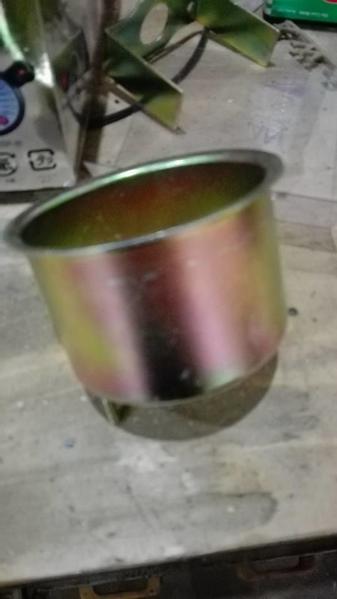
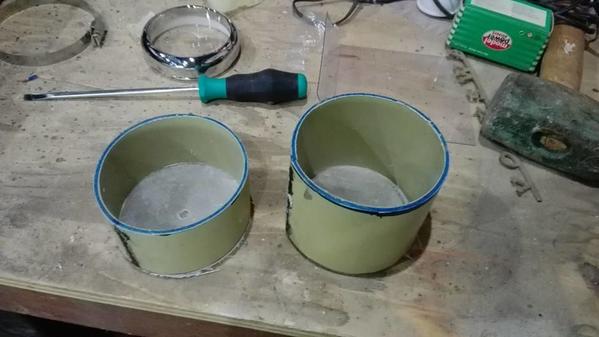
Lets start...locate something that is 100mm, sewer pipe.....awesome.....downside is, it's 120mm. So slice a section out and bend them down to 100mm and glue them back. The bases will be made from fiberglass and they'll be split down the middle so that they can be serviced. This is one of the jobs that have to be done this weekend...little bit o glass will do it. 

26219883_10159852704170357_2528335998039132341_n

I've found someone who can make me a set of bezels that I can use, but his price is stupid, so the search continues. The glass is the easy part. I'll make a new set of faces as well as backing plates and then also work on the lighting.

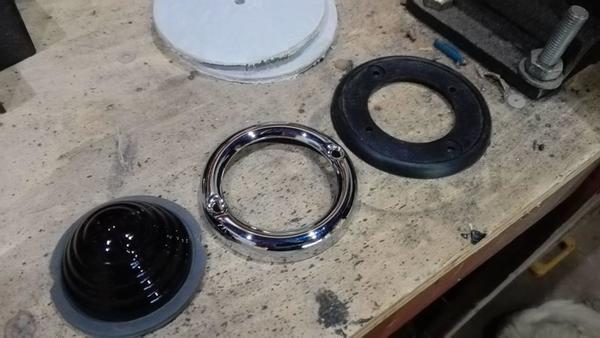
Last job will be replicating this. Which may have me just buying the rings and the lenses as the rest I can have made. 

26238794_10159852703800357_2166002712218289439_n 

Stay tuned. Loads of content to come. 

Attachments

Images (9)
  • 26169812_10159852705435357_2278401536355364211_n
  • 26239441_10159852703545357_723102641994390276_n
  • 26168778_10159852705320357_6307875089548703867_n
  • 26169266_10159852704275357_7138978222150904122_n
  • 26169333_10159852705120357_641899607937255224_n
  • 26219883_10159852704170357_2528335998039132341_n
  • 26229372_10159852704630357_3873882116061402668_n
  • 26238794_10159852703800357_2166002712218289439_n
  • images

Add Reply

Post Content
×
×
×
×
Link copied to your clipboard.
×
×