Originally Posted by Rich Drewek:

Ted, you're doing a fine job transforming your Speedster. What's it ben since you joined the madness? 12 months or so?

Thanks Rich & Teby.


I picked up the car in late March of 2014. Almost nothing I've done 'had to be' done. I just kind of went 'mad' with upgrades. I was thinking about it this morning, I've done a LOT of work on the car. For a change, most of it was mechanical and not cosmetic. With past cars it was always paint and interior... with mechanical items only as necessary. It's amazing what age does to you.


Teby  -  Heaters are for skinny people.  I don't have heater boxes or any sort of forced air heat. I may put in seat heaters eventually, but for now - I bundle up.


Good point on the engine compartment. I'll keep at it. Need to remind myself that it doesn't NEED to be on the road. I'd just like for it to be.


The rest of you need to get out there and drive.   


Greg - if I can almost totally rebuild the mechanicals of my car in less than a year, you should be able to get yours on the road. Yes... that's right... I called you out AGAIN.  


Ted

Ted,


Finish the car EXACTLY as you want it to be.  That means don't rush to put it back together then say, "Damn, I wish I would have........."  Everything is apart right now and there is no better time to do the upgrades you want. Otherwise you'll have to do it all over again next fall/winter after you are disappointed you didn't do it to your liking the first time.


Robert

This weekend was sort of productive. I managed to get the trans axle filled up with gear oil, the brake lines bent and installed, removed the old lines/reservoir, filled the brake system full of fluid, cut and installed the emergency brake cables and cleaned up the engine compartment a bit. Anyone know where I can get a new 'hook' for the hood prop rod? My hook is looking a little tired. See the second photo below.


Installing this:


IMAG0706


Allows me to remove this:

IMAG0705


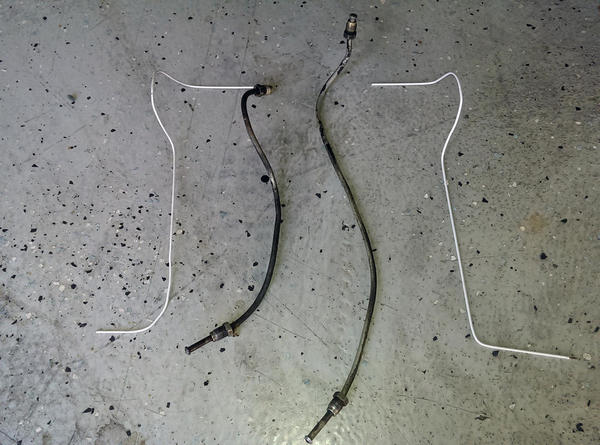
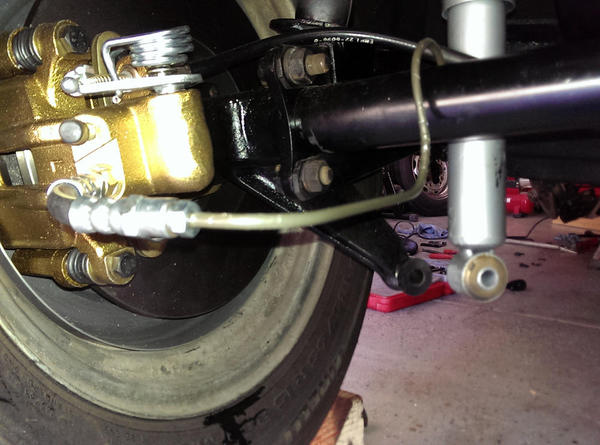
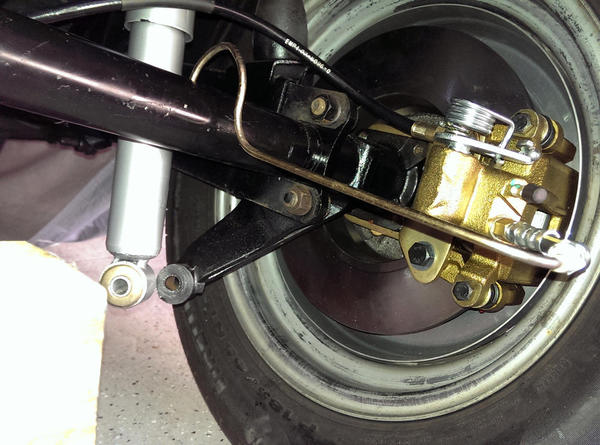
Below you will see the left and right original lines. I mocked up the new lines using some scraps of old coat hangar. In retrospect, I may  have to get two new lines (longer lines) and come up an over the top of the caliper. 


IMAG0708

IMAG0709

IMAG0710


Oh, I also installed the lower shock bolts. Trying to decide if I'm going to reinstall the rear sway bar or not. I'm not sure I noticed a difference when it was installed.


I hope to get the air out of the brake system and that front ball joint buttoned up sometime this week.


Thanks for checking in...

Ted

Attachments

Images (5)
  • IMAG0706
  • IMAG0708
  • IMAG0709
  • IMAG0710
  • IMAG0705

Prop rod hook:  Home depot electrical department, in the area selling electronic/audio cable and plugs and stuff - get a neoprene or rubber coated cable clamp - something with a 3/8"-1/2" ID should be fine.  Position it in the car so half of it looks like what you have, then use a Dremel to neatly cut off what'cha don't want.


They may have a different device in the same area that you may prefer - just look around and see what's what.  Radio Shack (if you local one has not yet become a cell-phone-only storefront) may have them, too.


Is that a Volvo brake fluid reservoir you're using on the MC??

Last edited by Gordon Nichols
Originally Posted by Gordon Nichols - Massachusetts 1993 CMC:


Is that a Volvo brake fluid reservoir you're using on the MC??

Thanks for the info! I'll check out the Home Creepo on the way home tonight.


The reservoir is one that came with the front disk brake kit. I had reservations about using it directly on top of the MC, when I called CB they said "yank out the barb fittings and stuff the new reservoir right into the rubber fittings. Sounds like a plan! So I did.


I don't drive the car in bad weather or off road, I figure it should be fine. I'll keep the lid tight and the dirt screen in there. We'll see how it goes. Do you have any concerns with it? I should have checked here before doing it. Oops.


Also, do you see that huge hole to the right of the MC? It's a bout 2" to 3" around. Sort of off shapen/oval. It's in the wood 'fire wall', down by the pedal cluster. I can't figure out what it's from or why it's there. I'm nearly sure it's not necessary. I'm considering patching it with wood and fiberglass. Any thoughts?


Ted

Last edited by TRP

Yup, got your very own Mouse Door there......


Seriously, all  can think of is maybe someone put a floor-button Hi/Lo dimmer switch there.  I never had a floor mounted switch so I don't know, but you can certainly put a patch over it.


As for the Volvo (or CB) fluid reservoir, they fit the VW master cylinder like a charm, don't leak, stay water and dirt tight and seem to be a perfect fit for our application.  I think Dr. Clock uses them, too, and yes, all you do is push it onto the rubber grommets and you're good to go.


Looking good!  What's the road-ready ETA??

Thanks!


That's a good question, when will it be back on the road?  Road ready eta is really predicated on which motor I go with. If I go with the 1600, I could have it on the road next weekend. If I go with the 1915 it's going to take a bit longer.  December 05 will be two months off the road, so my desire to drive the car is starting to outweigh my desire to go fast. 


The Setrab should be here Friday I'm hoping that things will really pick up the pace once the cooler arrives.  Of course, I may just put that off until later. With the type 4 cooler in the widened doghouse with the balanced fan - I may not need the external cooler until the summer. Maybe I can hook up the 1915 with the external filter and just get 'er going? The two big hold ups are the fact that I need to clean up and paint the shroud and rejet the carbs. I have a less than 1 year old set which are currently set up for 1600. I have a vintage set that need rebuilding. Trying to decide which set to put on the 1915. I'm not sure it matters one way or the other. Some say the older Kadrons work better than the newer ones. 


I managed to get the front end buttoned up this evening. New ball joint in and the lower 'turkey leg' has been installed. Once I bleed the brakes I'm all out of excuses. It's then onto the motor. Ohh... I need to install the outer hose clamps on the new axle boots. Almost forgot those.


One thing at a time...


Ted


Last edited by TRP
Today was a day of tying up a lot of little things.

Today I:
Buttoned up the front end and put both front tires back on.
Wednesday I hooked up an industrial vacuum pump to the brakes and removed every speck of air out of the lines.
Sanded down and patched up the doghouse cooler with the type 4 dog house.
Removed the CB performance Super Screen out of the sump and reinstalled the extended pickup tube.
Noticed I have a screwed up stud on the sump. (may need a new sump...)
Cleaned up all of the rear wiring loom. Ditched all the crimp connectors and soldered everything.
Reconnected the purple wires for the reverse lights. One was frayed. Cut and soldered it.
Checked all the nuts and bolts for proper torque.
Replaced the cylinder tins.
Resprayed the alternator backing plate.
Swapped a case stud so I can could install my CARB linkage.
Installed the CARB linkage.

Tomorrow will be another day of hustle.
I hope to get the thermostat flaps welded in the open position.
Swap out the 1600 doghouse fan for the welded and balanced fan.
Paint and install the fan shroud ( with the alternator )
Install the MOTOR!!!

If I get that far I will consider it a major victory.

The biggest hurdle will be the thermostat fins. I don't own a welder.

Wish me luck,
Tedimage:33101image:33098image:33099image:33100image:33093

Attachments

Images (5)
  • image:33101
  • image:33098
  • image:33099
  • image:33100
  • image:33093
Last edited by TRP
Originally Posted by Gordon Nichols - Massachusetts  1993 CMC:


Why are you welding the shroud air vanes in place (open) rather than simply installing the actuator struts and a thermostat?  It will make your engine warm up faster.


Not criticizing, just curious...Plus, you wouldn't need a welder.  Jus, sayin'


Other than that, WOW!  You're getting a whole lot of stuff done!!


Good Morning Gordon.
That's actually a great question. I'm welding them open because when the previous owner of this shroud widened it for the type four cooler the actuator arm/rod no longer fits without hitting the wider exit for the doghouse. I could leave them out all together, however Anthony strongly suggested using them and welding them 'open'.

Have any of you intrepid members mounted your cooler in the fender well?

Ted

Yup, under the circumstances, Anthony is absolutely right - Position them open and weld 'em up.


Regarding mounting a cooler in the fender well, that's where I put Pearl's and you can read all about it in the series of "Full-Flow" articles I just posted to the "Knowledge" section.


Let me know if you have any questions as you go along.


My cooler looks like this:


Gordon

Last edited by Gordon Nichols

A way to save the sump, Ted, is to re-tap the problem hole and install a 7mm stud. You'll have to drill the drain plate, of course, it will now only go on 1 way and unless you can find a larger copper sealing washer a little bit of rtv silicone will be needed, but you'll only have to do it once because the drain plate has a center plug/bolt.


A guy I know used 7mm studs in the bottom of the case to make the case to sump connection stronger, as he uses a Berg sump and they are heavier. He drove the car to Central America and back last spring and has driven to Mexico 3 or 4 times over the years, all on a 78x90.5 (85 or 90,000 miles?) that I don't think has ever been apart.


I have also heard of guys putting longer 6mm studs in the bottom of the case and putting nuts on the inside so the studs (with a little loctite) won't be able to move.

Thanks for the info. The sump has some sort of insert put in one of the existing holes. That insert is threaded into an enlarged hole and the the standard stud is threaded into that insert. Some hamfist appears to have stripped the sump where the insert was threaded into. I found the loose / wobbly stud while installing the new sump plate. That would be throwing a monkey fist at the ham fist.

I will look to see if I can possibly tap it for a 7mm, maybe 8mm?

Ted

Whoa......TED!  Your page count is closing in on Lane's.  Won't comment on whether that's good or bad.


On the cooler, my Derale came with the mounting brackets already mounted and I had the same question on spacing up off the deck;  "Is 1/2" - 3/4" enough?".  


Turns out, it is.  My fan can push or pull.  I have it set to pull from the fender wall out through the cooler (recommended in the install instructions) and it works fine.  


Also, a 7mm stud is easy to install for the drain plate.  I've done a few over the years for people.  They didn't realize the torque spec is, like, 5 ft lbs. and stripped a stud out when installing the plate.  Locktite on the new stud going in, and then use the thick, orange, silicon plate gaskets from Aircooled.net and it should seal right up.  Aluminum washers (ACE Hardware) will work in place of the copper ones - drop the torque spec 1/2 ft lb.

Last edited by Gordon Nichols

Ted,


I've got mine on an angle (relative to perpendicular), in a bracket made of angle iron. It pitches away from the vertical line of the inner fenderwell, in at the top, out at the bottom. There's probably 1/2" inch of clearance at the top of the cooler, and a couple at the bottom.


I'd think you'd want something more than the stand-off height, unless you've got vibration isolators that are 3/4"- 1" high.

Managed to get everything painted. The thermostat flaps welded and the new welded fan installed. When I mocked up the alternator to the shroud, the fan son freely. Once I offered the shroud up to the motor, the fan now rubs on the shroud. I will tear that down today to see if I can figure out what's up.

I mocked up the carbs (as they have to come off before the motor can go in).

image:33110

Ted

Attachments

Images (1)
  • image:33110
Originally Posted by MusbJim - '14 VS SoCal:


DUDE! YOU are a MACHINE!! The rest should be easy. 


On another note, we're going to be in Moonstone Beach in January. Maybe we can meet somewhere between your pad and Paso Robles (or wherever)!


Sounds like a plan. Let me know when and I will run it past SWSBO. I'm sure she'll be up for it.

Talk to you soon,
Ted

Last picture, under the exhaust pipe in the lower right - What's that part lying on the floor??


The last time I had my car out I only had the driver's seat installed and stopped back at the house to get a heavy blanket to toss into the passenger seat spot as a sound deadener.  As I was crossing the garage floor with the blanket (the car was still outside) I spied a 1/4" X 20 nut lying on the floor.  


Major panic ensued.......


Then, when I got back from the second ride (a little shorter than the first stage) I realized that it was one of the nuts holding the seat attach hardware under the car and I had missed picking it up when I pulled the seat.


Whew!

Heh, that's a wad of blue painters tape. I had it on the shroud while I was installing it.

I do have a pile of nuts and other assorted goodies lying around. I was concerned, then I remembered I have two motors now.

I will clean up the garage and start to figure out what to do with the other motor. I need to sync the carbs and dial in the timing a bit. I also found one of the holes in the new rotors is stripped. I will call CB and have them send me a new rotor.

Last night the timing was jumping a bit while I was trying to set the advance. I'm going to go through the valves and carb settings and THEN the setting the timing again.

It's nice to have everything up and running again.
Ha! Not, the slug. The new engine is in. I was having an odd issue with the timing. It seemed like it was bouncing between 25-30 BTDC. It was late and I wasn't sure what was up. I thought my led head lamp and the timing light were playing tricks on me. Maybe the light was goofing up? Some internet mechanics suggest issues with the crank gear, end play, or the distributor gear spring.  I'll start there and hope I can figure it out.

I'll start again this weekend. I'll check the valve settings, the carbs, the distributor spring, etc.

I really hope this isn't something wrong with the end play or the crank.

Ted
Last edited by TRP
Well... I couldn't just sit here thinking about the spring. is it there? Is it not? Why didn't I check before inserting the distributor? Such a simple thing to check. Just one nut.

So, I went to check. Sure enough. The spring was missing. Who'd of thunk it would be so simple? Maybe some time this week I will be able to go through the valve settings, the carb settings and lock in the timing. If not this week, for sure this coming weekend.

Sweet!

Ted

lol lol. Ladies and gentlemen  Terry Knuckles out of nowhere!!  LOL LOL 


cool Ted now we can enjoy speed runs down highway 1. Like last year  (started by the Knuckle bros).   now that was a highlight!! 


Doug.   How's the AZ?   Hope your well 


Tebs


Last edited by Former Member
Hey Doug and Teby!

Thanks for the kind words. I can't wait to get it out and drive it. Last night was the first time I've driven it in nearly two months. You'd think I lived on the east coast or something?!

What's new with you guys?

Knuckles - thanks for the inspiration to check that spring!

ALB / Wolfgang / Gordon - any pointers on setting up / aligning the gear shifter? I feel like I may need to do that after installing the new trans. Third and fourth are easy to find. First and second seem like they are hiding from me.

Ted
Last edited by TRP

Doing Good Ted thank you for asking... My Mistress ( MISS JILL) is all buttoned up and ready for the road.. she halls ass after her 4 week rehab stent .. Just bought a black box from CB I will have that installed and WAL-LAH.. I did tell you that she has a 1903cc Stroker that produces 77hp at 4500rpm and 105 FT LB of torque .. Scott Sebastian DYNO'd it for me .. You have done a hell of a lot of work on your car looks great and I cant wait to see it...  Maybe in Jan at Moonstone?    


yes Terry,  I think we are related... Is your Right foot heavier than your left? IF yes...   we are related..


ps my car will not be... repeat, will not be running like crap next year....


lol lol


tebs


Last edited by Former Member

Add Reply

Post Content
×
×
×
×
Link copied to your clipboard.
×
×