Well, there is a good chance my VS (Az) will finally be delivered Wednesday 12th...Just wondering..I am considering adding a badge to the engine hood grill.  Are there any 'tricks of the trade' when installing these? Do you have to remove a protective part to get to the grill from underneath the engine hood? Thank you

PS. oh yes, as promised I will post photos when delivered..

Danny  the newbie

Original Post

Replies sorted oldest to newest

I decided to not have any badging on my IM but if you do it, the guys here seem to prefer a 3M sticker system and file the posts down to allow for removal should you change your mind.  In any case they stay on from what the consensus is on using this tape.  Somebody else can chime in for sure.

Welcome to the crazyness.    Ray

For an engine grill badge, you either need to find 8-year old arms/hands that can go in with hood open past the rain shield or around the grill slats (CMC shown) and add the containment bar and nuts (ss/brass nylock work best).  Another alternative is to remove the grill - the rain shield is molded as inner liner of the trunk so not removable.  Some have hidden threaded bits - use lock-tite.

CMC engine grille

Attachments

Images (1)
  • CMC engine grille
Last edited by WOLFGANG
Newbie Danny of Nipomo Ca. posted:

Well, there is a good chance my VS (Az) will finally be delivered Wednesday 12th...Just wondering..I am considering adding a badge to the engine hood grill.  Are there any 'tricks of the trade' when installing these? Do you have to remove a protective part to get to the grill from underneath the engine hood? Thank you

PS. oh yes, as promised I will post photos when delivered..

Danny---with a Vintage it is easy to unscrew the four screws that hold the grill in place.

Don't load up the grill like I did at first either. I learned that a bunch of badge will actually block needed cooling air from reaching the engine.A couple of tasteful badges look fine.  Get  a Green and white Nurnberg cloisonne badge---a good original one --not the repro garbage.  Compliment it with a PCA badge---like the one WWolfgang posted above.  (Porsche Club of America) and the PCA decal for the windshield---you can find these on Ebay---not cheap but not many care in the fleet that use badges have them.  Forget the cheesy badges that were never on a 356 back in the day.

We haven't heard many reports on the Speedsters being made by VS in AZ but I hear there are many great improvements to the build.  I do know of their sterling parts service---great stuff, fairly priced and fast delivery.  If the cars reflect this attention they should be a nice improvement over past production.

Troy Sloan posted:

Simple like Jack said. The 4 screws are right there on the top and easily removed.  The badges come with the attaching hardware and depending on where you locate them the mounting screws may need to be shortened.  I always apply a little locktite to the threads.

I frequently add 3 badges and have never experienced overheating problems.

Troy, will there be any problems since I will have a luggage rack?

Short of using a ‘super glue’ like adhesive I think your best bet is to remove the grill and install the badge(s) as Wolfgang suggested by using the backing bar and associated nuts that should come with the badge.. There is simply not enough surface area for an adhesive to grab and adhere to - not to mention the natural contour of some of these badges that would make an ‘adhesive’ strategy even less appealing.

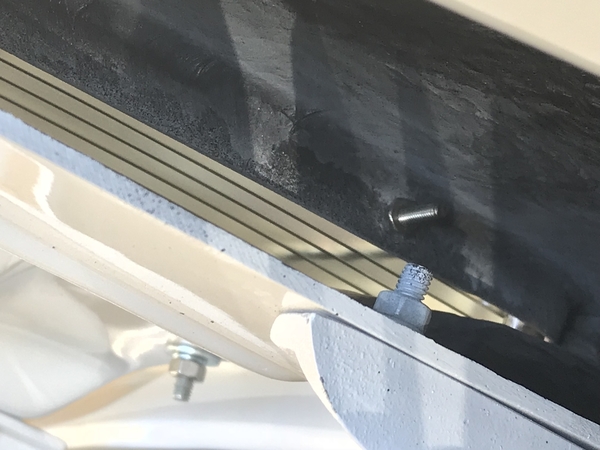
Your VS engine grill is secured by four small bolts in each corner of the grill, and the nuts are accessible by opening the engine lid, securing it open with the hinge pin, and reaching through the sides of the rain shield to access the nuts. I use a deep socket fitted to a straight ‘screw driver’ drive. Loosen the nuts (my grill is notched to slide over the bolts so that I don’t have to remove the nuts and bolts entirely) and you should be able to gently work the grill out of the opening.

Mount your badge as you like on the grill, gently work the grill back into the lid opening, tighten the nuts, and you are set!

30West posted:

Short of using a ‘super glue’ like adhesive I think your best bet is to remove the grill and install the badge(s) as Wolfgang suggested by using the backing bar and associated nuts that should come with the badge.. There is simply not enough surface area for an adhesive to grab and adhere to - not to mention the natural contour of some of these badges that would make an ‘adhesive’ strategy even less appealing.

Your VS engine grill is secured by four small bolts in each corner of the grill, and the nuts are accessible by opening the engine lid, securing it open with the hinge pin, and reaching through the sides of the rain shield to access the nuts. I use a deep socket fitted to a straight ‘screw driver’ drive. Loosen the nuts (my grill is notched to slide over the bolts so that I don’t have to remove the nuts and bolts entirely) and you should be able to gently work the grill out of the opening.

Mount your badge as you like on the grill, gently work the grill back into the lid opening, tighten the nuts, and you are set!

seems simple..thanks to all members who responded!!

Danny

I picked up my slightly used 2017 build year VS this September. Added three badges. No overheating issues, so far. Four screws attach the grill. Took it out to add the badges. Only trouble was reinstalling the screws as it's easy to drop them. If you don't have any tools to help, you can use a piece of paper to hold the screw (push it thru the paper) as you tighten it. Remove the paper by tearing it when done.

30West posted:

Short of using a ‘super glue’ like adhesive I think your best bet is to remove the grill and install the badge(s) as Wolfgang suggested by using the backing bar and associated nuts that should come with the badge.. There is simply not enough surface area for an adhesive to grab and adhere to - not to mention the natural contour of some of these badges that would make an ‘adhesive’ strategy even less appealing.

Your VS engine grill is secured by four small bolts in each corner of the grill, and the nuts are accessible by opening the engine lid, securing it open with the hinge pin, and reaching through the sides of the rain shield to access the nuts. I use a deep socket fitted to a straight ‘screw driver’ drive. Loosen the nuts (my grill is notched to slide over the bolts so that I don’t have to remove the nuts and bolts entirely) and you should be able to gently work the grill out of the opening.

Mount your badge as you like on the grill, gently work the grill back into the lid opening, tighten the nuts, and you are set!

@30West

Your description of how the engine grill is attached is unlike any Vintage Speedster I've ever seen.  Are you describing the grill on a new Vintage Speedster from Justin in Arizona?  If so, that is very different.

Ron P posted:

I picked up my slightly used 2017 build year VS this September. Added three badges. No overheating issues, so far. Four screws attach the grill. Took it out to add the badges. Only trouble was reinstalling the screws as it's easy to drop them. If you don't have any tools to help, you can use a piece of paper to hold the screw (push it thru the paper) as you tighten it. Remove the paper by tearing it when done.

Great idea.  My fat fingers drop at least one every time I do it.  I just use a magnet to retrieve them. 

@TroySloan, 

Yes, mine was built by Justin and crew in AZ. And in contrast to other Speedsters I have seen (including VS), a U shaped channel was cut in to the grill collar at each bolt location so that the grill can slide down into the opening over the the bolt but between head of the bolt and the edge of the engine deck lid. 

Since you only have to loosen the nuts and not take out the bolts entirely to remove the grill, you don’t have to worry about dropping anything down into the rain shield.

30West posted:

@TroySloan, 

Yes, mine was built by Justin and crew in AZ. And in contrast to other Speedsters I have seen (including VS), a U shaped channel was cut in to the grill collar at each bolt location so that the grill can slide down into the opening over the the bolt but between head of the bolt and the edge of the engine deck lid. 

Since you only have to loosen the nuts and not take out the bolts entirely to remove the grill, you don’t have to worry about dropping anything down into the rain shield.

Yes, the U shaped channel is very common on the California produced Vintage Speedsters too, but I've never seen one with bolts rather than metal screws that just screwed into the fiberglass.

Have you ever posted pictures of your Arizona produced Speedster?  I'd love to see them and hear about the build process.

Last edited by Troy Sloan

No, Troy, haven’t posted any pics or anything other than cursory details of my AZ build experience (which was an absolute blast, by the way). As a relatively new guy here on the SOC site, and out of respect and humility for the amazing amount of knowledge, technical expertise, and experience that everyone here has to offer, I figured a low profile was appropriate.

I’m out of town for work but hey, since you asked, I’ll try to get some pics up next week when I get home!

I found Justin and his crew in Scottsdale to easy and FUN to work with, easily accessible, responsive and prompt communicators, patient with questions and concerns, and genuinely invested in producing a great car and exceeding expectations. There are obviously several great builders around the country, and I certainly have nothing but great things to say about my experience with Justin and Vintage Speedsters, AZ !!

Troy Sloan posted:
30West posted:

@TroySloan, 

Yes, mine was built by Justin and crew in AZ. And in contrast to other Speedsters I have seen (including VS), a U shaped channel was cut in to the grill collar at each bolt location so that the grill can slide down into the opening over the the bolt but between head of the bolt and the edge of the engine deck lid. 

Since you only have to loosen the nuts and not take out the bolts entirely to remove the grill, you don’t have to worry about dropping anything down into the rain shield.

Yes, the U shaped channel is very common on the California produced Vintage Speedsters too, but I've never seen one with bolts rather than metal screws that just screwed into the fiberglass.

Have you ever posted pictures of your Arizona produced Speedster?  I'd love to see them and hear about the build process.

He may be mixing up his fasteners and is calling the shaft of the screw the bolt. Not an uncommon mistake. Or, Justin has found a new way of connecting the grill to the opening. Either way I'd like to see it.

Troy Sloan posted:
Ron P posted:

I picked up my slightly used 2017 build year VS this September. Added three badges. No overheating issues, so far. Four screws attach the grill. Took it out to add the badges. Only trouble was reinstalling the screws as it's easy to drop them. If you don't have any tools to help, you can use a piece of paper to hold the screw (push it thru the paper) as you tighten it. Remove the paper by tearing it when done.

Great idea.  My fat fingers drop at least one every time I do it.  I just use a magnet to retrieve them. 

Been there, done that.  The easiest and simplest way to put those 4 grill screws back in is to just hold them with needle nose pliers---grip' em by the threads and stick the point into the screw hole then screw 'em in.  I like to use a socket with a socket holder ---the tool with a handle like a screwdriver that takes a socket.  Super easy peasy.

You can use a screwdriver just as well but the socket is better and won't slip out of the screw shot like a screwdriver blade.

One other note---over the 13 years I've had my car I have replaced the original fastners with those metal screws that have a hex bolt  and screwdriver slots.  Looks good and easy to replace lost ones.


Last edited by Jack Crosby

Here you go gents:

Rear deck lid is up, and viewing (from passenger side) into outboard opening of rain shield, you can see one of the four (unpainted) bolts and nuts securing the engine grill.

A1C96E0D-FDA0-44B8-8DBF-A0AE9E951CEF

F7994335-7194-4B02-A89C-499C86B0BD48

43972129-58D8-4537-9057-5282A4528674

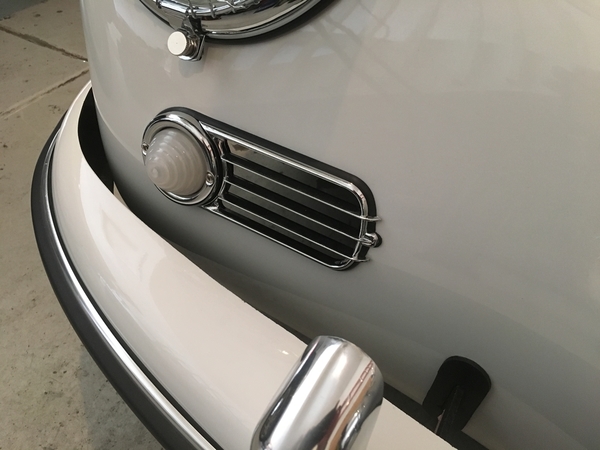
I removed the luggage rack and grill not to install badges but to install engine grill rubber gasket, and did the same for the horn grills (the car was delivered without the gaskets installed).

9E39B932-0930-42CE-A78D-F5A990EB7C88D741F2F9-5631-4C9A-A8AB-0330DF10F013

Attachments

Images (5)
  • A1C96E0D-FDA0-44B8-8DBF-A0AE9E951CEF
  • F7994335-7194-4B02-A89C-499C86B0BD48
  • 43972129-58D8-4537-9057-5282A4528674
  • 9E39B932-0930-42CE-A78D-F5A990EB7C88
  • D741F2F9-5631-4C9A-A8AB-0330DF10F013
Post Content
×
×
×
×
Link copied to your clipboard.
×
×