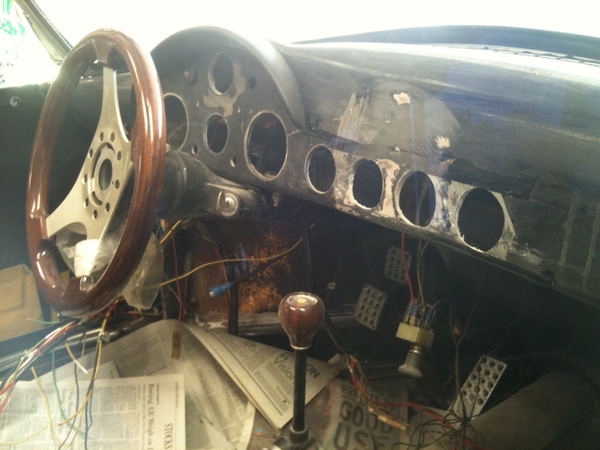
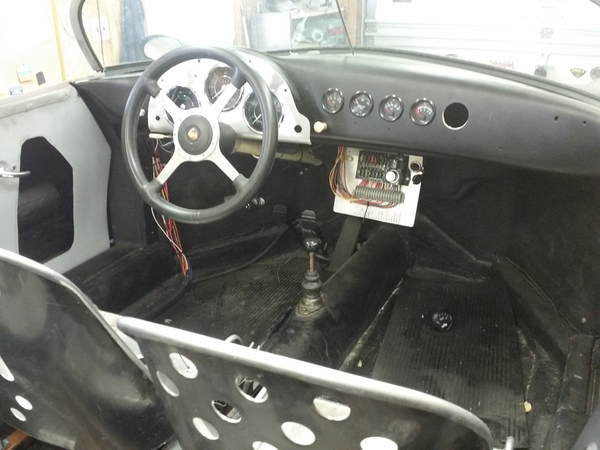
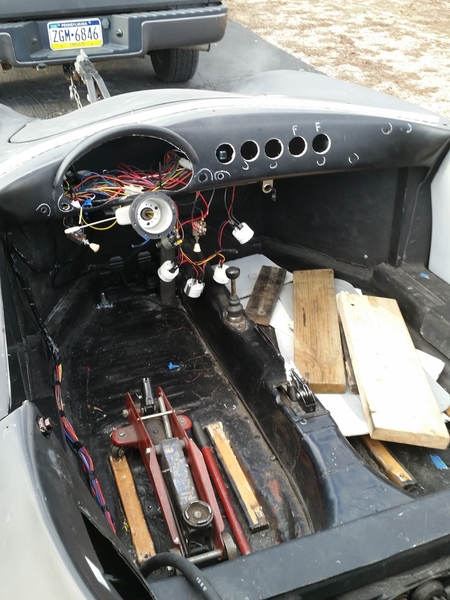
I have been attacking all of the things I don't like about the older CMC replicaca I purchased. One of the things are the gauges. I wondered if anyone ever replaced theirs with the VDO instruments? If so how did you simply go about it ? I am trying not to have to replace the whole dashboard. Maybe, there is no easy fix ?
Replies sorted oldest to newest
Wow, you even have a CMC horn button! I cut the holes and mounted the VINTAGE CMC gauges and then decided I didn't like them. I used Gorilla hair fiberglass based filler to reduce size of the holes. It left a ring of may 1/8" of new fiberglass. I will probably cover the dash with vinyl. I looks like your dash might be covered with vinyl already? The issue is replacement gauges are smaller than the CMC gauges or require a different configuration than you have. 914 3 set of VDO gauges are popular - with the large tach in the center. Repro 356 VDO gauges (3 set) are available from BECK SE for around $700 and are quality units. There are also VDO cockpit gauges out there too. Note you will have to change the senders too! (Ok - I got carried away with gauges!).
Attachments
Hi, Ray....
This has come up a few times in the past, going from the "Classic" or "Vintage" gauges you have to either reproduction 356 gauges or the slightly larger ones from a Porsche 914.
As I'm sure you know, the placement and sizes of the gauges differ greatly. What is most difficult in your case is the two main gauges and their wide placement, so maybe it's best to start with a blank surface.
If I were going to do it, I would remove the dash eyebrow (it has 4 10-32 screws holding it on from the rear) then cut out the dash gauge area and replace it with a flat piece of fiberglass and just 'glass it in place. I think that Gary @flatfourfan did that on his car. Then you could get the gauges you want and cut the holes to match, where you want them. You would also have the option of either a Pre-A, 2-gauge dash or a 356 A, 3-gauge dash - your choice. I can supply a dimensioned photo of a Pre-A dash, if you wish.
Another alternative would be to place a flat material behind the dash, simply glued to the backside with Liquid Nails or something similar, then fill in the existing gauge holes with Bondo and sand smooth. I would prefer the first method, but whatever floats your boat.
On the material to use as a replacement gauge surface, I'll leave that to @Alan Merklin as I know he's done a few of these dash conversions.
Regular Bondo will eventually crack unless you use the "gorilla hair" variety, impregnated with fiberglass strands. I'd favor cutting it out and replacing with flat fiberglass section. Then lay a couple layers of fiberglass strips on the backside to make it a good repair.
Thanks for the suggestions. I really appreciate them. I think probably the best alternative would be to skin over the existing dash.
Two ways of doing this . You can get the FG dash section you need and bond that in place and have a clean slate to work with. The other method would be to cut a fiberglass backer and 3M Panel Bond that to the back of the dash , then fill in the old gauge holes with Tiger Hair fiberglass, sand that and skin coat the FG with a Polyester filler and final sand. You'll need to be very careful cutting the new gauge holes with a GOOD quality hole slow at slow speed as to not create heavy vibrations . I have done both methods. It is time consuming but worth the effort.
You mean you want to buy a Lenox hole saw with the REALLY nice mandrel this time and NOT the cheasy Chinese fall-apart holesaw?
I bought the Lenox and bitched about the price until I used it. Worth every penny. I've purchased different sizes over the years and have a nice selection now.
The first hole I bought it for was to enlarge the taillight openings for the "correct" Spyder lights. I cut a piece of wood to fit the old hole with a smaller holesaw, and used that as a guide. It all worked out very nicely.
I replaced the replica gauges with rebuilt authentic VDO gauges. I had the work done by Palo Alto Speedometer. Came out great. The few problems were taken care of immediately with no complaints.
The VDO have a smaller diameter. To make up for this I designed filler pieces that can be 3D-printed. You just glue the fillers to the back of the dash and slip the gauges right in. Easy, and inexpensive, to do. If you like, I can send you the file and suggest where to have the printing done.
Notice the black ring around the gauges? That's the fillers painted satin black, so they look like the rubber that would normally be there.
Attachments
Ooops. Didn't notice that you had a non-stock dash configuration. So, ignore my previous post.
Thanks, for the information. I probably will go with doing a skin over the existing dash with new holes. The current dash as naugahyde over it and was done in the 1980's has held up well but is not to my taste.
Best glass filler material I have yet worked with is Upol Fibral. It's much more spreadable than the various "kitty hair" and "tiger hair" products and sets up very hard and strong. It also sands hard so it's not something you want to overfill with.
If I were doing your job I'd make a template for the new gauges out of hard board so I could can fit it up for looks before drilling the new holes. Then I'd take the gauges out, remove the eyebrow bit and mask that area down to the line where the flat face meets it. I'd drape plastic over everything under it and then 80-grit the front of the dash, then acetone the back, then 80 the back, then acetone twice more.
Then I'd tape over the front face of the binnacle, tightly, with good masking tape, then resin the back and lay up two layers of 6 oz cloth. Let it dry, peel off the tape, 80 grit that, acetone it and fill the holes with Fibral. Don't mound them.
Let it dry an hour and acetone that, then 80 it again, acetone again and come in with Upol "Gripped" filler. Again, Bondo, Evercoat etc. are fine but the Upol stuff is worth the extra scratch, imho. Easy to spread, easy to work, no pinholes. Two spreads of that and I'd be down to 220 grit before sundown.
Next day sand it out to 400, lay in your template, mark the holes and cut them, 220-300-400 the cut edges and test fit the gauges, then spray to match and Bob's your uncle.
@Ray Shanahan : even if the term “replicaca” in the first sentence of your original post was a typo it is still going on my list of Best Words Ever!
Agreed, Mayo. I didn't catch that until you pointed it out.
edsnova posted:Best glass filler material I have yet worked with is Upol Fibral. It's much more spreadable than the various "kitty hair" and "tiger hair" products and sets up very hard and strong. It also sands hard so it's not something you want to overfill with.
If I were doing your job I'd make a template for the new gauges out of hard board so I could can fit it up for looks before drilling the new holes. Then I'd take the gauges out, remove the eyebrow bit and mask that area down to the line where the flat face meets it. I'd drape plastic over everything under it and then 80-grit the front of the dash, then acetone the back, then 80 the back, then acetone twice more.
Then I'd tape over the front face of the binnacle, tightly, with good masking tape, then resin the back and lay up two layers of 6 oz cloth. Let it dry, peel off the tape, 80 grit that, acetone it and fill the holes with Fibral. Don't mound them.
Let it dry an hour and acetone that, then 80 it again, acetone again and come in with Upol "Gripped" filler. Again, Bondo, Evercoat etc. are fine but the Upol stuff is worth the extra scratch, imho. Easy to spread, easy to work, no pinholes. Two spreads of that and I'd be down to 220 grit before sundown.
Next day sand it out to 400, lay in your template, mark the holes and cut them, 220-300-400 the cut edges and test fit the gauges, then spray to match and Bob's your uncle.
I appreciate the time that you and the others have spent guiding me through this process. Also, to be honest I first had thought that I had typed replica and then went I went back to correct the replicaca , I thought I would leave it. Someone before me did a lot of mistakes and now I have the task of correcting them.
It’s an idea that’s a little out there (unless you have a Spyder) but how about doing an engine turned piece of aluminum or stainless steel to fit the dash space and install your gauges into that?
It could be bonded to the existing FG dash if you didn’t want fasteners to show and would be a LOT easier than re-glassing the dash, I would think.
You mean something like this ? 
I imagine a section of the dash could be done in this manner.
If you like the look. I don't particularly.
John Boy Steele did this on a speedster, the way he did the dash plate radius's at the bottom corners it actually worked.
Spyders have this dash plate, and it was finished in hammerite or hammertone silver paint. I did mine this way, and I like it.
This is excellent advice but it's only the "easy button" if you can get the panel cut just so, either at home or by waterjet. Don't ask me how I know.
I particularly don't like the look of the turned metal for this car. If it were a custom car of the 1940's I think it would be fine. I had a 1941 Buick coupe that had the original turned metal dash and it was nice.
I'm with you Ray. There are two things I can't stomach on these cars: diamond-tuck upholstery and engine-turned panels. It's all a matter of taste, and that stuff just isn't to mine.
I agree DannyP. I guess when you are talking about these replicas you either go as close to the original or the other way. That type of upholstery and finish is not to my taste on this car, although is an art form and has its' place.
How about this look? I did this a few years ago now but it's just an overlay painted to match the dash color(sort of). I had a lot of CMC and additional gauges (like 6) so the original dash was kind of Swiss cheesed. The overlay tucked under the brow and ran down to the bottom of the dash. Made wiring and getting behind easier as well. Have fun.
Attachments
DannyP posted:I'm with you Ray. There are two things I can't stomach on these cars: diamond-tuck upholstery and engine-turned panels. It's all a matter of taste, and that stuff just isn't to mine.
You forgot crushed velvet.
Frank C. That turned out great and probably was a lot easier than what has been proposed. Since it depends on the existing features, I would have to think about it. It definitely looks professional though.
ALB posted:DannyP posted:I'm with you Ray. There are two things I can't stomach on these cars: diamond-tuck upholstery and engine-turned panels. It's all a matter of taste, and that stuff just isn't to mine.
You forgot crushed velvet.
Yes I did. But you forgot a carpeted dash and fuzzy dice, along with the bobble-head of your choice.
I have the hula dancer with the mandolin. The classics never go away.
Having a dash plate, like Danny suggested, that can be removed with the gauges still attached and laid face down on the steering column would be great for accessing the back of the gauges.
I might have to put that on my list when I upgrade my gauges......
Carlos, if you make a dash plate you'll want to make it pretty thick. And as Ed found out, it's really hard to cut accurately. A waterjet would be the best way.


