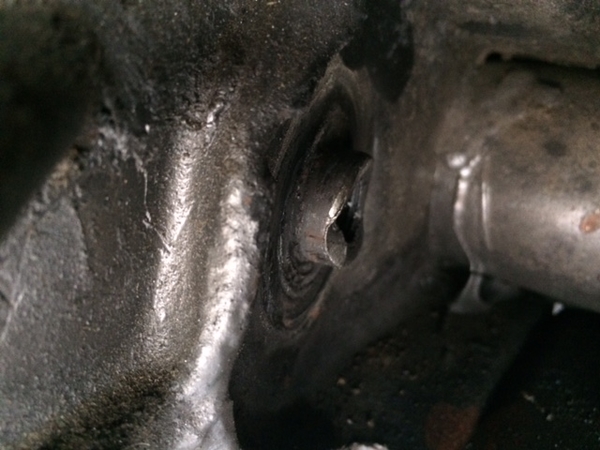
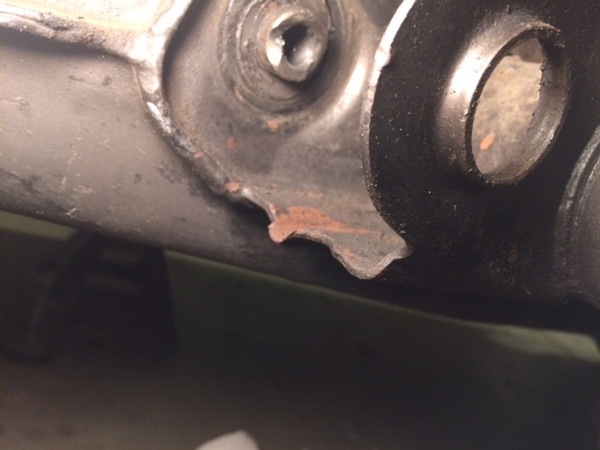
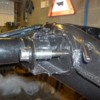
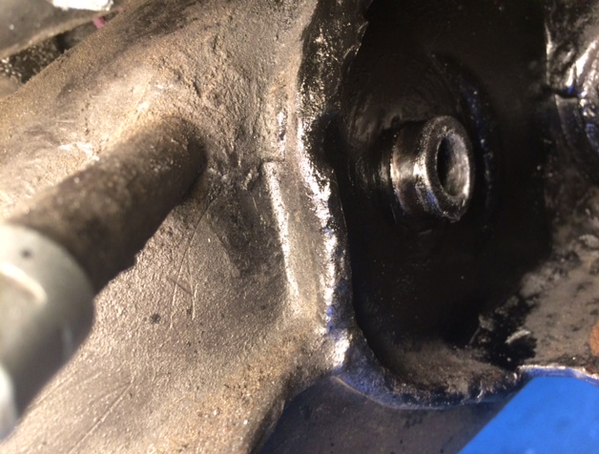
One step forward, two back. The frustrations are setting in ... OK, I am ready to finally install my narrowed trailing arms. Removing the old arm and I come across this: The pivot bolt seemed tight, but maybe not tight enough. I have read that they tend to want to back-off over time. There was only one washer on the outer face of the outer bushing, I have read there should have been two. To me, it looks like the arm was orbiting during operation. Today I will take a look at the other side. Need some advice on a fix. All I can imagine is to have a welder come over and try to build-up material around the nub, clean it up and run a flat washer against it, or have a new one welded in. There are IRS conversion brackets that come with a similar fitting welded on. The locating of the fitting would have to be exact so the pivot bolt would bolt in at the proper angle. Not sure who could pull off such work. Greg at Vintage perhaps?

Thanks in advance,

Brian in the early throws of regret

CB171402-79FA-4A08-8D19-2DEB85E0487A05C01660-6057-4052-AA78-1CE280ABA3C0

Brian in Murrieta

Attachments

Images (2)
  • CB171402-79FA-4A08-8D19-2DEB85E0487A
  • 05C01660-6057-4052-AA78-1CE280ABA3C0
Original Post

Replies sorted oldest to newest

Yeah, better photos would help a bit, but it looks like the top photo is the chassis end of the diagonal arm and it also looks like it has a pair of bushings, one pressed in from each side, so I would expect that a new pair of bushings could be found and pressed in.  Getting the old ones out might be a bit of a problem, though.  Don’t know if bugcity.com has those or not (better to call them to find out).

The bottom photo looks like the mount on the frame and it is toast, but there should be another side to the diagonal arm mount that the hex socket bolt fits through on the outside, then screws into the mount in the photo so everything is supported at the base of the diagonal arm.  

You’re right about the big washers - none on the inside and TWO on the outside.  Only one on the outside allows the diagonal arm to orbit, as you mentioned, and flop around.  I would suspect that the hex socket bolt might be toast, and you should check the outside diagonal mount on the frame as the hole might have become egg-shaped (but maybe not).  While I agree that a welder might build that boss up so you could restore that locating bushing, different photos might suggest a better solution.

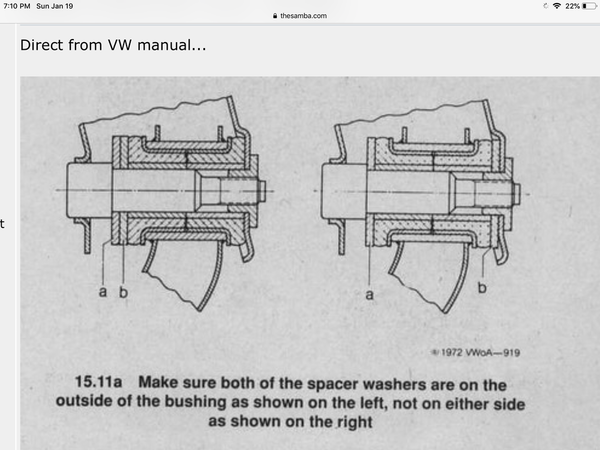
I found better photos over on the Samba.  Not the best, but an exploded diagram, too.

https://www.thesamba.com/vw/fo...ewtopic.php?t=500019

Hey Wolfie,

Those are the conversion pieces I was referring to. There seems to be plenty of thread left on the exiting fitting, as it took a breaker bar and some leg power to break the bolt free. I think the fact that there was one of the thick washers missing that played a part in the disfiguring (The washers press against the rubber edge of the bushing on the outside and the rubber edge of the bushing on the inside rides against the cars tunnel) The bolt might have bottomed out before the trailing arm bushing was fully compressed. I could purchase those pieces, cut a generous area out around the threaded bung on the conversion bracket, screw it on to the bolt and have it welded on to the car in that position. Still thinking about the alternative of adding material to what is there and grinding the surface smooth, or welding a small flat washer to the face of the existing bung.

Last edited by RacerX

It looks like the diagonal arm (DA) is supported by the bolt, and that the boss at the inner end just helps to keep things centered but mostly gives the bolt somewhere to thread into and bottom out.  There is enough material left on the boss that it should hold things in place as the diagonal arm bushing will be forced against the frame side by the bolt and two washers (on the outside) and the bolt itself and won't move around as it did before.  Scope out the bolt really closely (use a metal straight-edge) to make sure it is not worn along its' length.  If it is, get a new one - maybe get a new pair anyway.....  They're cheap.

Looking at the replacement brackets shown by Greg, all they have is a big, honkin hex nut so those don't do a whole lot to center things - they're depending on the bolt and it's close tolerance with the inside of the DA bushing to holding everything in place, especially with the DA inside bushing properly snugged up against the frame.

That said, it wouldn't hurt to build up the boss surface on the frame and then Dremel it off nice so the DA bushing fits nicely over it, but I'm not convinced that it would gain you a lot unless 3/4's of the entire boss is missing.  Again, the bushing is close against the frame and the bolt will hold it from lateral movement.

If it were mine, however, I would get a couple of sets of DA bushings, 4 new washers  and a couple of new bolts, press new bushings into the DAs and put it all back together and not even think about it.

Yes, it takes a lot of snot to break those bolts loose.  If you look closely at the side of the bolt head you'll see a small groove in it.  Once you reassemble everything, torque that bolt up to 90 ft. lbs. (dry, no locktite, no anti-seize compound), then find where that groove is and, with a small cold chisel, crimp the collar of the mounting bracket into that groove to prevent the bolt from loosening up (that's why it was so hard to break it loose when you took it apart!)  Don't scrimp on the torque: 87 - 90 ft. lbs.  Use a torque wrench.

Last edited by Gordon Nichols

Let me repeat;  "the boss at the inner end just helps to keep things centered but mostly gives the bolt somewhere to thread into and bottom out."

I would be more concerned with the bolt not evenly flat against the bung when tight, rather than the bushing inner diameter fitting over the bung - there is enough material left for that, but the bolt will have an uneven surface to mate to.  So what's the answer?  Well, either your original idea:  build up the boss with some weld and then grind it off as flat as you can get it (use the bolt as a guide for where/how much to grind off) but don't forget that the inside of the boss is threaded and you don't want to mess with the threads - it's a bear to cut new threads through very hard weld material.  If you're careful and apply a weld bead to the OD of the bung, avoiding the threads on the inside, this will work.  If you're getting new bolts anyway, use an old bolt as a guide both for welding and later grinding and maybe the bolt can protect the threads.  Be creative.   

The other alternative is to reassemble as-is because I don't think there is enough material missing from the boss to make that huge a difference and it's a big honkin bolt.  

Anybody else got some good ideas?

LI-Rick posted:

Using the bolt as a guide for welding would be a mistake imho.  I say there is a good chance you will weld the bolt to the mounting boss.  I would plug the hole with a piece of brass tapered in a lathe, or a wooden plug.

Thanks for that! I was going to ask the mechanics at work what I could use that would ensure the threaded hole would not get welded over ...

Brian

Sorry if I seemed grumpy - certainly didn't mean to!  I don't have a lot of different ideas on this that look fool-proof.

Rick's right, of course, and that occurred to me on the way back from a Dunkies run:  If I did the welding using the bolt as a guide, I sure as heck would weld the two together or overlapped the thread area, especially if I MIG'd it.  Don't be like ME!  The brass or wooden plug sounds good as a shield, though. Whatever you can find that works, BUT I would also find a well-recommended welder in your area, tell him what you're trying to do and see what he can suggest.  You can't be the first person trying to restore something like this so he may have some good ideas, too.

If I think of something else that makes sense, I'll be back.


Look at the drawing from the Bentley manual.  It shows the bushing sleeve pivoting on the bolt and the shoulder.  They have to be the same size OD.  Put a mic on them; I think your photo is misleading because of the angle the picture is taken with.  

What I think happened to bugger the shoulder up is with having only 1 washer in there, the trailing arm pulled to the outside of the car, then fell down, off the shoulder and onto the threads of the bolt.  It rubbed back and forth for who knows how long, therefore wearing the parts together.  Gordon, what do you think of my theory?

Once you have the 2 washers installed, it shouldn't happen again.  BTW, the reason for 2 washers is it spreads the rotational friction over a greater area.

Last edited by LI-Rick

@LI-Rick Great news. On your suggestion, I mic’d the inside of the bushing sleeve and the outside of the bung fitting. The sleeve fits over the bung as @Gordon Nichols suggested, more as a locating device. At some point in it’s life, the bolt must have backed-out enough to do the wear I am seeing. I may still build-up the nub for peace of mind though (With the plug in the threads). Time for me to get my eyes checked. Must remember, always best to measure when in doubt. Thank you all for the help.

Brian

Post Content
×
×
×
×
Link copied to your clipboard.
×
×