Alan, and others: I took the week end off and drove down to Va. Beach (in the Mazda) to see some friends. So no phone call about tins. Needed to get away from the obsession which is this car. Carb arrived Fri PM, just before I left, and I'll be working to get it on and running tonight. The tins can wait for a bit, while I sort out the carb thing. I believe there is enough room between the oil pump and the pulley to allow a tin to be inserted, if it is bent properly and does not spring back when bolted down. The one I have (although banged around) would probably sit OK, if tweaked right. I don't think getting the tins off is a big deal, but there are a few nuts and bolts that need to be found and turned to do so. The aluminum siding is more-or less the permanent "tin" that spans the gap between the car body and the VW engine tins. Might be nice to dress this up w/ a better look, but the fact is, what is there works the way it should, so I have no big pressure to change. It's on the list, however.
To change out the "rubbing tin", you'll have to remove the crankshaft pulley, I grind about 50% of the the oil pump bolt heads to allow for additional clearance..... ~ Alan
Kelly,
Some of the tin on my car is also of the "faux" woodgrain variety.
Obviously JPS has been using it for a while.
At no extra charge!
It might be funky but it works.
Some of the tin on my car is also of the "faux" woodgrain variety.
Obviously JPS has been using it for a while.
At no extra charge!
It might be funky but it works.
Former Member
"The one I have (although banged around) would probably sit OK, if tweaked right."
If you want, I can strip and prime (or paint, if you let me know what color) a nice strong genuine German piece of pulley tin and get it right off to you.
No trouble at all.
If you want, I can strip and prime (or paint, if you let me know what color) a nice strong genuine German piece of pulley tin and get it right off to you.
No trouble at all.
TC: That is really generous. It is just the piece that sits forward, and makes essentially 1/2 of the well that the pulley runs in. You have the picture. It is black, which I guess is just factory standard. Anyway, my fix w/ the spring retainer (my orthodontist would be proud) is working. There is now plenty of clearance between the "high" spot that was rubbing and the pulley. Does not appear to require grinding oil pump bolts. Unless there is a whale of a lot of end play in the crank, this should work OK. I have re-installed everything, with hopes of getting back on the road ASAP. Some day, after I get all this initial BS taken care of, I'll be looking to dress up the tins and would fix this one. So if I had a good one ready, it would be awesome. You got this stuff just laying around?
Meanwhile, the carb is back from JPS (got a new body) and is on, and awaits my first attempt to balance the linkage and idle on the carbs. Perhaps tonight. In reassembling the linkage, I have come to think poorly of the little ball and socket pivots at each end of the hex bar, and now want the larger pivots, as seen on other cars and in the links above. Will be looking to buy these pieces and to make the mods soon.
Meanwhile, the carb is back from JPS (got a new body) and is on, and awaits my first attempt to balance the linkage and idle on the carbs. Perhaps tonight. In reassembling the linkage, I have come to think poorly of the little ball and socket pivots at each end of the hex bar, and now want the larger pivots, as seen on other cars and in the links above. Will be looking to buy these pieces and to make the mods soon.
Kelley:
as seen in the responses up above, just about everyone who installs a high-volume oil pump knows what you're going through with the interference with the engine tin.
Like TC, I found the same clearance problems with Melling pumps, and ended up both grinding off half of the thickness of the pump nuts as well as zapping four holes in the tin to let the nuts protrude.
Later, I full flowed the case and went to a Berg pump (which is not a Melling and not quite so tall) and most (but not all) of the clearance problem went away.
It all depends on which pump you're using, how much tin interference you'll find, but the fixes are all the same.
I have a couple of male-end Heim joints for your linkage if you want to buy them. I also have the same joints with female mounts, if you prefer. Email me and I'll pass along further info. Danny P can probably give you leads on the rest of the parts needed for the kit.
gn
Former Member
Kelly,
Shoot me an email with your address and I'll send you off a nice black shiny piece of tin to go behind the crank pulley. I also have one with the four clearance holes drilled in it for the oil pump nuts. Just lemme know which one you need and where to send it.
I love to make stuff, draw stuff, play with stuff, Building engines is a Saturday relaxation for me so I always have spare stuff hanging around.
Luck,
TC
TC: daytime is kelly.frazer at jhuapl.edu; home system: patkelly88 at comcast.net. I see the work system every day, and the home system not quite that often. Believe the regular, unmodified tin should work, as there seems to be plenty of clearance between the pump bolts and the pulley. Don't know what sort of pump it is, other than "full flow". Maybe a really clean install of this tin involves cutting some holes. So you could send the regulation part, and if holes need to be cut, I can do that. Meanwhile, the retaining spring is doing a fine job.
Gordon: not sure which is better: male or female. I need to re-read the other posts and the links you sent over previously to see what you and Danny and Bill have found out. Seems as if getting the hex bar to sit at about the same height as before may be a good idea, so which of the two styles lets that happen?
Replacemernt carb body installed and linkage reset. Car started at the first touch. So far so good. Also, significant throttle hesitation and exhaust popping and so forth seen earlier w/ leaky carb is now gone. So am back on the road -- whoo-hooo!
Kelley:
Go out to your car and find the bottom air cleaner plate (the one with the vertical mounting tab for the linkage stud) and measure the distance between the upper surface of that plate to the centerline of the linkage stud that fits into the end of the hex bar. THAT is the distance you'll want to maintain, as you'll be cutting off the existing mounting tab and mounting a Heim joint right onto the lower air cleaner plate.
Now: The Female Heim joints that I have will position the centerline of the stud fitting into the end of the hex bar at 1-3/8" above the surface of the lower air cleaner plate.
The MALE version of that heim joint can be lowered so that the centerline of the stud can be as low as 5/8" above the air cleaner plate (or as high as 1-1/2" if you thread the hole in the plate to 8mm X 1.00 pitch).
Big difference....so check how much distance your current setup has, and choose the Heim that would work best.
gn
Kelly, nice pics of your car on the JPS Gallery site!
I've been looking for that -- John said he would put the Red Baron in the Gallery. I'll have to go take a look. I am driving the car now, a bit. Finally got my local MD title and temp. plates, so can drive legally for a change. adjusting the clutch is still an issue (see other thread in Tech Gen section) needing a new cable. And my valve covers leak. Will replace the cork ones supplied w/ rubber-flex ones and red RTV. Used this technique with old P-cars many years ago with good results, and also the other cars I have had where I could actually do something to the stuff found underneath these covers. Recently owned machinery does not fall into that category, however.
Recent news: Ran the car in the rain for first time, so it is now baptised. Lots of leaks here and there. Aside from the usual and expected imperfections in the side curtains, looks like the water gets in under the windshield, and also drips in at the top when rain is heavier and speed is up. Found a loose tie-down clamp that was faulty and probably not pulling the leading edge of the top onto the windshield properly. I'll get another one of these. I also have continual oil on the tins at back just to the left side of center and this seems to be from the distributor, which is out now so I can replace the O ring and see what happens. Clutch pedal began squeaking, so some WD-40 has fixed that. More later . . .
I have (or had, actually) the same distributor O-ring leak. When I put in a new O-ring it moved to some other spot in the same area. I'm not sure where it's coming out now, but someone suggested that there was a breather hole on the distributor from which it could be spraying if I had the car overfilled - which I think I do. It's really tough to know when you're full if you have an external cooler, external filter, and extra large sump.
Former Member
Lane, check the temperature sending unit right there next to the oil fill and the distributor.
That plastic doohickey might be the culprit (according to Jim).
That plastic doohickey might be the culprit (according to Jim).
Mine's not plastic, and I've already sealed up the threads with thread sealer. No improvement. Poop!
Former Member
Lane, that's because you let a bunch of enthusiastic Pennsylvanians at it on a drinking weekend!
I'm kidding. What's this I hear from Kelly that you think there might be a leak up through the stalk of the distributor?
I'm kidding. What's this I hear from Kelly that you think there might be a leak up through the stalk of the distributor?
When replacing an dist 'O ring, it can get nicked against the case and develope yet another oil leak...glob a bit of grease on it as you gently drop it in.
The area around the base of the distributor is dry, as is the sending unit. I'm really at a loss as to where it's coming from. The "distributor breather hole" idea came from someone else on this site, but I'm having a senior moment and't can't remember who. I haven't found such an opening yet.
If the disti breather hole is leaking (which I doubt, on your engine) it'll drizzle down the housing onto the clamp and you'll be able to see and feel it back to the source.
By any chance, is the oil sender leaking out of the TOP? Look out where the wire contact screw is and see if it's wet around there. I've seen some leak past the phenolic hat, even though the threads are sealed.
Beyond that, I'll be doing an oil change tonight and will look at mine to get any other ideas and let you know.
gn
Former Member
Does the engine have a breather? If there is no vent sometimes the oil will leak out where ever it can get out.
.... and the next question: how hot is it running? I had a heck of a time with the distributor seal on both (under-cooled) 1776s.
I have a SERIOUS breather setup with hoses to each valve cover, each air filter, and two little air filter thingies on it. I am pretty sure that the engine is a little overfull, which is contributing to the problem. I plan to do an oil change as soon as the heat index here drops below the boiling point of water, and will be very careful about how much I put in. We'll see if that helps.
Oh, Gordon, the clamp DOES have oil on it. Where exactly is the distributor breather hole?
Oh, Gordon, the clamp DOES have oil on it. Where exactly is the distributor breather hole?
Lane, The dist'r has four small holes in the bottom of the "cup" that is its body. If oil is coming up past the internal seal (what exactly this internal seal is, and how/why it would leak is still TBD) it would drain out these holes, vs. fill up the cup. I really believe this is what is going on in my car, but have not got it fully trouble-shot (?). Will replace the external O-ring seal first, and see if trouble persists. If anyone knows about the internal dist'r seal, and if it is inspectable/servicable, please advise. My most significant observable so far is that if you place your fingers on the bottom of the "cup", where the four holes are, they come back covered in oil. Although I have not tried it yet, one could use a mirror to inspect the holes and underside in-situ while running. That might reveal more definitive info.
As to running temp, so far my engine is mostly normal to cool, according to the oil temp gage.
As to running temp, so far my engine is mostly normal to cool, according to the oil temp gage.
The issue of oil inside the distributor, and leaking out on the tins and engine is addressed in its own thread. Evidence is conclusive: dit'r is leaking internally, most likely driven by high case pressure, most likely (that is, hopefully) a result of a new engine not quite all run-in, therefore having higher than normal blow-by. Two things will be tried: Install a new dist'r and keep running the engine to get it "seated". Beyond that, several have suggested adding more and larger case breather pipes. Will take that under advisement while working w/ JPS to make this go away.
Former Member
Kelly, your car and Tom's look drop dead gorgeous! Sorry I didn't see this stuff, I tend to check Spyderowners and not here. I usually go here only a couple times a year, since I check about 6 forums often.
Kelly, you need two 5/16" I.D. heim joints, nuts, bolts and washers to secure them. Then you need some 5/16" od rod from a hardware store, or some 5/16 od bolts, the kind with a partial thread about 2-3 inches long. You'll also need some springs to keep the hexbar centered and compensate for engine widening as it heats up. You might need spacers for the springs if your hexbar is short like Gordons is. His fell out until he put spacers and stronger springs in. My hexbar is long as the idle speed and mixture adjustment is on the inside. My carbs are reversed from most Speedsters, the linkage is attached to the throttle arms toward the outside. As such, there is no way my hexbar could fall out, if I want to remmove it, I have to unbolt a heim joint.
I had a thought: with a lathe a c-lip channel could easily be cut on one or both sides of the rod, to effectively retain it from the outside and/or inside, around the heim joint. This way only a light, small spring would be needed to combat engine growth and vibration.
OK folks, several things. First on the heim joint business, I think I have the concept pretty good, and still have to noodle out the exact details. The business about engine expansion and using springs is very cogent -- had not thought of that, but have noticed that the current design has springs, and so that must be the reason why. I'll get to this one by and by.
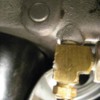
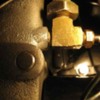
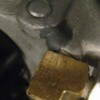
The Oil Leak Saga. Some pictures attached to show the dirty deed. Basics: the boss that accepts the oil sending units was cracked, either by too much tightening of the brass fitting in there, a faulty casting, or a hole drilled/tapped a bit off center, leaving a wall too thin. Or all of the above, who knows? Once you're snake bit, why sorta doesn't matter. Anyway, the crack is there, sure as hell. The fix: clean it up good, file the area down to bring fresh metal, and put two part epoxy paste on to seal it up. Results: so far, after two days of hard driving: spotless. No oil dripping at all.
Note the very rough texture of the casting right in this area. I suppose this is "normal" for these sorts of parts, but I can't help believing that this is contributory.
Peace out.
Attachments
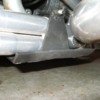
'nuther item: very cool, fancy extractor exhaust system (Sidewinder, as I am told) is a lot of pipe for a car so low, and so it drags ass now and then. Car was delivered w/ scrape marks on this very expensive plumbing. I added to the trouble, and began to worry about wearing the pipe through; it was already decidedly flat, where initiallly round. Had none other than the masterful Cory Drake make me a skid plate, now attached for all to see below. Thanks Cory, this is going to work, I do believe.
Attachments
Just some other shots. Enjoy!!
Attachments
Didn't realize the sidewinder sat so low.
Anyone else have trouble with dragging the header?
~WB
Anyone else have trouble with dragging the header?
~WB
Bill - I also have the sidewinder w/center-exit exhaust tip. I don't think my collector sits as low as Kelley's. However, my car is lowered and every once in awhile I'd be reminded of that fact when my exhaust tip would scrape while entering/exiting a driveway.
I remedied that by shortening the exhaust tip by 1" and no problem since (with altered approach/exit angle).
Kelly - Even with the 'skid plate' on the exhaust, it would be prudent to still be mindful of your low clearance. Particularly because the skid plate is now your low point by an additional 1" than before. Any impact on this skid-plate would be transferred to the next weakest link in your exhaust system. I'm sure you're already aware of this so I'm just saying...
"... so I'm just sayin' " MUSB, don't ever stop sayin'. The skid plate only takes about 1/4" away from my clearance. And I am very mindful of ass-draggin' possibilities. Also, thinking of boosting the rear by 1/4 - 1/2 inch. I think I could stand that and still have the right "look", and buy a little insurance against contact w/ the pavement. The other thing that is very low is the front end, where the big diam swaybar dips down a lot. I have not measured the clearance, but it is jkust a few inches there too. Ran over a paper bag from MacD's in the road one day and did not see it in the rear wiew mirror. Later, found it wrapped into the front sway bar. . . . but you dasn't call me a low-rider; uh-uh.
Former Member
I can take that sway bar off your hands ... No more "fast food" worries ...
What does that skid plate fasten to? I have the same setup (sans skid plate) but have not had a big issue (yet), tell you better when I get the car back.
Former Member
Tom, it's a 3/8" plate at the bottom, in three strips. The middle section is 3 3/4" wide and 6" long, with two 1"X6" strips of the same plate welded on at angles. Inside the two outer gussets are the 3 3/4" tall verticals (same plate steel) with washers welded on at the tops. The washers and the risers pinch the plate to the pipe without having a hanger of any kind other than the single bolt. Easy peasy.
Former Member
That's such top-quality work that you'll be planting flowers in it by spring, Kelly.
Dear God, don't tell anybody (else) where you got it. Let's just keep that little detail between you, me and the 200 other people with Speedsters on this quiet little public forum.
:)
Dear God, don't tell anybody (else) where you got it. Let's just keep that little detail between you, me and the 200 other people with Speedsters on this quiet little public forum.
:)
It's just a U shaped channel, w/ a bolt across the top to hold it onto the pipes. What you see in the picture is what you get. Cory has given the details. Hopefully he kept the blueprint, rendered onto a piece of cardboard, so he can recreate this masterwork, and sell them on evil-bay for mucho dinero -- or give them away as favors at Carlisle next year. I forgot:
Bwaaaahahahaha
Bwaaaahahahaha
My little village (Highland) runs a fair each year at this time. I have lived here for about 22 years, and this year was my first time attending. Basically, rode up to the center of Town to get a burger for lunch; was not expecting much. In the Speedster, of course. Well, as these events are likely to have, so this one did too: an impromptu car show! Pull it in and park it. Whoo-hoo, my very first! And guess what? Another Speedster was there too. A replica, I am certain. Could not find the owner, but I now know who has his name, and so will look him up. Did not have my camera w/ me -- a bone head move I will not repeat -- but was moved to take a few shots when I got home, see below. There was a guy there who restores E-type Jags, and he had one finished and one about 80% WOW!! He is meticulous in the extreme, and these cars were immaculate: better than new. It was a great sunny day, and I gave a few friends rides, and turned a few heads, of course.
Attachments
Former Member
Make sure you send the middle photo to Theron for the '08 calendar.
Can you photoshop the garbage can and picnic bench out?
Garbage can is really a phone line junction bix; picnic table?? Perhaps the down tree, in process of being rendered to fire wood -?-
Photoshop? I can try; don't have much experience.
Photoshop? I can try; don't have much experience.


