We all have a lot of time on our hands these days with our national Quarantine. It's sort of double for me because the recovery time of a double knee replacement. I can now do a little stuff in my shop and sit a lot when I need to. Here's what I've been playing with.
I got a piece of windshield frame from Greg at VMC and started playing around with how I could mount things to that frame other than the way I mount my sun visors. We all know that there isn't enough thickness to the frame to drill holes and tap threads into it. Plus there's a good chance of the machine screw going in too far and fracturing the windshield.
The frames wall thickness is only .080". This however, is thick enough to allow a 6-32 X 1/2" flathead machine screw to be countersunk into the frame from the inside perfectly. The problem is getting the countersink drill in there do do this. Here's how I did it.
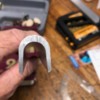
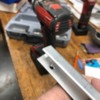
I ordered a length of 3/8" drill rod from Grainger to make myself a reverse countersink tool from scratch. I like to use water hardened steel drill rod because I don't always have the right kind of oil around to do an oil hardened process. Once I have made the countersink on the lathe I took it off and hand cut two cutting grooves into it such that it will cut the aluminum in a clockwise direction such as my drill does. I use a Dremel grinder for this.After that I heat this little cutter up with a propane torch to CHEERY RED. (not orange or yellow because that's too hot) and quickly water quench it. It should be hardened then. Hit it with a file to see if it's hardened. (just like on "Forged In Fire") If it is, you're ready to insert it into the hole in the frame from the inside, chuck up your drill and ream the that hole enough to allow the 6-32 flat head machine screw to be flush with the inside surface of the windshield frame. Heres a few photos with captions to further illustrate what I did. One of the Photos is just how messy my bench gets what I several projects going. I hope this will be useful for someone in the future............Bruce


