Carlos G posted:One way of making a car lighter that is often overlooked, is looking at oneself in a mirror.
Hey, don't make Al start to think about getting a lot of piercings. They're really not becoming at our delicate age.
Carlos G posted:One way of making a car lighter that is often overlooked, is looking at oneself in a mirror.
Hey, don't make Al start to think about getting a lot of piercings. They're really not becoming at our delicate age.
@ALB Hi Al, before I did any adjustments, the wrist pins in grams were, 132.2, 132.6, 132.4 and 134.2. To reduce the weight, I used a small diameter grinding wheel that would fit inside the pin and took material off both sides.
Speaking of reducing weight, about 15 years ago one of my Pelican forum buddies was converting a 911SC into a 934 relica. He had done a body off pass through the chassis and drivetrain replacing bolts and nuts or cutting them down to the exact length needed to reduce weight. After doing that and some of the other things you described, he got his car under 2000 lbs. My frankenporsche (also a converted SC) weighed in at 2700 lbs to give you a sense of how serious he was. Just curious, do you know how much your 356 weighs after all of the things you've done to it?
Mike
Carlos G posted:One way of making a car lighter that is often overlooked, is looking at oneself in a mirror.
Now that's just hurtful/hateful. 
Mike....Maybe I missed it in your comments but how did you weigh the large end and the small end of your rods ? I know you recorded the total weight difference but then how did you determine which end (or how much of the total) you removed from each end ? I was surprised how much difference there was in the wrist pins !...............Bruce
mppickett posted:Carlos G posted:One way of making a car lighter that is often overlooked, is looking at oneself in a mirror.
Hey, don't make Al start to think about getting a lot of piercings. They're really not becoming at our delicate age.
Stan Galat posted:Carlos G posted:One way of making a car lighter that is often overlooked, is looking at oneself in a mirror.
Now that's just hurtful/hateful.
Don't worry, Mike, I'm not one for any piercings, whether they be for decoration or ink (which I guess is decoration as well). I'm not a fan of pain...
And Carlos, I'm with Stan on this one![]()
@Michael Pickett- did you notice the inner diameter of the pins being especially hard?
aircooled posted:Mike....Maybe I missed it in your comments but how did you weigh the large end and the small end of your rods ? I know you recorded the total weight difference but then how did you determine which end (or how much of the total) you removed from each end ? I was surprised how much difference there was in the wrist pins !...............Bruce
I'm sure Mike will explain what he did in more detail, but you have to build a fixture to hold the other end of the rod so it is level with your scale to get repeatable results.
aircooled posted:Mike....Maybe I missed it in your comments but how did you weigh the large end and the small end of your rods ?
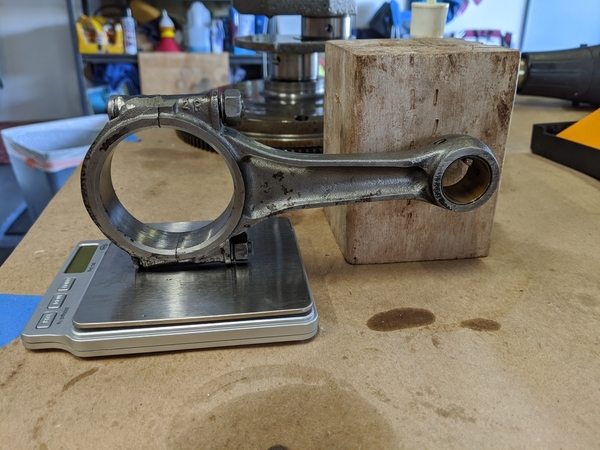
Bruce, I took a small 4x4 block and drilled one hole for the big end and another for the small. With a 1/8" bit positioned in either hole (smooth end out) the rod arm was level and I could weigh the big and small ends consistently. I marked squares in pencil around the scales and the block to make sure they didn't shift position and marked a landing zone on the scale for consistency. Rinsed and repeated until I could get the same readings.
This harebrained scheme was the third approach. The first two showed a lot of weight drift because there was too much surface area on the block side. In this case, smaller was better.
ALB posted@Michael Pickett- did you notice the inner diameter of the pins being especially hard?
@ALB - it was definitely hardened compared to the rods. I tried a drill bit inside one of the pins that needed a little bit removed and it just skipped around and didn't remove much. That's when I went to the little grinding wheel.
My first attempt to build the pulley end of the crank wasn't successful following the instructions in the VW Service Manual (178* oil bath). The cam timing gear scootched down about 1/8" and said "that's about right." I pulled it off and put the crankshaft in the freezer overnight (suffering through smart ass comments from Marianne about "What's for dinner?"). This morning I heated the oil until it smoked and it dropped right into position like it knew it was going home. Applied the spacer and the brass timing gear fell right into place, too. Had to buy the expensive retaining ring expanders to get the locking ring in place without scratching the #4 bearing surface. It only bit me once before agreeing to slip into place. Now onto piston rods and bearings.
mppickett posted:ALB posted@Michael Pickett- did you notice the inner diameter of the pins being especially hard?
@ALB - it was definitely hardened compared to the rods. I tried a drill bit inside one of the pins that needed a little bit removed and it just skipped around and didn't remove much. That's when I went to the little grinding wheel.
I knew the outside surfaces of the pins were hard but wasn't sure about the insides. A carbide drill bit is probably what's needed to remove larger amounts of material. I guess even the grinding wheel took a little while?
Thanks Mike...It sounds/looks like you were right on. I recall finding the balance point between the big end and the small end and marked this on the rods. This became the index distance between the pivot point of both ends when weighing the ends. This changed when I ground off some so I re-indexed that center point each time until I got what I wanted. I have to say that "blueprinting" an engine is one of the more interesting and exciting parts of engine technology. It doesn't cost much to do except time and produces significant results too !......Good on you Mike !.......Bruce
ALB posted:I knew the outside surfaces of the pins were hard but wasn't sure about the insides. A carbide drill bit is probably what's needed to remove larger amounts of material. I guess even the grinding wheel took a little while?
It went very quickly on the two pins that were a few tenths of a gram out. The other one took about 10 minutes of grind, blow out, weigh, switch sides and repeat. About 2 minutes in, I had to go find my welding gloves to prevent my fingers from cooking.
I did my top end over the summer. I didn't bother splitting the case, great oil pressure, no knocks, and 0.005" endplay. When Jake built the engine 45,000 miles ago, it was fully blueprinted and balanced. I replaced the pressure plate(as it had some bent fingers) and crank pulley(JayCee with hidden spark trigger wheel from the Dub Shop, machining and fabrication by me). So the whole assembly of pulley/crank/flywheel/pressure plate was no longer a balanced/indexed unit. Some people gave me flack for not splitting the case and re-balancing. It runs like a top, and I can discern no imbalance whatsoever, as smooth as it always was.
However, I did change the pistons and cylinders. New Brazilian Mahle 94mm "B" pistons for mild stroke(78mm). They were off a bit, I ended up removing 2 grams from one piston, and almost 6 from another to get them all the same. I used a grinder then a flexible small disc sander to smooth on the 2 gram heavy piston. On the 6 gram heavy, I took it to my friend Mike's and removed the 6 grams on a Bridgeport mill. All material was removed from the underside of the crown. 6 grams of aluminum was better than 1/16" deep and about 2 square inches and included the grinding boss.
Rods were already end-balanced when Jake built it, and all my piston pins were right on the money, no weight to remove there. Also had the heads redone so I'm basically back to a new engine again.
Keep going Mike, you got this! I really enjoy your posts.
Cool Stuff Mike.
Just thinking about what Danny did on his pistons gives some credit to balancing each component on an individual basis. ie balance the pistons separately from the wrist pins , balance the rods separately too. VS mate a piston with a wrist pin etc. to get everything balanced as assembly (piston, pin,rod) that equals the other three assemblies. If that is done and a piston change is necessary, the. other components of the assembly will no longer be in balance..............Bruce
mppickett posted:@ALB Hi Al, before I did any adjustments, the wrist pins in grams were, 132.2, 132.6, 132.4 and 134.2. To reduce the weight, I used a small diameter grinding wheel that would fit inside the pin and took material off both sides.
Speaking of reducing weight, about 15 years ago one of my Pelican forum buddies was converting a 911SC into a 934 relica. He had done a body off pass through the chassis and drivetrain replacing bolts and nuts or cutting them down to the exact length needed to reduce weight. After doing that and some of the other things you described, he got his car under 2000 lbs. My frankenporsche (also a converted SC) weighed in at 2700 lbs to give you a sense of how serious he was. Just curious, do you know how much your 356 weighs after all of the things you've done to it?
Mike
Hi Mike- The info I've read states that the early (pan) Intermeccanicas weigh in at 1700-1750 pounds when done. After I'm finished I expect the thing to come in at somewhere around the lower end of those numbers, and if it hit the 1600 lb. class I'd be thrilled. This is, of course, with a functional roll bar on board which will add 75? 85? 95? lbs.
And yeah, getting any 911 into the sub 2,000 lb club is quite the feat! And I know all about shortening bolts to exactly the length needed...![]()
@aircooled- How much work you put into it depends on how high you want to rev it (balance requirements for 5,000 rpm are different than for 6500 rpm), how smooth you want it to be and last (but not least) how anal you are.
@DannyP- I agree with you- with it's condition there was no reason to touch the bottom end, and certainly no reason to question the amount of work that went into the balancing, given the original builder's reputation. Glad to hear it's up and running well! If I make it to Carlisle this year I expect a ride, and you have permission to try to scare me silly!
Yoda out for now (I don't know why write that I do, we all know it's not true!)
That's OK, AL...
Here's a new, seasonal photo of you when you were a kid of, oh... 50 or so (from the Mandalorian):
As a youngster pretty cute I was! (and as long as we don't drag out that pic with the lipstick and the hoochie mama outfit it'll all be ok)
"Drag out," indeed :-)
Al valid 4 or even 5-point (petty bar) rollover rig in your car should not top 70 pounds. To pass SCCA Hill Climb tech inspection—8 pt with side impact protection and a front hoop over the windscreen—it would be well over 100. But please tell us you're not going that way...
Al. After you get through with the roll bar
and turn it to Swiss cheese that is... you should get to 50lbs but only if you have a drain channel made for rain.
IaM-Ray posted:Al. After you get through with the roll bar
and turn it to Swiss cheese that is... you should get to 50lbs but only if you have a drain channel made for rain.
Darn it, Ray. You beat me to it.
Sorry to disappoint you guys, but the roll bar is one thing I won't be drilling holes in...![]()
Yoda: Print the roll bar in a graphene-style structure on a 3-D resin-style printer. Lotsa holes, 5% of the density and 10 times stronger than steel (even impact resistance!).
Sorry Mike, it just hit me funny ![]()
I moved on to looking at the 043 Mexico heads and the intakes. The heads, as described by the previous owner were "racing heads." They indeed, had been massaged. Porting swirls down the intake and exhaust, 40mm and 35mm valves. Otherwise, nothing special. I decided to just make sure I was getting good flow from the intake manifolds into the heads.
The Erling gasket overlapped the rockers side of the ports. Plus, it was way too big for the Kadron manifolds.
Gasket trimmed to fit the intake.
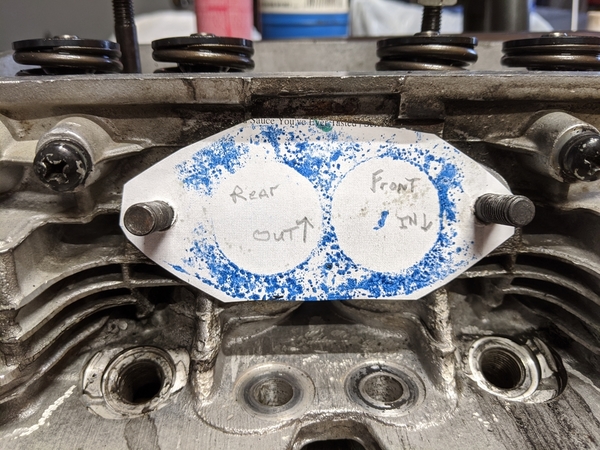
I then flipped the trimmed gasket and put it on the intake manifold and trimmed it to not block the openings. I made a thin paper replica of the trimmed gasket, cut holes to fit the studs, attached (blue masking tape) 2 positioning bolts on intake and made sure the paper gasket fit. I sprayed some paint onto a paper towel and coated the contact surface of the Kadron manifold, pulled it off and let it dry.
I labeled the orientations on the blue gasket and slid it into place on the head.
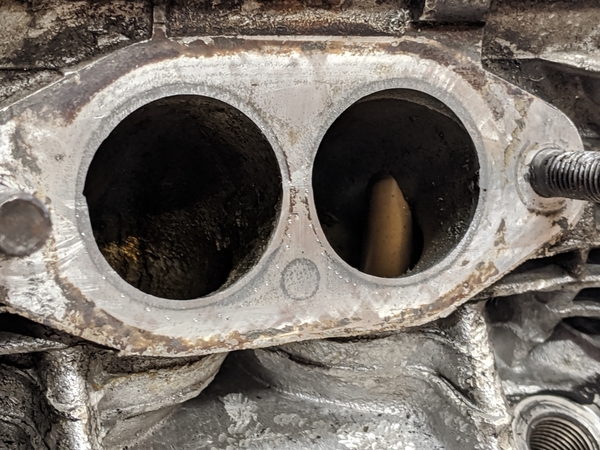
I rubbed the edges of the ports on the head with a pencil to get an outline. Using a dental pick, I followed the blue outline of the Kadron ports and put tiny indentations in the surface of the intake ports where the Kadron ports didn't overlap. Look closely on the lower side and you'll see a semi-circle of dots ranging up to 4mm outside the ports on the head.
The gasket had blocked the Kadron ports at the top and the port overlap had blocked them at the bottom. It had clearly gotten the full "race head" treatment. Hey, what do I know.
On a wild hunch that spinning a big drill would make me feel happy, I got out my porting burrs.
I matched the head intake ports with the Kadron manifold and blended a smooth passage to the intakes. I didn't mess with the porting that had already been done inside the head, I just made sure there was a straight shot in and curved edges.
I went ahead and cleaned up the Kadron manifold where it is welded to the coupling plate. There were areas where the plate edges intruded into the ports. I just smoothed those out.
One side down and I'll finish up the other side tomorrow. I find this kind of work very satisfying. I guess it hits my OCD just right.
Ols school : Sand the base of intakes perfectly level by using emery paper on a piece of window pane glass then moving the maifold across the emery paper in a sweeping " figure 8" motion then finish it off with a finer grit gets good results .
Alan Merklin posted:Ols school : Sand the base of intakes perfectly level by using emery paper on a piece of window pane glass then moving the maifold across the emery paper in a sweeping " figure 8" motion then finish it off with a finer grit gets good results .
Thanks, will do!
@edsnova- Just a 4 point, Ed, with the back braces going through the back of the passenger cabin and tying into the brace between the tops of the shock mounts. (Hopefully) It'll be a kafer bar type thing with a support on each side going from the top shock mount area to the frame horn end and another support going down to the torsion tube.
@Gordon Nichols- wouldn't that be cool!
@Michael Pickett-Looking good Mike! The further you can smooth those changes in flange shape up the manifold (so the change is more gradual) the better/more power it will make. And watch that the area between the intake ports doesn't get too thin or the engine may develop a habit of sucking that part of the gasket out, with rough running being the result of an intake leak that you can't find unless you take the manifolds off. If you use Alan's method to flatten the manifold bases don't go very fine on the sandpaper- leaving it a little bit rougher will help keep the gasket in place.
Alan, you forgot to mention How to Sand
Great work.
IaM-Ray posted:Alan, you forgot to mention How to Sand
HUH ? moving the manifold across the emery paper in a sweeping " figure 8" motion then finish it off with a finer grit gets good results .
Just kidding, Alan. Very interesting process.
@ALB, I've always subscribed to the theory that intake passages on carbureted engines should be be smooth to aid aid flow, but some texture should remain to create turbulence to more completely mix the gas and air. Too much polishing and too much texture is bad so finding a happy medium is what I've always shot for. My cardboard, duct tape, play dough and vacuum cleaner flow bench didn't get shipped out here from Rhode Island - since it didn't work...
Great point about the gasket between the ports!
Anyway, does that make sense? Thanks, everyone!
As an alternative method to think about, If you make sure that both the head mating area and the corresponding flange on the bottom of the intake manifold are really flat (that sanding on glass trick mentioned above) and it still sucks the center of the gasket out over time, you could delete the gasket and use Locktite 510 flange sealant in place of the gasket between the parts (as recommended to me by Jake Raby). Harder, but not impossible, to get them apart in the future, but they shouldn't leak.
Looking at your photo of the head, though, you've got about twice as much meat between ports as I do, so the gasket will probably be fine for you.
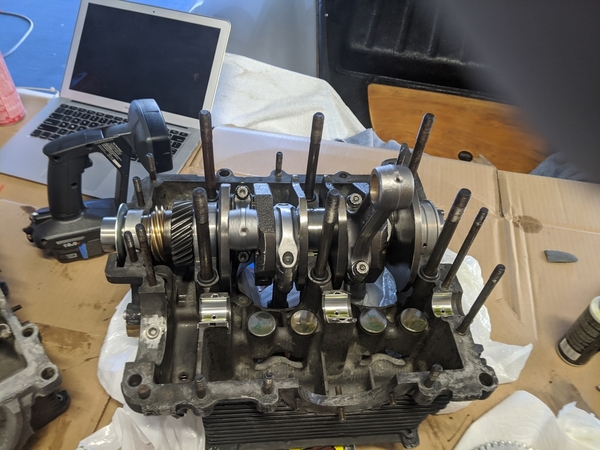
Progress report for New Year's week: all of the engine rebuild parts arrived and the fun began. Little things measured to 1/1000ths of an inch, cleaned, coated with assembly lube and torqued to the appropriate spec.

First the crankshaft, then the case halves, the bearings, the camshaft and lifters, and finally the piston rods. Sealing the case around the parts yields a complete short block.
The rings are installed on the pistons, the pistons gently inserted into the cylinders, the pistons/cylinders attached to each connecting rods using the wrist pins and the cylinders sealed to the case with aviation sealant.
The heads are bolted onto the cylinders and the valve train installed and adjusted to 5/1000ths of an inch gap. Valve covers installed and we've completed a long block.
The flywheel, clutch, pulleys, crankshaft tooth wheel, crankshaft sensor, oil cooler and engine tin are installed and the engine is ready for installation.
Oh, then I spin a heavy duty drill handle into my right hand. I've done it at least 20 times while building this car and escaped with bruises and very sore fingers. This time I heard a pop and while icing my hand, I figured that I'd broken a finger and maybe a wrist. Thirty minutes later the x-rays show a neat diagonal break on my 4th finger and that my wrist was just fine. A custom splint cast and wrapping later I was back at home taking ibuprofen and continuing to ice it. The strategy worked. No real pain and I was able to do a few low stress tasks before going out to pupus with friends at the beach. Here's a picture demonstrating how to measure 3 fingers of scotch. Could have been a lot worse!
Access to this requires a premium membership.
Supporting members have donated about $4.00 a month ($49.00 US per year) paid annually.
AUTO RENEW: You membership will auto-renew after 12 months. If you prefer not to auto-renew, you can cancel your premium membership at any time and it will remain in effect until the end of the 12 months. To cancel, sign in at SpeedsterOwners.com and navigate to: (Your User Name) > Premium Membership.
PLEASE NOTE: Your credit card will receive a charge from CROWDSTACK PAY, the payment processor, not SpeedsterOwners.com.