Agree tenfold Gordon..........Bruce
Well said, Gordon!
I've got a door hinge question for the CMC/IM crowd. I am missing a few of the 3/4" spacers that fit between the hinges and the supporting frame post. Is 3/4" still the recommended spacer length for all 12 pieces? I suspect that individual cars may need some adjustment for best fit, but I couldn't see whether any best practices had emerged around spacer lengths. Thanks!
hmmmmm.....No answer yet? Been over 20 years since I messed with them so let me go take a look and report back. I seem to recall abandoning some of the CMC-supplied spacers and going to something else so I'll check my notes. gn
On the CMC or FiberFab speedster, no spacers are used at the hinge plate to the door or door jamb mounting locations....there have been a number of speedsters that I have added a washer between the hing to get ta better door to body alignment but none had 3/4 spacers. Perhaps they are specific to the IM?
No, I think they came on the CMCs, FiberFab and old IMs. Both the FiberFab and the old CMC manuals reference 3/4" hinge spacers, but the CMC one says you can shorten them to move the door inwards. Maybe most folks had to do that. The ones that were with my disassembled car were 3/4" long more or less. I'll try it out with and without and report back. Thanks,
Mike
Mike can you post a photo ?
My CMC was a deluxe kit that had doors premounted. In an early build manual I got from CMC it did address cutting twelve 3/4" shims from the aluminum suppied for mounting the door.

Attachments
Ok, back from a great 2 weeks visiting family in Japan. Every time I go I marvel at the safety, the thousands of unlocked bicycles in big cities and the general level of what we in Hawaii would call the aloha spirit. Neat folks.
I've got my IMs doors test fitted and adjusted. This forum was very helpful, but evidently a gentleman named Corey had shared a step-by-step that I was never able to find (looks like he's no longer a member (Projekt Hoopty?). Anyway, I went ahead and started the setup with 12 - 3/4" long pipe spacers between the door posts and the body side hinges. I suspect each car may have small differences depending on how the body frame jigs were set up. In my car, the body frame had been rebuilt totally, so I ended up tweaking the spacers (1/16" out on the bottom and 1/16" in on the top). Here are the steps I followed:
Adjusting CMC/FiberFab/old IM doors
- Tape about three pieces of cardboard to the door sill.
- Sit door on the cardboard spacers and look at how the bottom gap appears. It should be level and less than 1/4 in
- Look at the rear of door gaps and the front of door gaps. To get the door to actually fit within the door frame, it's likely that you'll need to sand off of some the rear door edge and some off of the top front inner edge of the door. Start first on the front of the door towards the headlights. look at the existing gap and try to make it consistent from bottom to top. You will probably have to sand some of the outer edge of the dashboard to allow the door top to fit flush. It's okay to carefully sand some material from the front top of the door where it touches the dashboard. Slide a piece of paper in the gap to find tight spots and mark the area that needs relief with a wax pencil. Once you have at least some small gap all the way along the front of the door, move to the next step

- Sand the rear edge of the door so that it will fit within the body frame. Don't take off too much material at this point You're just trying to get the door inside the frame.
- When the door will fit flush in the frame on the front, back and bottom start looking at your gaps and decide where you need to take material out. Sand just a little bit at the time until you have at least a little bit of a gap all the way around. Don’t look for perfection yet and don’t take too much out.
- Insert 3/4 inch long pipe spacers into the hinge bolt holes in the body until they butt up against the frame. Attach the hinges to the body frame and tighten firmly (small part of the hinge attaches to body, large part attaches to door).

- Remove the cardboard spacer from the floor and attach the door to the hinges loosely. Rest it on something while you line up the bolts and bolt plates. Remember to use two short bolts on the top of the top hinge. Tighten slightly until the door can still be moved but will hold the position.
- Try to close the door and then do some gentle adjustments to the bottom gap and the front & rear gaps. Loosen and tighten the hinge screws as needed to shift the door.
- Once you can get the door within the frame, work on getting an even bottom gap - 1/8” or so.
- Once you have a fairly even bottom gap, see if the bottom of the door is even with the edge of the body. On both of my doors, it was sunk a little inwards from the body along the bottom edge gap. If it is inward, you will need to add spacers on the body side of the small pipe spacers to move the bottom hinge outwards. If the bottom edge protrudes past the body, you will need to grind down the pipe spacers 1/16th inch or so.
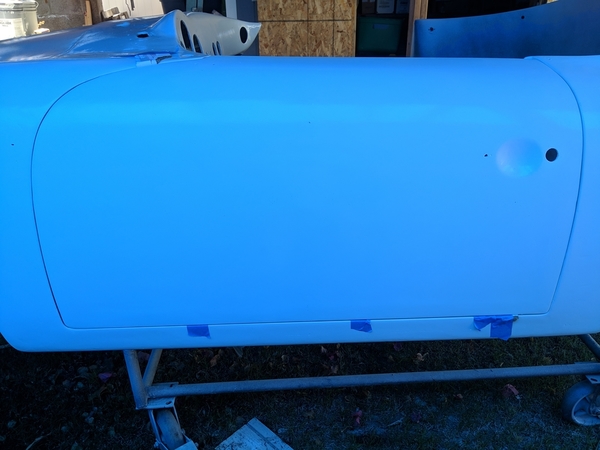
- Before removing the hinges, take a pencil and mark around the sides and front of the hinges where they currently are located. This makes it easier to get back to your starting point. Remove the bolts from the hinges and take the door off. If the bottom needs to come out, add three flat washers to the screws attaching the hinge to the body at the bottom. If the bottom needs to move inward, remove the pipe spacers and grind off around 1/16th inch from each one.
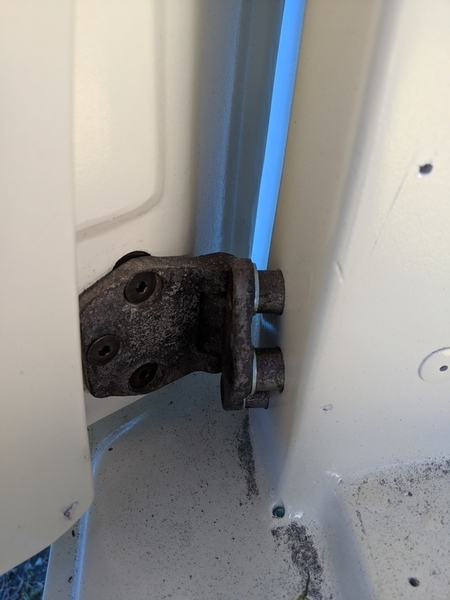
- Reassemble the door hinges hand attach the door again putting the hinges back at the marks you made.
- Close the door and check the bottom gap again. Repeat the adjustments as needed until the bottom is flush. These adjustments will alter the flushness of the top of the door and may squeeze out any gap you had along the top (sand a small amount if this occurs).
- Check the top of the door and see if it leans out from the body or leans into the body. If the top of the door leans out from the body then you will need to take the pipe spacers out and grind them down a 16th of an inch or so to help move the top back in. Keep adjusting the top spacers and the bottom spacers until the door is flush at the top and the bottom.
- Once the top and bottom are relatively flush, you can finalize your edge gaps. Recheck your gaps all around the door at this point. You're on the final leg now and can use fine adjustments to the hinge positions and edge sanding to achieve the gaps you want
- If you have done all of the adjusting and have achieved good gaps and flushness with other body surfaces but still have one corner or part of a door edge that sticks out, you will need to sand the surface of that corner until it matches the body outside of the door. I run a paint stirrer across the gaps to see if it strikes an edge that is sticking up. I mark those spots with a wax pencil and then open the door and sand across the edge to lower it.
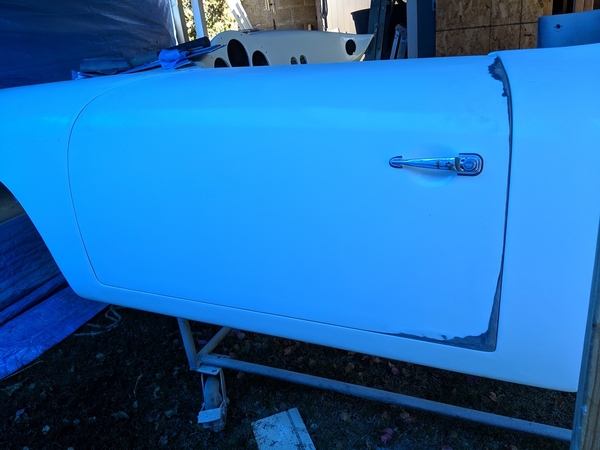
- Don’t look for perfection. If you are doing these things, you’re going to be doing some touch-up or a total repaint. There are opportunities in the filling/painting stages to make the surfaces match up well.
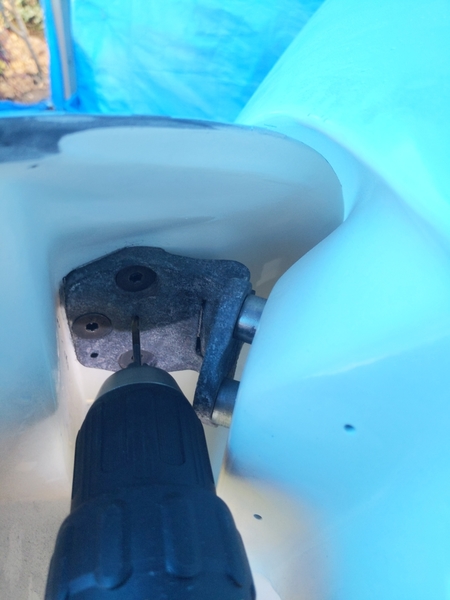
- A final important step: drill two small nail-sized holes in each hinge where it attaches to the door. Go all the way through the hinge, the fiberglass and the bolt plate. Label/mark and keep each hinge with its matching bolt plate. Mark the side of the bolt plate that faces the hinge. This way, using nails/pins in the locating holes, you can return to your alignment on any particular door if you have to take it off (say for painting) in the future. Keep each hinge/plate pair in a separate, marked zip lock bag to be sure they don’t get mixed up.
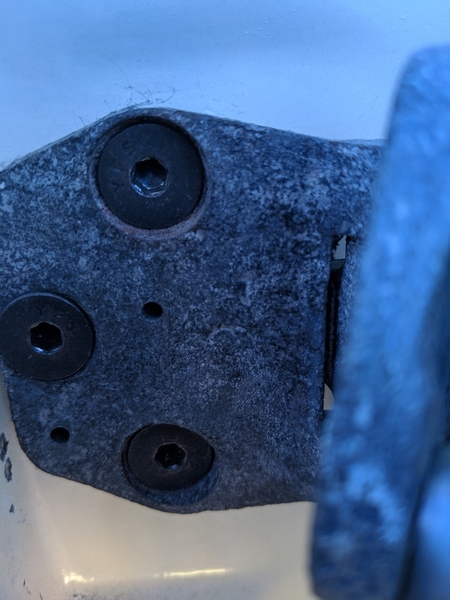
Have a great weekend everyone!
Mike
Attachments
^ Brilliant! ![]() @Michael Pickett
@Michael Pickett
That looks pretty dang good. BTW, Cory is still here but under a different name. @Cory Drake is his name now.
I have been summoned by a mysterious email saying I’m still here.
I’m not, really. I’m on the facebook page, but not here — partially because of stuff like this. Navigating this site, with a tub of people using made-up names, is not my cuppa.
I can’t find what it is I’m mentioned in or what the relevant connection to me is with a door hinge (which looks really nice, by the way), so I’m headed back to the hermitage.
if you need me, please use the phone. :-)
Cory Drake posted:I have been summoned by a mysterious email saying I’m still here.
I’m not, really. I’m on the facebook page, but not here — partially because of stuff like this. Navigating this site, with a tub of people using made-up names, is not my cuppa.
I can’t find what it is I’m mentioned in or what the relevant connection to me is with a door hinge (which looks really nice, by the way), so I’m headed back to the hermitage.
if you need me, please use the phone. :-)
(and get off my lawn!) ![]()
![]()
You can get used to "new things" if you really try, @Cory Drake.
mppickett posted:
Alice and I arrived at this station a couple of years ago. Stayed at the hotel across the street. So upscale and crazy-busy. Enjoy your trip!
Cory Drake posted:I have been summoned by a mysterious email saying I’m still here.
I’m not, really. I’m on the facebook page, but not here — partially because of stuff like this. Navigating this site, with a tub of people using made-up names, is not my cuppa.
I can’t find what it is I’m mentioned in or what the relevant connection to me is with a door hinge (which looks really nice, by the way), so I’m headed back to the hermitage.
if you need me, please use the phone. :-)
I guess scrolling up a few comments was too hard.
Anyway, Mike the job you did looks fantastic. I'm going back to Facebook too where there are just as many people with made up names but since they're my friends I know who they are. Oh wait! I know who everybody is on this forum too, even those with made up names.
Sounds like exciting times back when the board changed software. Incidentally, @Theron, I don't have a problem navigating or searching (although I sometimes am clumsy in finding). Nice job and many thanks for keeping this place running. I was one of the first non-Harvard Facebook users back in aught-6 and still have a love/hate opinion about it. I didn't know about the speedster owners group and have signed up for it on there, too. You can never get enough speedster info. Thanks for the kind words regarding the little door set up post. Truth be told, with my memory these days, I might be someone who benefits from it. Cheers,
Michael Phillip Pickett (Mike, please)
Mike,
I've been Cory's friend for years. He can get cranky when he hasn't had his Metamucil and morning constitutional. Plus, he found some crabgrass and two dandelions in the yard this morning, and getting the sprayer out is going to eliminate his nap.
I think you have it all figured out, but he's a good dude with a hangover grudge that has nothing to do with you or anybody else on this site. Losing all his build pictures in the migration from Theron's old site to this one makes him super-reluctant to engage over here. Pity, though-- IMHO, the FB format makes continuity of thought a lot more difficult. Plus Mr. Zuckerberg has a tendency to root around in places he ought not be.
It's a big tent, and there's room for both spaces.
Also, in the spirit of thread drift and on the topic of FB, I give you
"Opinion Rhapsody":
No troubles at all, Stan. Cory said my door hinge looks really nice so he's obviously got good taste :-) Seriously, while looking for door info I came across a lot of his old Projekt Hoopty work and saw that he has amazing skills and creativity. I'd be upset, too if I lost a lot of things I cared about. I was actually delighted to find out where he's hanging out now. It would have been a shame for the community to lose the kind of knowledge that he obviously possesses. Re: FacePlant - if you want to see a million pictures of the most beautiful and talented 2 year old on Maui as well as examples of a warped sense of humor, just look me up there. I occasionally post speedster build updates on my wall, but nobody really understands what I'm doing. I'm in total agreement about the trustworthiness of the Zuck. It's just business for those guys.
I like the tone, friendship, humor and supportive folks on this site. Having to keep thousands of faculty members happy (all smarter than me and each other) for several decades means I just don't get offended easily so please rest assured that I'm just fine. Thanks for your explanation and humor, though. It's always good to understand what is going on with folks around you.
Mike
Stan Galat posted:Also, in the spirit of thread drift and on the topic of FB, I give you
"Opinion Rhapsody":
Oh my gosh, this is the most brilliant thing I have seen for a while. Thanks!
Stan Galat posted:Plus Mr. Zuckerberg has a tendency to root around in places he ought not be.
I deleted my FB account a couple weeks ago for just this reason.
 Hi, Mike. Cory again. I went back and re-read what I had said a couple days ago, then what followed. Sorry about being so curt.
I do like what you've done, especially the part where you took a great deal of effort to explain how the steps related to each other, and how each step of your process is built upon the last. Marking nails and using them as guides is brilliant, as is your writing on how and why.
The only thing I would add is to color-code top, middle and bottom. I put paint on everything, but in order to make the different pieces make sense, especially with the different pieces of pipe as spacers, that's what I'd do. Red-yellow-green or something, before they get bagged in the future (like you said, for paint or patch-work).
As has been pointed out, I did record all of my advice to "future me" here, from my wiring diagram and fuse arrangements to wheel offsets and sources for parts. I was counting on the old site to be my archive, and most of my critical stuff was in the captions for my build's photographs. I didn't have a reliable computer at that time (2005-2007), and was spending long hours every day I wasn't at work literally buried in a garage. It was quite a lot of information, and none of it got saved in archival form.
I think it's safe to say my entire build was documented here, from the time I cut into the body with a reciprocating saw and threw away my perfectly good Speedster seats, right up to the day I did a burnout leaving the garage.
It's all probably searchable, but there're just hundreds of posts and thousands of detail photos out there -- floating around -- and searching them out is like throwing darts into a lake to catch one particular fish. I find it frustrating, moreso because I'm old enough now that I'm beginning to forget things I know I typed up.
Stan and Danny have brow-beaten me sufficiently. I've got a little more time than I did the last time this came up, and maybe a little more patience. Your efforts are much cleaner than mine were. You're writing with brilliant style, and I think I might just have to settle into a comfy chair now and again and check in on what's happening here.
No promises, but thank you for doing interesting things.
Attachments
I like this, but no group hugs or talking about our feelings, eh?
How about beer, fire and a little kumbaya at Carlisle, what’s says you @Cory Drake?
Kumbaya
Is that some sort of 16-year-old Jamaican rum?
BTW Mike you car looks amazing, I’m sure you are counting down the days to get her on the road to Hana.
Cory Drake posted:
Cory, thanks man. Glad to see the Hoopty is still looking good. That's a great idea about a touch of paint on things to indicate position or order. I'll definitely take that approach before final paint disassembly. I've moved onto fitting the luggage compartment cover and latches. Thanks again and hope to see you around here or on the FB group. Your projekts are great inspiration.
Oh, as a postscript, I've become addicted to Google tools (Chrome, Keep for lists, Docs, Sheets and Photos). Since I use a Google phone and Google Fi is my carrier, every photo I take is automagically backed up to Photos. I dummy up my SOC posts in Docs and then just copy/paste to the website. I've lost enough stuff in my life to just want backup done without ever thinking about it.
Mike
Joe Fortino posted:BTW Mike you car looks amazing, I’m sure you are counting down the days to get her on the road to Hana.
Ha, you've got it exactly right! I put in a 12.5 gallon gas tank just to make sure that trips around the Hana side or the North shore would be easy. Stop by in a few months and we'll see :-)
So, it's getting to be decision time on several key rebuild issues. The hood, dashboard layout and the exhaust. I'd like to share my preferred approaches and would appreciate well considered opinions and criticisms. Remember, my goal is a serious tribute to not only the greatness of the 356 speedster, but also the long, serious racing history of Porsche.
 I've pretty much settled on this steering wheel and gauge set up, but let me know what you think.
So, don't get me wrong, I think the rear end aero is just wrong, but I have to say that the front end and hood treatments might give me the extra 10ths of a second that I need in street mod 2.
Okay, now I'm really conflicted about the exhaust system. I've narrowed it down to either this one or another, totally different approach.
 I have to say that I am a little bit inclined to go with this approach since it's likely to give me the best clearance over speed bumps.
Like I said, I'm struggling here and could use some good advice. Some days I don't even know what day it is I'm so conflicted. Thanks!
Mike
Attachments
As the good sisters used to say: You're bold as brass, young Master Pickett!
Mike, I think this is the better option:
While it doesn't appear to be the 'four into two into one' extractor design that's preferred for our engines, it will probably be free-flowing enough for anything under about 20 liters displacement. The only downside is that heater boxes will be very expensive.
And, despite appearances, the other one is not a legitimate exhaust system:
This was an early attempt by Mercedes to get their turbo diesels to run as cleanly as Volkswagen's. Only one of the 24 pipes is connected to the engine. The rest are fakes.
The thinking was that there was only a one in 24 chance the smog station would test the actual exhaust pipe, so you had a 23 in 24 chance of passing your smog test. If you failed, you could just bring the car back the next day and what are the chances they'd pick the right pipe twice in a row?
From an engineering perspective, this is actually a much simpler solution than what VW came up with.
Have a nice April.
Attachments
Mitch, I knew I could count on you for good advice! Oh, and no heater boxes needed in Hawaii :-)
Has anyone heard anything lately on this build and the gentleman doing the building?
Todd M posted:Has anyone heard anything lately on this build and the gentleman doing the building?
He's been on vacation.
Robert M posted:Todd M posted:Has anyone heard anything lately on this build and the gentleman doing the building?
He's been on vacation.
Thanks.
How do you go on vacation from Maui?
And... he's back. First the trip to Japan and then having the flu (brought home by my wife and the 2 year old from art class) and finally a few weeks in NC to attend 3 family reunions. I'm finally back to my "fighting" weight, or at least my TV binge watching weight.
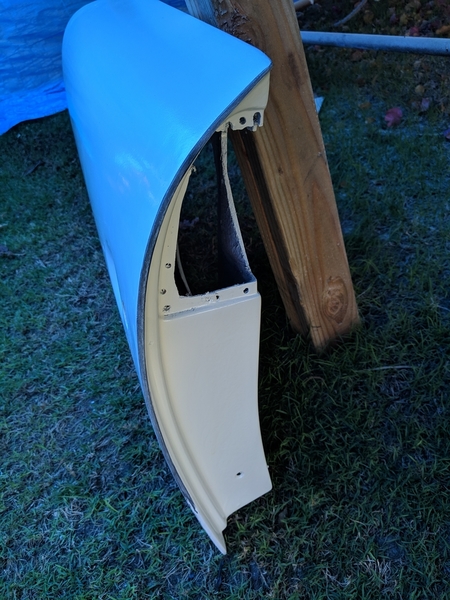
It's getting warmer out here (around 70* in the morning and 90s in the PM). I've made some progress with body filling and sanding the hood and fenders, but the Evercoat Rage Ultra sets up too quickly in the warmer temps. I've taken a break on the body work and have some of the Rage Ultra Xtra being delivered today. They claim setup times at around 20 minutes, so I expect I'll get at least 10 minutes before my puddle becomes a lump.
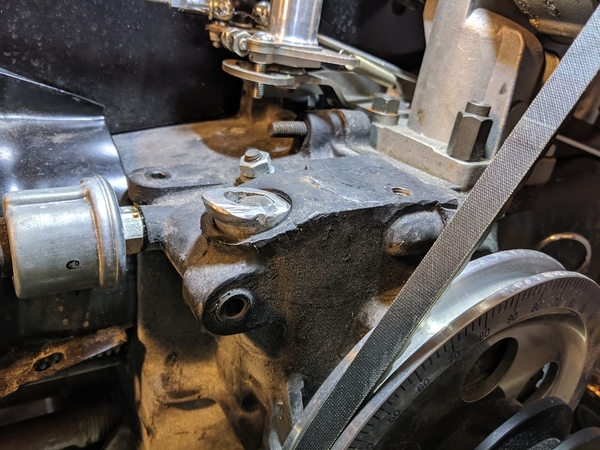
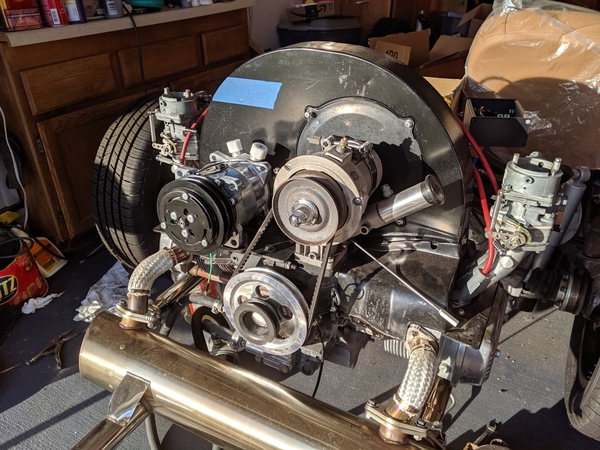
In the meantime, I've been fabricating a mount for the Sanden SD7H14HD AC compressor (model 4647). As you may recall, I removed the distributor and setup electronic ignition to open up a space for the compressor. During the body test fit, I marked the fan shroud with blue tape to indicate the highest point the compressor would fit under the deck lid. Here's a few pics of what I put together. It's way under the top limits and I'm happy with the fit. I ended up using a fractional horsepower v-belt (read lawn mower). If anyone needs something like this, NAPA carries them with a part number of 4L300W (1/2" x 30"). If you need slightly different lengths, a 31" belt would be 4L310W and so on. Amazon carries a variety of lengths from D&D Powerdrive with part numbers 84300 (30"), 84310 (31") etc.
The condenser and fan will be located between the back seat area and the firewall. I had two long hoses made up (14.5' of #6 and 19' of #10). It cost me $280 and made me regret selling my AC hose crimping tools before retiring out here on the island. But, how many more times will I be doing this, right Alan?
Here's the open space where the distributor used to be. I plugged the hole with a cut-off distributor shaft filled with JB Weld. I cut the shaft at an angle to provide additional level space for a mounting plate. The distributor clamp bolt can be seen in the middle. It's at an angle, so I fabbed up a bracket that followed the angle down to the edge behind the oil pressure sensor. That bracket then angles up to the end of the mounting plate and the whole support bracket welded to the bottom of the mounting plate. This adds additional thickness to the plate and horizontal rigidity.
Below is a test fit of the mounting plate. A 1"x1" notch was later cut so the bolt in bracket underneath could be easily accessed after the bracket was welded to the mounting plate. The plate is 3/16ths thick. I suspect the bracket underneath adds enough rigidity to keep anything from vibrating. Time will tell, I've had some interesting sounds emerge from supercharger brackets that 'should' have been just fine :-)
Below is the Sanden bracket laid on top of the mounting plate. In this picture, it is turned 180* from where it should be. You want the long ears closest to the center so you can add tension to the belt when you are adjusting. Once I got the bracket where I wanted it (so the drive belt and compressor would be correctly aligned), I center punched and drilled four holes in the mounting plate to match up with the Sanden bracket.
Test fit of the compressor. The blue tape marks the highest point that the top of the pulley would clear the deck lid. We're way below the interference line and a shorter bracket should put less stress on the mounting points.
Final mounting setup with everything set up with loctite, adjusted and tightened. Phew, this setup was one I've worried about for a while. It turned out to be easier than I feared.
I may need to clean up the engine a bit before I finish. It's showing a little bit of what happens when you live close to the beach and have 20 mph winds every day.
Attachments
BRILLIANT!! ![]()
Fabrication God! Looks awesome.
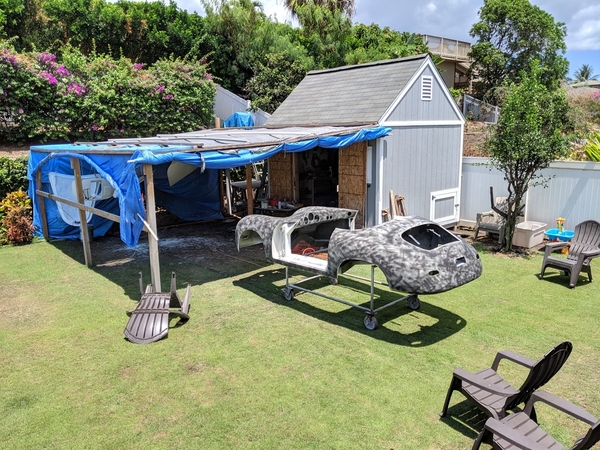
As you may have seen on the news, Maui has been burning since yesterday. We're fine and there hasn't been much property damage, but our town was cut off from the rest of the island yesterday (roads in & out closed). I donned my good filtration mask and finished filling/sanding the body. Here's a picture of the second guide coat. I'm much happier with the progress at this point, although I may be approaching the 40 hr limit...


