I finally need to get off my duff and build some side windows. I've got the lexan, stainless posts and assorted McMaster-Carr seals based on the great threads that have gone before ( @Lane Anderson@Jack Crosby, @Alan Merklin , @Stan Galat, @Gordon Nichols, etc).

With the exception of some of Lane's photos, most of the pictures referenced in the posts were lost in the server restructuring year back.

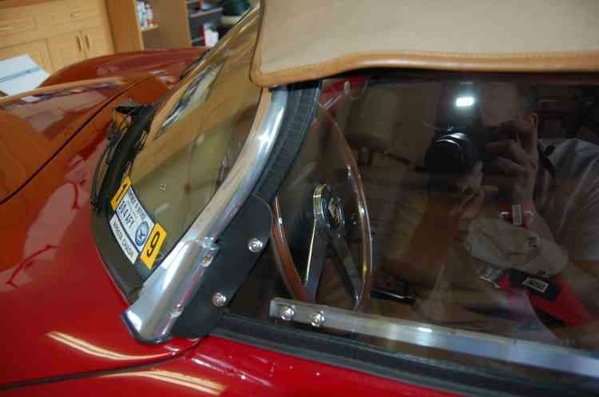
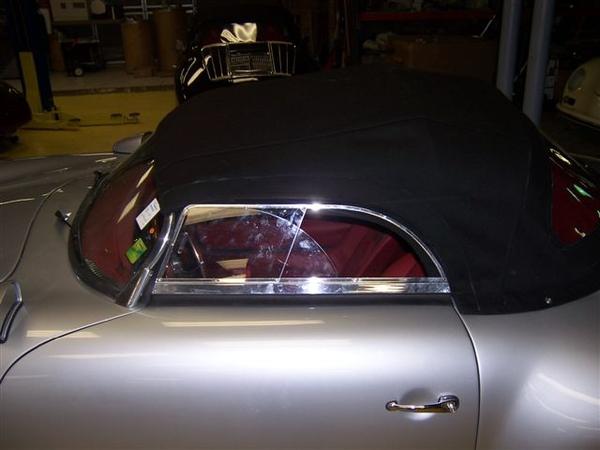
Having never seen actual windows in the wild, I'm wondering if any of you who like their side windows would be willing to take a photo or two of them not attached to the car. I'm particularly interested in the sealing area at the windshield and any suggestions for how to approach the sealing. I do understand that it will very likely leak no matter how I do it. I'm just looking to reduce the flow to a gallon/minute or less...

Also, I'm guessing that the trick to opening and closing the door with the window attached is that the fit at the top and back is loose enough to move the top fabric over the window. Is that a good guess?

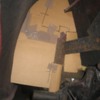
Here's a pic from one of @Lane Anderson's posts. Some views of this part unmounted from the car would be amazingly helpful. Thanks in advance!

MikeSide Window_0003

Attachments

Images (1)
  • Side Window_0003
Original Post

Replies sorted oldest to newest

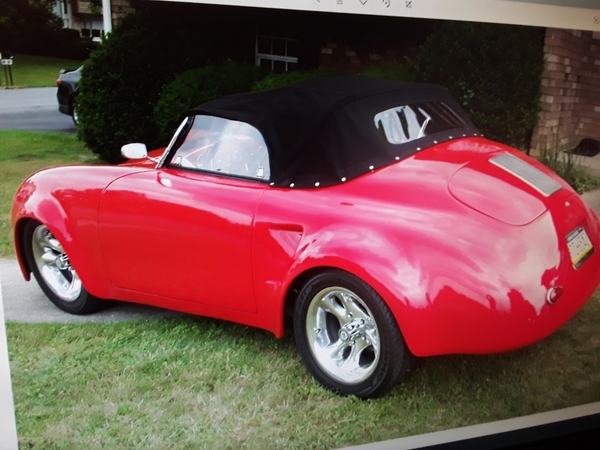
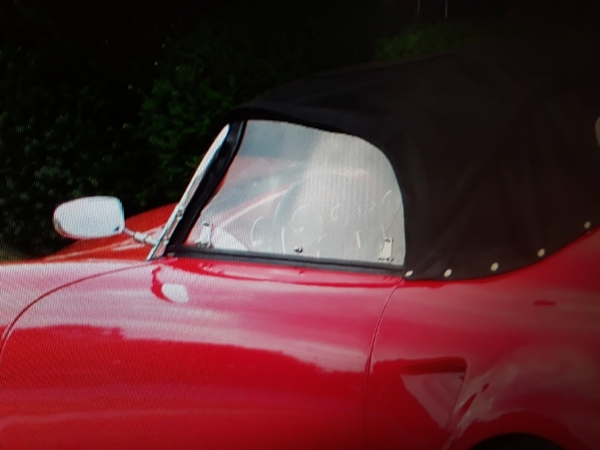
Lexan Margard side curtains, not the greatest photos but I am three weeks away from doing a set for the Speedster I am building. The leading edge I tuck behind the windshield frame and that rubber rests against it.  On several cars I cut the ends of the header bow at an angle to better accept the top of the side curtain. These pics do not show that.


20200430_15081620200430_15053120200430_150534


Attachments

Images (3)
  • 20200430_150531
  • 20200430_150534
  • 20200430_150816
Last edited by Alan Merklin

I built my side curtains when I installed my Stayfast top, so some fab and install info is here:

https://www.speedsterowners.co...t-top-on-a-speedster

Fresh photos from today:  I used Lexan sheet that is 1/8" thick.  If I did them today I would use 3/16" or 1/4" to keep them from warping out at turnpike speeds.  If you never go above 60mph, 1/8" is fine.

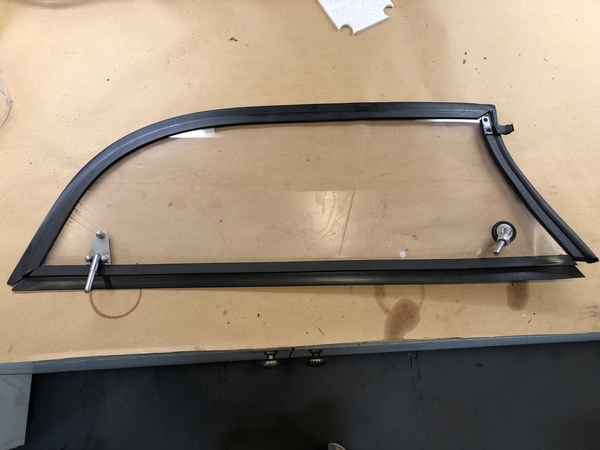
Mine look like this (Driver's side shown).  As you can see, because of the short height I went for maximum "glass" exposure so I don't have those fabric borders on them (and the front seating peg is not straight - That's fixed a few photos down).  The leading curve corresponds to the curve of the windshield (see convertible top info above for details) and technically they fit just along the inside edge of the windshield frame, not butt up against the frame.
IMG_0703

I got the idea for this front mount from Ola Miltorp on here years ago.  Simply bend a 5/16" stainless steel bolt to the proper length, height and angle and cut off the head.  WAY better than the original CMC mounts.  Takes a bit of trial and error to get the Lexan angled right, but doing so eliminates leaks along the leading edge.  

I also seem to be unique in that I gently heat the Lexan with a heat gun and gently bend the forward lower corner inward to correspond to the shape of the lower corner of the windshield for a perfect fit.  Careful - Too much heat too fast will cause bubbles inside of the Lexan.

IMG_0704

This is the tubular seal for the leading edge of the glass.  It came with the CMC kit, but McMaster Carr has it, too.  It is just pushed on and the "U" channel has metal fingers inside to grab the Lexan and it doesn't pull off (they may have it at local auto glass places, too).  The other rubber gasket all around the Lexan was from CMC but again, McMaster Carr.  1/8" channel with a 1-1/4" fin down one side.IMG_0705

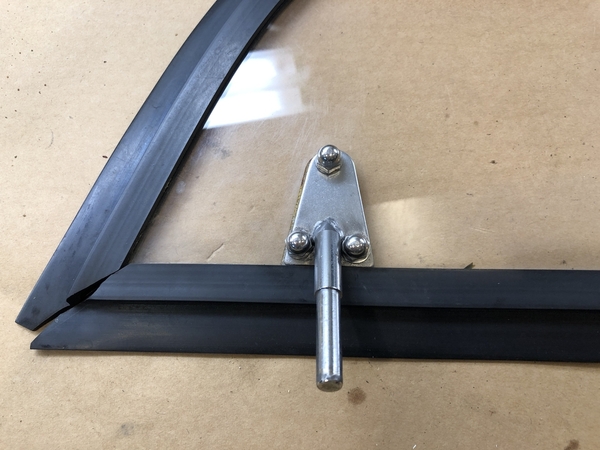
This is the original CMC window mount.  They work.  I can't say anything bad about them, they're just functional and not elegant.
IMG_0706

See?  Ola's design is a lot cleaner and looks right in the car.  Put a nut, s/s washer and rubber washer on each side and snug them up.  The outside has an acorn nut that looks nice.  The other nut down the shaft is a nylok stopnut used just as a depth gauge when installing the window.
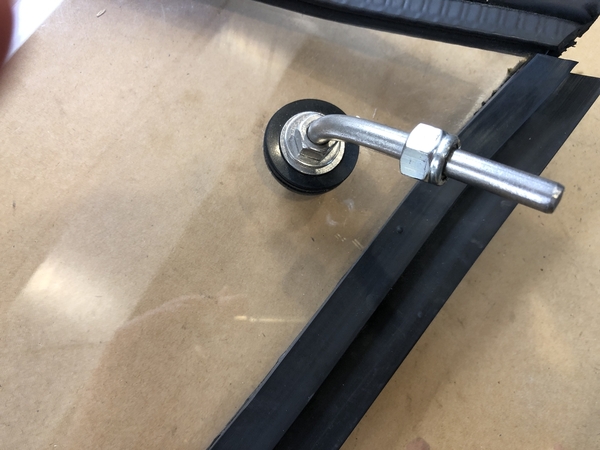
IMG_0707

I added these clips to prevent the upper leading corner of the Lexan from ever pulling out at 70+ mph when passing a semi-trailer and sitting in their vacuum wake alongside.  They work great, but the 1/8" Lexan allows some bowing at mid-length that 1/4" never would allow.  They come from a bi-fold door hardware kit.

IMG_0709

And this is a cross-section of the tubular, leading edge seal.  It came from CMC and when properly installed it works great.  Once installed, it stays there.

IMG_0710

Now, to get a really good seal, read my top installation article up above, but I blasphemed both the Porsche Purist and Replicar crowd by making the side windows a few inches longer so that they go past the end of the door to fit into the rear of the top's side window pocket.  That is a huge improvement in sealing against rain, along with reducing the pocket's height along the top of the Lexan to hold the Lexan in place.  There is also an anchor snap on the bottom inside of the top to hold the bottom rear corner of the top's pocket tight agains the Lexan seals.  With normal length windows, that pocket is often exposed like an air scoop funneling wind and water into the cockpit behind the seats.  Tucking the Lexan into the pocket at the edge of the door can allow a big hole at speed.  Allowing it to overlap the bottom of the side pocket closes that gap completely.
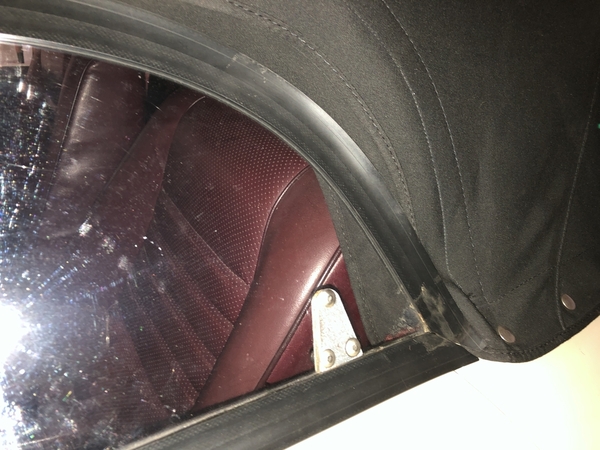
IMG_0712

Close-up of the lower rear corner of the Lexan
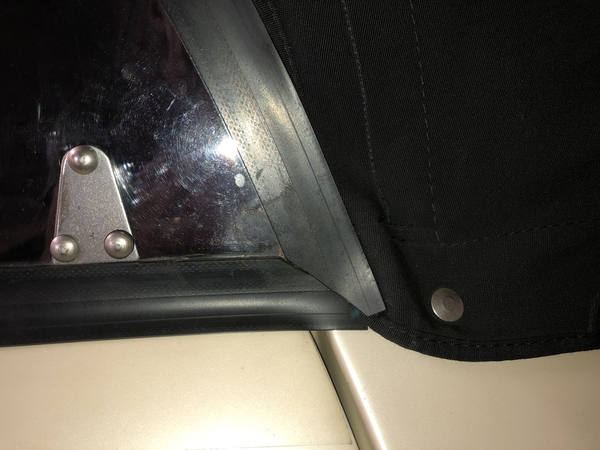
IMG_0713

Here's the front seal in action.  Properly fitted, it allows zero water intrusion.  See where the bottom corner is bent in slightly to make everything match top to bottom?

IMG_0714

Bottom of same seal.  Yes, the bottom rubber seal could be made to fit (look) better.  I'll leave that up to you.
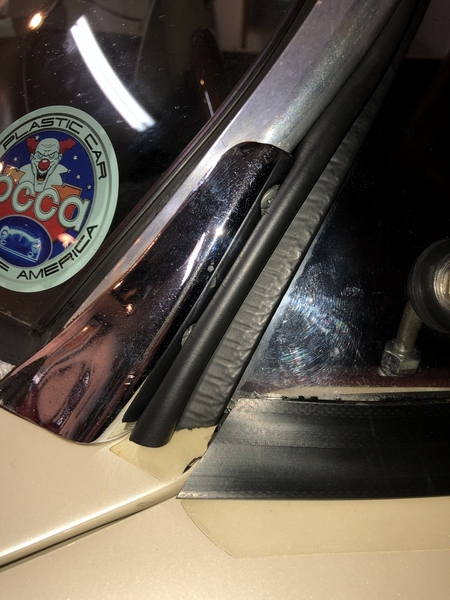
IMG_0715

Now, once you get a top and side windows installed, you may notice that you have trouble seeing overhead stop-lights in downtown Kihei (if they even HAVE stop lights there) when you're first in line at the light.  I have a solution for that, too.  Get a stoplight fresnel lens from LightInsight.com and put it at the very top of your windshield right in front of the driver.  Best $20 bucks you'll ever spend.  It looks up at the light that is out of sight because of the low convertible top.  Here, you can see my shop lights overhead (and the area above the cabinets) in front of the car that you can't see because the convertible top is in the way.  And it is a static-cling, too!

Frikkin awesome.

IMG_0680

Attachments

Images (13)
  • IMG_0704
  • IMG_0705
  • IMG_0706
  • IMG_0707
  • IMG_0708
  • IMG_0709
  • IMG_0710
  • IMG_0703
  • IMG_0712
  • IMG_0713
  • IMG_0714
  • IMG_0715
  • IMG_0680
Last edited by Gordon Nichols

Gordon, Allan and Lane have written the book on fabbing lexan Speedster windows. I made a few starts but was never satisfied with my result and so I opted for improving the stock windows---in my case the ones from Kirk Duncan's Vintage Speedster Mfg.   My original windows failed to fit snugly up into the slot in the convert top, front and rear to provide any sort of a seal.  So I had an upholsterer sew  a couple of inches of the same fabric used around the windows that came with the car around the original window.  There are pictures posted here with measurements.  It's far from a perfect solution and I'd call it "water resistant" but not water proof. 

The window improvements are all a piece of the puzzle of preventing water intrusion and I have spent many hours to have dry floors even in driving rain, dry thighs with no more water dripping on my legs from under the rivet holes made under the windshield, water from the center of the top of the windshield and wetness in the front trunk.  The Vintage, SAS and CMC cares aren't Miatas and not even IMs and require some mods to get them trip worthy in bad weather. But it's possible and  we do love them, don't we?


Last edited by Jack Crosby

The guy from Ohio ( red flared speedy with matching trailer) he  had made a set of aluminum sliding windows but still had to work in the weather stripping . Haven't seen him here for a few years though. The sliding window  in the below photo is way expensive and doesn't seal well at the windshield.

Careys side windows

Attachments

Images (1)
  • Careys side windows
Last edited by Alan Merklin

If I recall, “the guy from Ohio” was quite an artist and made his living, or at least a side income, from glass sculpture.  My apologies to him that I can’t remember his name.  At any rate, those slider windows require a level of skill (and set of tools) well beyond most of us.

An expensive, but easier, solution would be to fabricate a set of Lexan windows and add plexi sliders sold for race cars.  Much easier to make, but as I found out, those sliders are pricey.

By the way, Gordon was talking about the advantages of 1/4” over 1/8” Lexan.  I split the difference and found 3/16” to be an excellent compromise.  Also, the pop-out vents I like so much won’t work with 1/4”.

EDIT: Was “the guy from Ohio” Syl Mathis?

Last edited by Lane Anderson

Michael......Here's what I did.  See Photos.   I used 3/16" lexan and made the new pins on a small milling machine, then polished them.  They fit inside the windshield frame slightly.  I also removed the top inner flap to significantly improve visibility. Yes, I have to physically run my finger down the edge of the flap at the rear to make sure the curtain is inside the rear flap each time I get in.  I didn't go for sealing out the rain so much as increasing the side visibility. "It never rains in California" but boy I gotta tell ya, I can sure see a lot better!  The photo of the original side curtain compared to the ones I made show a significant difference/improvement in side visibility.  Also, as you can see, the my wind wings still fit too!..............Bruce

Attachments

Images (8)
  • DSC_0024: Original side curtain
  • DSC_0025: New side "window"
  • DSC_0026: Outside view of new window
  • DSC_0027: Inside view of new window
  • DSC_0028: New pin to window attachment
  • DSC_0029: View of seal area at rear
  • DSC_0066: Top is down, window installed
  • DSC_0067: Old pin and new pin

Bruce that was so well done, and I would think that your wings help a lot with the front edge.  Do you have a close up of how the front meets the windshield area.

Actually, have you ever thought of having some form of hook make on your wings where the lexan windows would hook into?  I wonder how much more of a solid install that would make.  I could be really off here not having had any curtains on my 356. 

Last edited by IaM-Ray

Jack, when I was messing with my seats last month I discovered two YUGE! holes at the rear of the cockpit at the corners under the back seat.   I found them when I reached up under the fiberglass overhang from the rear seat area -  they were under the carpet.   My guess is that they're both about the size of a Quarter or half dollar.  I was too lazy to get it up on the lift to see where the other side came out near the wheel wells, but I gave each a blast from the cockpit side with expanding foam, trimmed it neatly, put the carpet back and declared it professionally done.  I suspect that is where my never-found "leak behind the seats" came from.  Might be the same on a CMC and VS, but I don't know.

Those leaks were unique, I think, and easily fixed in this case, but all or most of the other leaks on these cars can be eliminated with the right choice of weather strip or seals properly applied.  We've seen some really good ones on here, and some not-so-hot.  Trial and error and then telling people about what works seems to be the key.

Give me enough years and I'll fix all of these damn leaks.

Mike, with the current isolation due to the COVID-19 pandemic we are offering all of our graduate courses online only for the remainder of the year.  Most graduate courses can be found in the syllabus or here:

https://www.speedsterowners.com/forum/knowledgebase

Or you may search for individual courses that fulfill your needs via the search function - Please be aware that we may have made some course titles obscure to avoid state and local government questions, especially for our suite of CBD courses.  

We are also waiving the normal course fees during the pandemic since we don’t have a clue how much to charge for online tutorials after we receive our very generous government payout that is more than our normal, non-pandemic revenue.

Rest assured that as soon as we know, you will be contacted by a member of our Solicitor Team from “Taqure, Muny and Runn of Kelly Square, Worcester, Mass., to negotiate your settlement.

The Faculty and Staff of SOC Univ.  
Remember our motto:  “SOC It To Them, Before They Catch On!”

Alan, I admired  those splash guards, and still appreciate you sending me a set of the cardboard templates, but the aluminum guards just would not fit my car.  There were some pieces of  frame angle iron in the way.  I did finally get the wet floor deal solved---only took me 12 freaking YEARS!!   There was a piece of some kind of rubber material that was jammed between the two parts of the pad---where it was welded after being cut. Some was missing and the rest was rotten. I don't know why because it seems a good weld would seal the two pieces. I have had my car on a lift a few times but the space I'm talking about is impossible to see---you think you see everything, but you don't---at least I didn't.  Last year prepping for Carlisle I rented a lift and with a lot of effort there it was---the place where the two pan halves meet with one half sitting on top of the other half with a very rotten, falling apart piece of some kind of crappy rubber that had disintegrated.  BAM--that's where the water was coming in.  That space was all the way across including the area the shields would have blocked ---except the space went from one side to the other.  To fix it I found some rubber material similar to what an inner tube is made of and stuffed it into the space all the way across.  Then I sprayed the whole deal all the way across with that liquid rubber product, Flexsteel.  I let it dry for 3 hours then sprayed a LOT of water towards the repaired space and the floor stayed completely dry.  I have had it in driving rain including returning home from the 2,500 mile Carlisle round trip in storms and the floor remained as dry as my Genesis.  

Some time ago when I put all new carpet in I stripped the old out and painted the floor with truck bed liver then applied that sound proofing material  throughout.  That welded place doesn't show with the carpet up and it seemed like I did a thorough job of sealing the floor, but I was unaware of that welded seam where the two pan halves are. 

All together now, sing with me "We're having a good time!"


Can you imagine trying to build one of these Today as a one-off and have it come out right without the knowledge and tips from this site?   Whew!
Of course, there are always the creative solutions of “George from Texas”, right?    

You can always use twine, bailing wire, spit, chewing gum, and whatever else.

How about drywall screws on the windshield frame? I might know a guy who had one or two screws like that in there........(It was NOT me!)

@Jack Crosby posted:

My keyboard is typo-prone.  My post says Bed liver---shudda been bed liner.  

I wish there was a longer time period before noit being able to edit---Theron?

I wish we could go into our authored posts and change it anytime, sometimes we don't catch an error right away. 

I asked Theron about that once and the one hour limit is the platform maker's (Crowdstack) limit not Theron's.

Yep, 1 hour is the maximum from our host.  When the site used to run on the software I designed, way back when, I instituted 1 hour as well.  I found that some users (a larger amount that you would expect) would post something inflammatory.  When it got a bad reaction, they would go back and change it.  Then everyone would be lost and the regularly threads would make no sense.  1 Hour forces everyone to be more careful with their words.

-=theron

Post Content
×
×
×
×
Link copied to your clipboard.
×
×