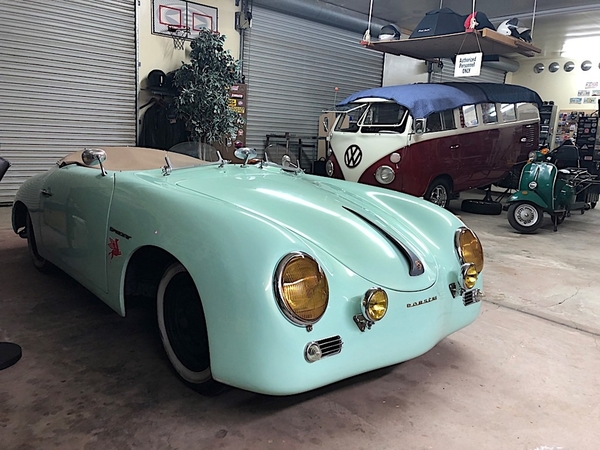
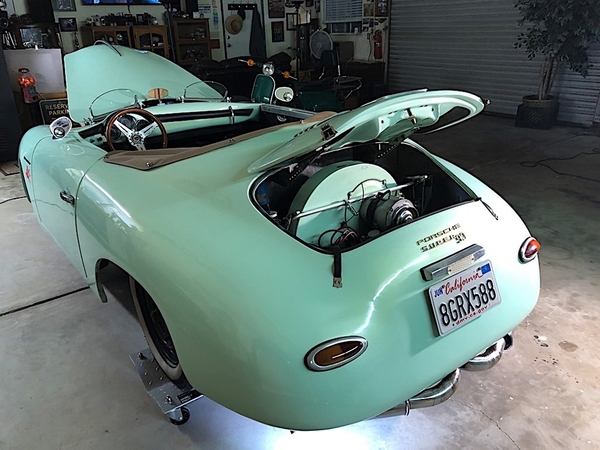
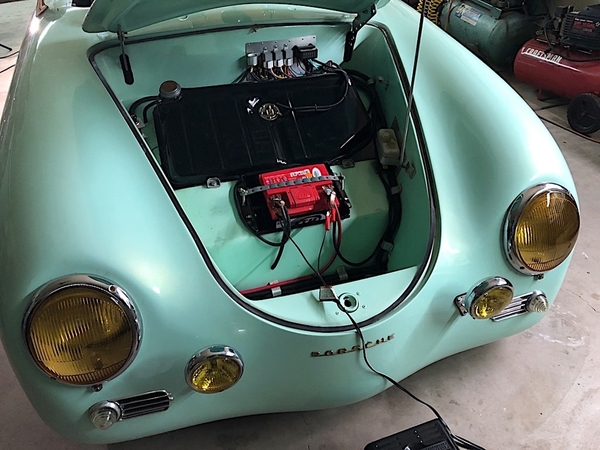
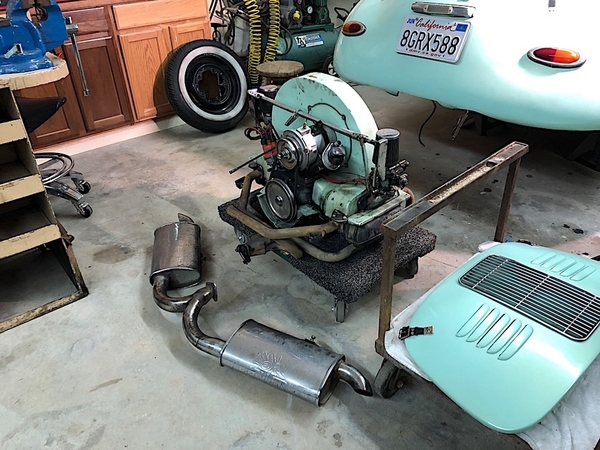
First off, I’d like to thank Theron for giving me pointers and insight before I actually  owned a Speedster. I’ve been lurking in and out of this site for awhile and thought I'd introduce myself now that I actually have a Speedster.

Greeting everyone! I’ve owned my ride for about a week now and have driven a total of zero miles! I'm familiar with VW's but never owned a Bug so I'm learning, especially the underside.

So far, from what I gather (please correct me if I'm wrong). My Speedster is based on a CMC/Fiber Fab Kit, 1969 VW Bug pan, 1600cc motor, Dual EMPI carbs, drum brakes on all 4 wheels, adjustable air shocks, electrical seems to work. It has a very bad oil leak, I'm suspecting RMS is bad. I yanked the motor out a couple nights ago.

I will more than likely go with a larger CC motor in the future but will repair the current motor and re-install to see what other repair "opportunities" may come up.

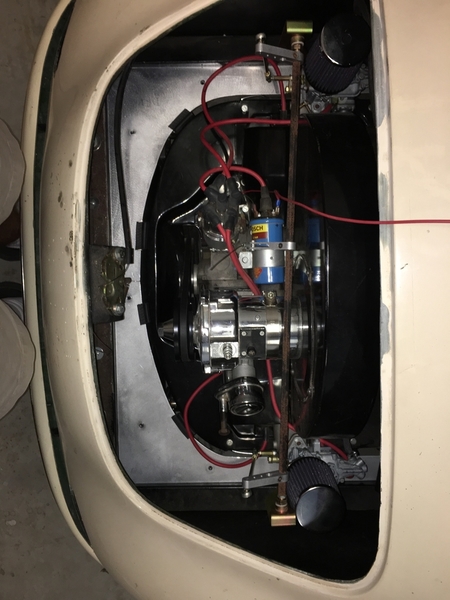
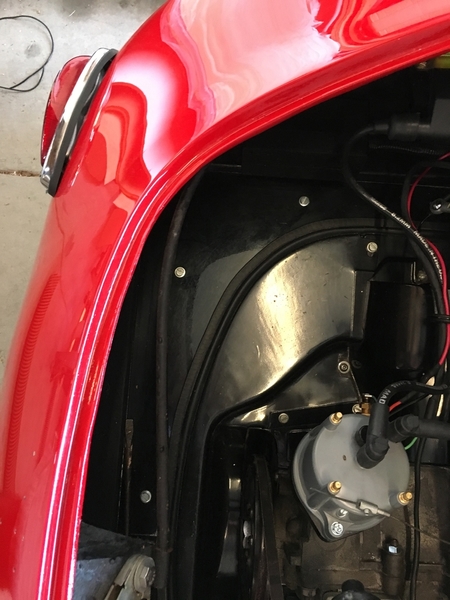
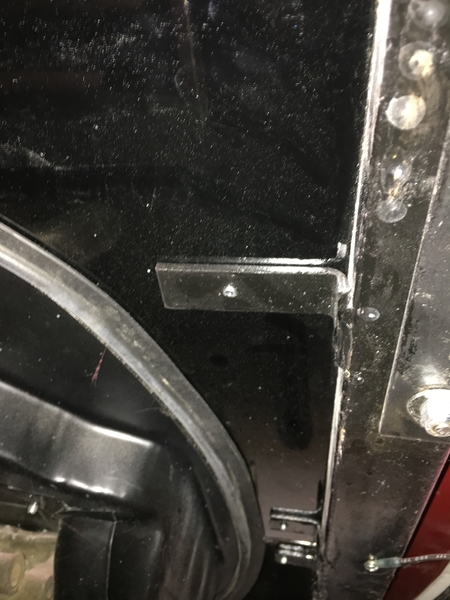
Question: Are you custom fabricating heat shroud (tins) inside the engine bay? Rubber seals used? There is no tins separating the lower part of the motor from the top, I don't see how this motor setup ran without heating up. Any photos of your setup would be great. 

Any feedback or input is always greatly appreciated!

!IMG_6804IMG_0018IMG_7004IMG_7012IMG_7059

"All I need are big dreams and open highways..."

Attachments

Images (5)
  • !IMG_6804
  • IMG_0018
  • IMG_7004
  • IMG_7012
  • IMG_7059
Original Post

Replies sorted oldest to newest

Theron posted:

I've got these under cylinder tins and pulley tin. You will probably need a rear tin and then close the gap to the body with sheet metal.  You can have them for the cost of shipping and the normal SOC trade requirement of minor beer money. PM me if you want them.
-=theron

Hi Theron,

Yes, I would like to purchase the tins. I'll PM  you. Thank you!

WOLFGANG posted:

Here's what the CMC kit came with.  They were 1/8" fiberglass but you can make them from duct sheet metal or thin aluminum.  Most span the 1/2" remaining gap with a '72 up VW Bus H engine seal.   Cool beachy color!

Very cool! I'll start hunting around for the bus engine seal.

May I ask where you got the documentation from? Is the CMC kit build still available? 

That is a good looking Speedster.  I have to agree with @Theron about the garage space!

I’m new to this as well (18mo the or so).  I am running all of the sheet-metal in my 1993 VS with a Type IV flexible engine seal (not 100% on the actual terminology).

I haven’t had the slightest issues with heat no matter where I drive.  I recently bumped it up from 1600cc to 2180cc with thick wall cylinders and added a thin line sump, external cooler, and remote filter.  It actually runs cooler now.

vdubuslife posted:
WOLFGANG posted:

Here's what the CMC kit came with.  They were 1/8" fiberglass but you can make them from duct sheet metal or thin aluminum.  Most span the 1/2" remaining gap with a '72 up VW Bus H engine seal.   Cool beachy color!

Very cool! I'll start hunting around for the bus engine seal.

May I ask where you got the documentation from? Is the CMC kit build still available? 

WOLFGANG posted:

Build manual? - supporting members can click onto the RESOURCES then LIBRARY link to download a couplemof versions of the CMC/FF build manuals aw well as wiring and VS Owners Manual.

ps://www.speedsterowners.com/pages/library

Here's a link to the seal once you get it all done:

https://www.googleadservices.c...oQ9aACCDg&adurl=

Robert M posted:
vdubuslife posted:
WOLFGANG posted:

Here's what the CMC kit came with.  They were 1/8" fiberglass but you can make them from duct sheet metal or thin aluminum.  Most span the 1/2" remaining gap with a '72 up VW Bus H engine seal.   Cool beachy color!

Very cool! I'll start hunting around for the bus engine seal.

May I ask where you got the documentation from? Is the CMC kit build still available? 

WOLFGANG posted:

Build manual? - supporting members can click onto the RESOURCES then LIBRARY link to download a couplemof versions of the CMC/FF build manuals aw well as wiring and VS Owners Manual.

ps://www.speedsterowners.com/pages/library

Here's a link to the seal once you get it all done:

https://www.googleadservices.c...oQ9aACCDg&adurl=

Link copied to my build sheet. Thank you!

Drumagination posted:

I have a CMC kit and I made templates out of cardboard then cut aluminum pieces to fit. I welded in tabs to the frame to support the aluminum sheets. I finished it with a bulb rubber seal all the way around ( not shown). I can shoot a final picture tomorrow if you want to see the finished product.


F3104C08-6D32-4FAE-BBE3-41D676097EE6

This is just plain awesome!

Yes, I would really like to see how you finished it off. 

Thank you for sharing.

I did something similar to Dru on my CMC, and made the shields out of HVAC galvanized sheetmetal from a Heating/HVAC place.  Maybe $20 bucks worth of metal (actually, they gave it to me). 

I have two pieces, one a giant horse shoe attached from the bottom, going around the back of the engine and along the sides to the firewall where it attaches to the firewall via a rubber sheet that looks suspiciously like a rubber stair tread.  All that just screws into the CMC body frame with 10-32 screws around the engine and seals against the engine tin with Frost King door weatherstrip from Home Depot.  I do not need the "H" gasket from a beetle or bus - there are no gaps.

The second shield attaches to the top of that body frame and goes across the back of the engine compartment (near the tail lights), but it has a kip-up at each end to seal against the body just beyond the tail lights where there's a big hole.  

I have paper templates of them both, marked with bends and approximate hole locations.  I can send them for the cost of packaging and postage - $5 bucks and they're yours, just PM me and we'll chat.

Gordon's templates are a huge time saver I still use them. At Lowes, I buy a flat piece of 2 x 3' heat A/C duct.  If you lay it out right one $10 sheet will be enough. Rather than welding tabs to the 2 x 2 frame I use one 5/16 self tap hex head screw on the left and right side near the engine bay bulkhead. the rest I just use a few nickel size dabs of seam sealer to glue it in place. I fold in the edge about 3/4" on a 45 degree angle to match the engine tin then use a foam Bus H seal to fill in the 1/2 - 5/8" gap. If you need to pull the engine, I just pry the pieces apart with a paint scraper.

Last edited by Alan Merklin
Gordon Nichols posted:

I did something similar to Dru on my CMC, and made the shields out of HVAC galvanized sheetmetal from a Heating/HVAC place.  Maybe $20 bucks worth of metal (actually, they gave it to me). 

I have two pieces, one a giant horse shoe attached from the bottom, going around the back of the engine and along the sides to the firewall where it attaches to the firewall via a rubber sheet that looks suspiciously like a rubber stair tread.  All that just screws into the CMC body frame with 10-32 screws around the engine and seals against the engine tin with Frost King door weatherstrip from Home Depot.  I do not need the "H" gasket from a beetle or bus - there are no gaps.

The second shield attaches to the top of that body frame and goes across the back of the engine compartment (near the tail lights), but it has a kip-up at each end to seal against the body just beyond the tail lights where there's a big hole.  

I have paper templates of them both, marked with bends and approximate hole locations.  I can send them for the cost of packaging and postage - $5 bucks and they're yours, just PM me and we'll chat.

Hi Gordon. Yes, I would like the paper templates you have available. I'll PM for your address and payment requirements. Thank you!

Alan Merklin posted:

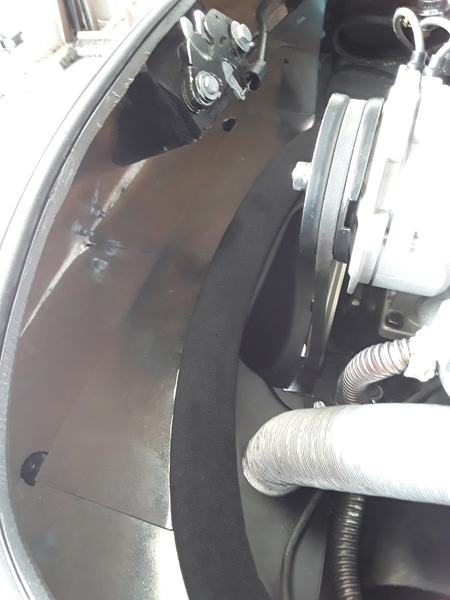
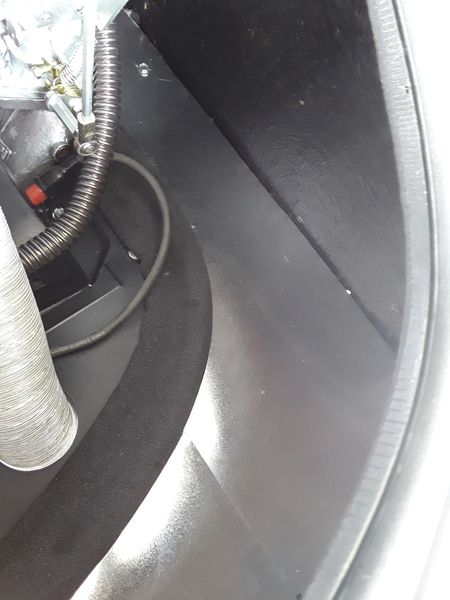
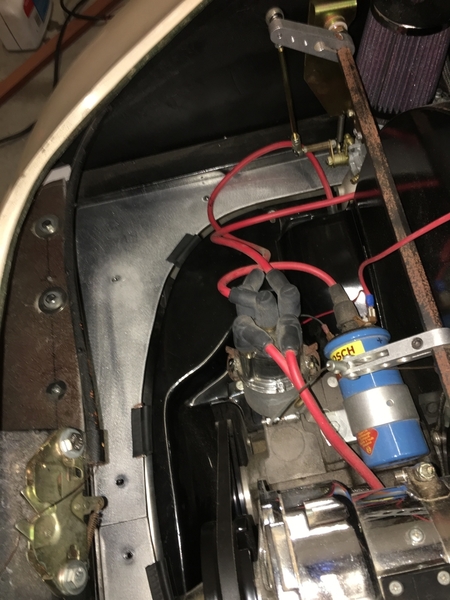
Body to engine filler tins20190617_11420320190617_11421920190617_114227

Thank you for the detailed photos. It makes it easier for me to visualize what needs to be done. 

The shroud on my motor was painted and it looks as if the motor became so hot the paint bubbled. Hopefully the engine didn’t suffer too much and still usable. I’ll know after I tear it down. 

Drumagination posted:

Here is my setup as promised. I used 2 pieces of aluminum that were tailored for my car. I would be surprised if you don’t need to custom fit yours. The underside shows welded-on brackets, and the bubble seal goes from firewall to firewall.BC066F8C-4836-41DE-845D-88FEC02D5776011243D6-FC42-4A4A-9A54-A0A72FBFCF7A4A4C9913-2828-4F2E-8998-2B74FC4DB144FDEB962D-1F65-44C2-8E8E-C3EF79AB6B1E

Thank you for sharing your tin setup. This is great, I'm able to see the end goal instead of guessing what I think is correct. I will definitely use the photos and drawings for my setup. I'm very appreciative to all of you for taking the time sharing. 

Theron posted:

I've got these under cylinder tins and pulley tin. You will probably need a rear tin and then close the gap to the body with sheet metal.  You can have them for the cost of shipping and the normal SOC trade requirement of minor beer money. PM me if you want them.
-=theron

Theron, you rock! I did not expect you to send the tins so quickly! Thank you!

IMG_0073Manetarium_

Attachments

Images (1)
  • IMG_0073Manetarium_

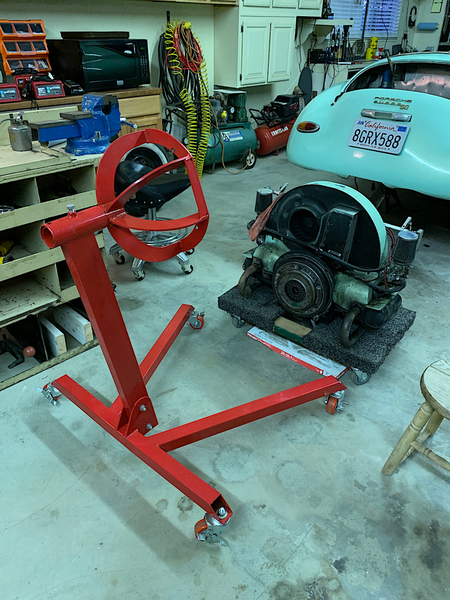
I picked up an engine stand last night. I'm definitely strong enough to lift a motor from floor jack to a dolly. I also verified I'm definitely not strong enough to lift a motor onto the the engine stand. I'll be getting a hoist this weekend for sure. One thing about living in the hills, you can't "chance" see an unsuspecting neighbor and ask if he wants to come over for a soda pop.  

IMG_0057Manetarium_

Attachments

Images (1)
  • IMG_0057Manetarium_
vdubuslife posted:

I picked up an engine stand last night. I'm definitely strong enough to lift a motor from floor jack to a dolly. I also verified I'm definitely not strong enough to lift a motor onto the the engine stand. I'll be getting a hoist this weekend for sure. One thing about living in the hills, you can't "chance" see an unsuspecting neighbor and ask if he wants to come over for a soda pop.  

IMG_0057Manetarium_

Attach the cradle to the motor, lay the engine stand on its side, insert the cradle tube into the stand, and lift the whole contraption up into position. That's how I did it by myself.

Robert M posted:
vdubuslife posted:

I picked up an engine stand last night. I'm definitely strong enough to lift a motor from floor jack to a dolly. I also verified I'm definitely not strong enough to lift a motor onto the the engine stand. I'll be getting a hoist this weekend for sure. One thing about living in the hills, you can't "chance" see an unsuspecting neighbor and ask if he wants to come over for a soda pop.  

IMG_0057Manetarium_

Attach the cradle to the motor, lay the engine stand on its side, insert the cradle tube into the stand, and lift the whole contraption up into position. That's how I did it by myself.

Darn!  You stole my thunder.

Hi George,

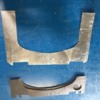
 I went to get the what I thought was a lower fiber sheet ready to ship you and realized it is actually the upper pc. I did find a lower pc. I had made from galvanized sheet metal that I never used that I will send you, I needed to bend it to ship but it is thin enough to flattened out nicely or use as an easy trace to make a part out of the material of your choice. Good luck with your car.

speedster engine compartment filler sheets

Attachments

Images (1)
  • speedster engine compartment filler sheets
Jimmy V. posted:

Hi George,

 I went to get the what I thought was a lower fiber sheet ready to ship you and realized it is actually the upper pc. I did find a lower pc. I had made from galvanized sheet metal that I never used that I will send you, I needed to bend it to ship but it is thin enough to flattened out nicely or use as an easy trace to make a part out of the material of your choice. Good luck with your car.

speedster engine compartment filler sheets

Thank you Jimmy V.! Your generosity along with Theron’s essentially takes care of a major part of my tin requirements. 

I would like to thank everyone for providing all the positive feedback and materials! 

Robert M posted:
vdubuslife posted:

I picked up an engine stand last night. I'm definitely strong enough to lift a motor from floor jack to a dolly. I also verified I'm definitely not strong enough to lift a motor onto the the engine stand. I'll be getting a hoist this weekend for sure. One thing about living in the hills, you can't "chance" see an unsuspecting neighbor and ask if he wants to come over for a soda pop.  

IMG_0057Manetarium_

Attach the cradle to the motor, lay the engine stand on its side, insert the cradle tube into the stand, and lift the whole contraption up into position. That's how I did it by myself.

Hi Robert, I watched a YouTube video where a guy demonstrated that technique. It looked simple enough but I’m going to tap out in using that route.

I have titanium plates holding my neck and back together. I’m still feeling it moving the motor earlier this week. Maybe I’ll wait until the FedEx guy swings  by and ask if he wants to take a break and have a soda pop...

vdubuslife posted:
Robert M posted:
vdubuslife posted:

I picked up an engine stand last night. I'm definitely strong enough to lift a motor from floor jack to a dolly. I also verified I'm definitely not strong enough to lift a motor onto the the engine stand. I'll be getting a hoist this weekend for sure. One thing about living in the hills, you can't "chance" see an unsuspecting neighbor and ask if he wants to come over for a soda pop.  

IMG_0057Manetarium_

Attach the cradle to the motor, lay the engine stand on its side, insert the cradle tube into the stand, and lift the whole contraption up into position. That's how I did it by myself.

Hi Robert, I watched a YouTube video where a guy demonstrated that technique. It looked simple enough but I’m going to tap out in using that route.

I have titanium plates holding my neck and back together. I’m still feeling it moving the motor earlier this week. Maybe I’ll wait until the FedEx guy swings  by and ask if he wants to take a break and have a soda pop...

Doing that would be probably be a better option. LOL

Post Content
×
×
×
×
Link copied to your clipboard.
×
×