i was in the commercial construction supply business for years, back then there was a product to level uneven concrete floors...set up the correct perimeter outside walls, pour this concrete/epoxy slurry in and like water it seeks it own level,might have to screed it to be perfect..other than that jackhammer the slab and start over..PITA
NASCAR (and most racing) frames are built from a level flat surface done the same way. Set up a form the size you need, then pour 1” - 2” of high cure strength epoxy into the form and let it self-level. In all of the chassis shops you find those pads all over the place. I don’t know how hard they are, but they can take a lot of abuse.
barncobob posted:i was in the commercial construction supply business for years, back then there was a product to level uneven concrete floors...set up the correct perimeter outside walls, pour this concrete/epoxy slurry in and like water it seeks it own level,might have to screed it to be perfect..other than that jackhammer the slab and start over..PITA
Comes in 5 pound bags at Home Depot/Lowe's (leveling compound)
Wet (soak) the surface and sprinkle it on. Self levels in a about 2 hours.
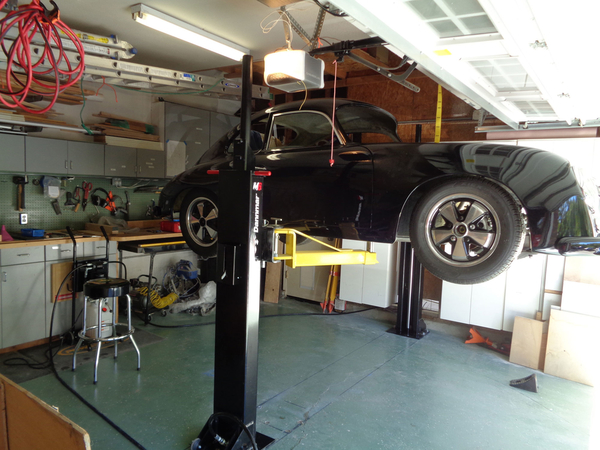
Been awhile since I have posted progress, because the progress hasn't been on the car, but rather the environment in which to work on the car. In order to install the lift, I had to move a cabinet.
That column is now located where the cabinet was. It was one of six cabinets in a row on one side wall of the garage. Had to drill a hole in the top shelf for the column to raise through.
This is the new location for the cabinet, complete with a drawing that my daughter drew many years ago taped to the cabinet door. Just to the left of the cabinet, you can see the shelves that I had to build to put stuff that was in the way of the new car lift.
This is another view of the newly built shelves. The drywall was also in the way of the car lift. Now it is just in the way of the shelf access.
In figuring out the location for the lift, one of the most important factors was space. The lift needed to take up as little space as possible so another car can be parked in the garage besides just the 356 coupe, which will be up on the lift. So I installed the columns with as little space as possible between them, but enough to get the coupe into. I was hoping that the arms would fit underneath the coupe with the narrow space, but they didn't. Hope is not the best strategy, so I probably should have test fitted the space with the car in place before I started drilling holes.
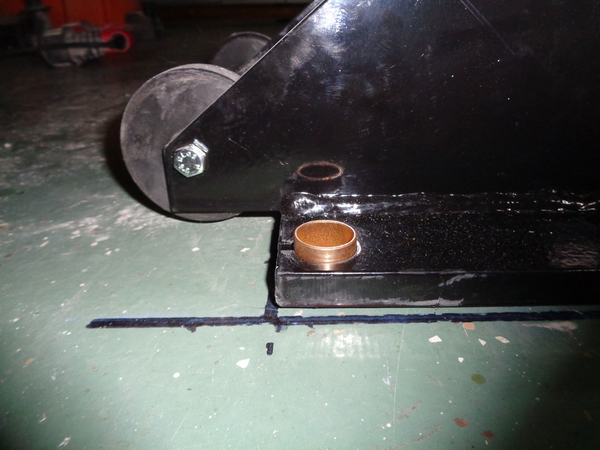
Those are the new holes in the new location. When I drilled the first set of holes, I used a homemade plywood template, because the diameter of the anchor sleeves is 7/8", but the diameter of the base plate holes is 1 inch, so if I used the baseplate as my template, the holes would be all over the place and rounded out from the hammer drill. It turns out the template was not an improvement over the baseplate, so with the new holes I tried something different.
I put a brass bushing with a 1" diameter OD and a 7/8" ID in the baseplate and started drilling.
And after drilling each hole I put a 7/8" dowel through the bushing and through the new hole in the concrete. I am MUCH happier with the new set of holes.
Now, I have to wait for the new anchors to arrive. When I unbolted the column, I noticed that the anchor sleeves were not installed the way they are supposed to be; down a few eighths from the top and tight. I installed them per the directions, and don't feel like taking a chance on one or two correctly installed anchors holding the entire weight, so I ordered some epoxy anchors, but they will take a week or so to arrive.
Attachments
Shop adventures.
+1 for epoxy.
Also get a little thinset and mix it with a few teaspoons of water-based floor urethane to fill the "miss" holes.
This is fun, right?
Todd, how far apart are your lift pillars ?.............Bruce.....(the new positions)
From the back of the base to the back of the other base, like the instructions show, they were 105", the minimum recommended by Dannmar. The new holes will measure back to back at 123". I had to go at least 18" to clear my garage door opener. Previously it just barely cleared on the right side. Now, it is measured to clear on the left side of the opener. Yeah, I measured instead of hoped.
I have been considering getting a wall mount opener and raising the garage door tracks so they are ceiling mounted. This will open up a lot of space for increased room for a possible lift.
Scroll through the video to see the highlights.
SUCCESS! Maybe.
It is in the air.
Got done with the installation yesterday, but the new lift only lifts after it has not lifted for a few, (maybe 6), hours or so. During my tests without the car on the lift, it only raised 11 inches on the first try, so I bled the cylinders, and it would only lift about 1/2 inch. I contacted Dannmar and Bruce, ( @aircooled ![]() , after the trying it the next day when it only lifted about 16 inches, (after letting the arms down, they would only raise a 1/2" again), and was told the seals would need some full cycles to operate properly. Ok. I don't like that answer, but so be it. I had to widen the space between the posts in order to fit the arms to the jacking points of the car, so I drilled some new holes, and used some epoxy anchors because two of the anchors on the left base were not expanding correctly in the hole, which I did not find out until I had unbolted the base. Hmmm.
, after the trying it the next day when it only lifted about 16 inches, (after letting the arms down, they would only raise a 1/2" again), and was told the seals would need some full cycles to operate properly. Ok. I don't like that answer, but so be it. I had to widen the space between the posts in order to fit the arms to the jacking points of the car, so I drilled some new holes, and used some epoxy anchors because two of the anchors on the left base were not expanding correctly in the hole, which I did not find out until I had unbolted the base. Hmmm.
The epoxy anchors set up overnight, and the left column was reinstalled, and the right column was reinstalled without the supplemental plate I was using to bring the two bases to the same elevation. All five wedge anchors on the right post base were tight and correct. Bled the cylinders again, and it raised to the 42 inch max, but when I let it down and tried it with the car, it would only raise a 1/2" again. That was yesterday. So, it sat overnight, and I tried it again this morning, and BOOM; all 42 inches with the car on it. So far, it will only raise to it's maximum height once per day. Guess I will continue to cycle it a few more times before contacting Dannmar.
The right column raises at about 1/2" higher than than the left side, so that is why I took the supplemental base out, but it occurred to me that at max height the right side is now lower than the left side by 5/8". Not sure whether to leave it like it is, or reinstall the supplemental base plate next time I unbolt the base from the floor.
If anybody is thinking about purchasing one of these lifts, there are a few things you should know. The steps for the installation are simple enough, but the actual installation is more complicated. It is not foolproof and if you read the reviews you will see that their quality control has a lot to be desired. The instructions suck. They are terrible. There are many steps that are just plain not written about. If you have some experience wrenching, you will probably figure out the stuff that is missing, but maybe not. It can be frustrating. The part specs are not correct and the instructions are not up to date with the product as currently sold and shipped. The fastener sizes are different than what is called out, and it can make a difference depending upon each specific installation. If you have not worked with concrete anchors, install the bases with the more expensive epoxy anchors. If the wedge anchors are not expanding properly the bolt will still tighten when the top of the wedge post meets the bottom of the baseplate, but the wedge has not actually tightened in the hole, and the only way to know if the wedge anchor has expanded properly is to remove the column and visually inspect for the correct installation. Personally, if I was Dannmar, I would only sell the lift with the epoxy anchors. With all the things that can go wrong with installation and initial use, Dannmar's fix seems to rely on their customer service department rather than complete and detailed instructions and better quality control.
Attachments
Wow you must be glad you verified the integrity of the install
i mean that is a catastrophic danger in-the making for the unwise
While I can understand that the hydraulic piston seals may be dry from sitting on a shelf for a while, they should re-activate with 3 - 4 passes up to 42", and not spread over several days. All of the Bend-Pak lifts we built took right off and lifted fine. Our big issue was leaking air lines to the safety latches - We'd push the button to release them and they wouldn't move until we reworked the line couplers.
Once you get the car up on the lift at 42" and if you don't set the safety latches to hold it there, will it creep back down or hold at altitude?
BTW, the Bend-Pak instructions were not the best thing in the world, either, but they weren't THAT bad.....
Using epoxy molly's is a God Send ! For the reasons Todd mentioned. Thanks to Will Hersh who recommended I use them............Bruce
Gordon Nichols posted:All of the Bend-Pak lifts we built took right off and lifted fine. Our big issue was leaking air lines to the safety latches - We'd push the button to release them and they wouldn't move until we reworked the line couplers.
Once you get the car up on the lift at 42" and if you don't set the safety latches to hold it there, will it creep back down or hold at altitude?
So far the height is stable. The safety latches can't really not be set because they are automatic. You can defeat them by moving the lowering lever, but the lift is an inch or so above the last catch and it is staying there. I will see in the next few days if it becomes more consistent.
More on Thorium in case anybody is interested:
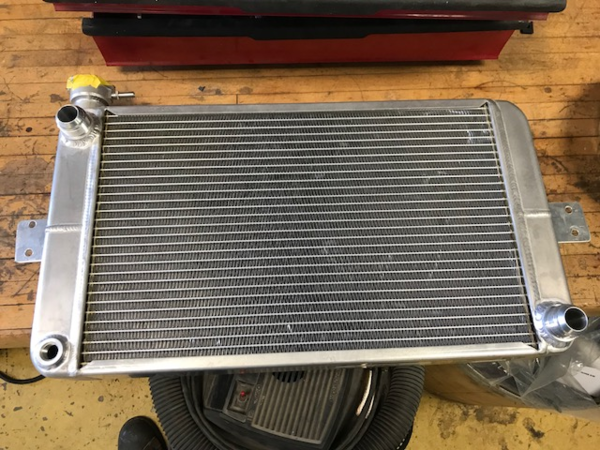
Anybody have any experience with this brand, (Assault), of radiators? Also, when figuring out which side I need my inlet and outlet on the radiator, it looks to me like the thermostat is on the intake to the engine? Isn't that kinda backwards? I seem to remember coolant exiting the engine, going through the thermostat, and then into the radiator.
https://www.amazon.com/Assault...TWD1F2N2X7SF8VQFJ86Q
Or does anybody see a problem with a 1.5 inch inlet and a 1.75 inch outlet? I am fairly sure that the Griffin radiator that folks use has a 1.25 inlet and 1.5 outlet.
Attachments
Carey of Special Edition has the radiators they use custom made to their specs. The Suby converted Speedsters use a slightly larger one than their 550 Spyder does. They had to use the smaller Spyder radiator on the suby conversion they did on my Fiberfab Speedster because of the lack of space up front. The radiator works perfectly and keeps the temps at 190 all day long in 95 degree plus heat driving on highways with reflected heat upwards of 110-120 degrees. I believe the Suby coolant flow direction is reverse from what most call normal.
Attachments
Some applications, such as Vanagon swaps, will reverse the water flow through the intake manifold, and/or use Tom Shields bypass fittings. Google Subaru cooling systems for engine swaps or similar to see what other car guys have done.
The Suby thermostat is on the bottom of the engine and requires the heater hoses be routed either through a heater core or looped together in order to work as designed. The heater core gets hot coolant from the top of the engine and dumps it on the thermostat, which tells it when to open & let in new cool water. It's the opposite of my old Chebby.
Advantage: you get faster warmup, both for the engine and the passengers.
Disadvantage: it's needlessly complicated for our application.
On Bridget I used a cheap aftermarket 2-core rad for a Honda Civic/del Sol. Inlet and outlet are (I believe) 1.25 inches, and I used step fittings to hook them to my 1.5 inch pipes. Works very well, as far as that goes, and fits the larger of the original two Legacy fans perfectly behind the stock MG TD grill. Not a practical form factor for the Speedster or Spyder, however.
Best would be 1.5 on both inlet and outlet.
edsnova posted:The Suby thermostat is on the bottom of the engine and requires the heater hoses be routed either through a heater core or looped together in order to work as designed. The heater core gets hot coolant from the top of the engine and dumps it on the thermostat, which tells it when to open & let in new cool water. It's the opposite of my old Chebby.
Advantage: you get faster warmup, both for the engine and the passengers.
Disadvantage: it's needlessly complicated for our application.
On Bridget I used a cheap aftermarket 2-core rad for a Honda Civic/del Sol. Inlet and outlet are (I believe) 1.25 inches, and I used step fittings to hook them to my 1.5 inch pipes. Works very well, as far as that goes, and fits the larger of the original two Legacy fans perfectly behind the stock MG TD grill. Not a practical form factor for the Speedster or Spyder, however.
Best would be 1.5 on both inlet and outlet.
Before I wrote this post on the radiator, I did a little bit of poking around and saw diagrams of what you are talking about. I thought the drawings were nuts. Thanks for the explanation, and it still seems basackwards.
I remember Rabbits and Sciroccos had the thermostat on the bottom of the engine on the bottom of the water pump housing.
Subarus are only backward if you compare them to American V8s.
—which are the standard and the right way to do it. What are you, a commie?
edsnova posted:—which are the standard and the right way to do it. What are you, a commie?
American straight 8, straight 6, in line 4s, V6s. There is the American way, the VW way, and the wrong way. Right?
Flatheads forever!
edsnova posted:—which are the standard and the right way to do it. What are you, a commie?
No, but some people might call me all sorts of names. I don't care what people think. Never did.
Because of my laissez-faire, laid back attitude, people often thought I was apathetic.
I had a T-shirt printed up with "People say I'm apathetic...but I don't care." ![]()
MusbJim posted:Because of my laissez-faire, laid back attitude, people often thought I was apathetic.
I had a T-shirt printed up with "People say I'm apathetic...but I don't care."
Say there, Guapo, you musta had that T-shirt printed so you could wear it at your in-laws' summer BBQ without offending them, eh? I, on the other hand, having no such familial constraints had mine printed to read "...but I don't give a ****!" ![]()
By the way: Our Forum's Language Censor immediately changed what I had typed into "****!", but you surely understand what my shirt really says...and it's not "damn!" ![]()
So much gets in the way of what one wants to do, all the things one has to do.
I wanna finish installing a 220V outlet in my garage, so I can plug in the mig welder that my friend loaned me, so that I get to welding on my replica. But, there are the sprinklers that need to be fixed, and the left side door window on the Fiat that needs to be fixed, and the stairs that have to be finished, and ... , you get the picture.
This evening, after I installed the new window regulator in the Fiat, the last plastic pin in the door panel won't lock in to the plastic grommet on the door. I don't know how to figure out what is wrong without taking the panel off again. There are about 10 or 12 pins and it seems that only one won't grab. The palm of my hand is bruised from beating on the plastic door panel. Any suggestions? You think maybe the grommet is busted? Or maybe even not there? I didn't find any when I was cleaning up broken parts from the bottom of the door.
I can't take a photo of behind the panel to show the pin and grommet, so here is a photo of the broken regulator just for fun.
Attachments
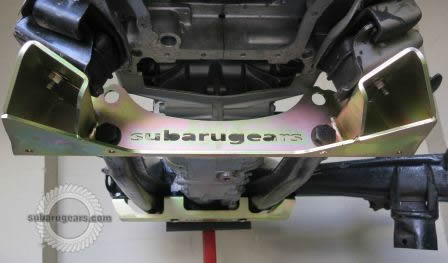
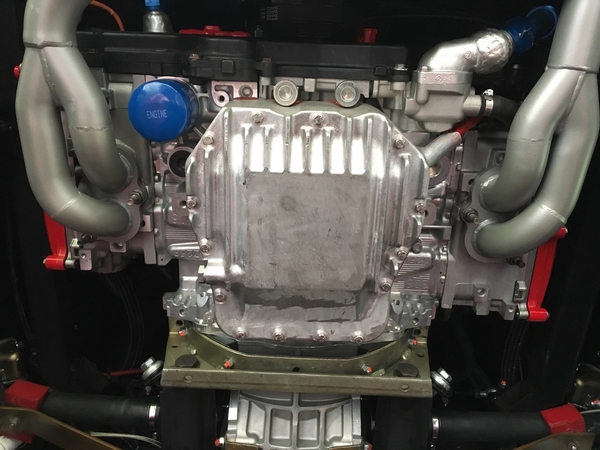
Subarugears makes a Subaru engine to Type 1 engine mount, and it bolts to the Type 1 frame horns. Since my project does not have a Type 1 pan, hence no frame horns, the Subamount is not a bolt on. Those of you who have a Subaru engine, and a manufactured frame rather than a Type 1 pan, how is your engine mounted to the frame? I would rather copy someone else than re-invent the wheel.
Attachments
Whoa- that's 1 heavy piece of steel! Of course, you know what I'm thinkin'- 20-25% lighter and you haven't even come close to compromising strength. Or make it out of aluminum and with just a few holes it'll weigh less than 30% of what that boat anchor does.
Just sayin'...![]()
Carey of Special Edition builds Suby powered tube framed cars, you may want to ask one of the Suby powered back Speedster owners how their engine is supported. My pan based Suby conversion doesn't use the suby motor mounts. My engine is supported by the transaxle via the frame horns with a heavy duty engine cradle and kafer bar setup. It works great and appears to very secure. I have about 3000 miles on the car since the car was converted by Special edition last year. The last pic is a beck speedster showing how their tube frame holds the type 1 transaxle.
Attachments
I have an IM and IM makes a full cradle that bolts to their frame and they use stock subie mounts.
In my case it wouldn't have given the engine any more support by having the stock Suby mounts attached to the cradle because it all is supported by the frame horns and transaxle regardless. My setup is rock solid and the engine doesn't move or rock even in hard acceleration. The extra support comes with the Kafer bar setup connecting in the shock towers.In this instance more isn't always better if it doesn't help, and it saves the weight of the large mounts and the extra size of the cradle. Carey and mike gave my setup a lot of thought. I think they hit a home run.
IaM-Ray posted:I have an IM and IM makes a full cradle that bolts to their frame and they use stock subie mounts.
Exactly. Does anybody have any photos of the cradle that either Beck or IM use, using the Subaru mounts?
Todd M posted:IaM-Ray posted:I have an IM and IM makes a full cradle that bolts to their frame and they use stock subie mounts.
Exactly. Does anybody have any photos of the cradle that either Beck or IM use, using the Subaru mounts?
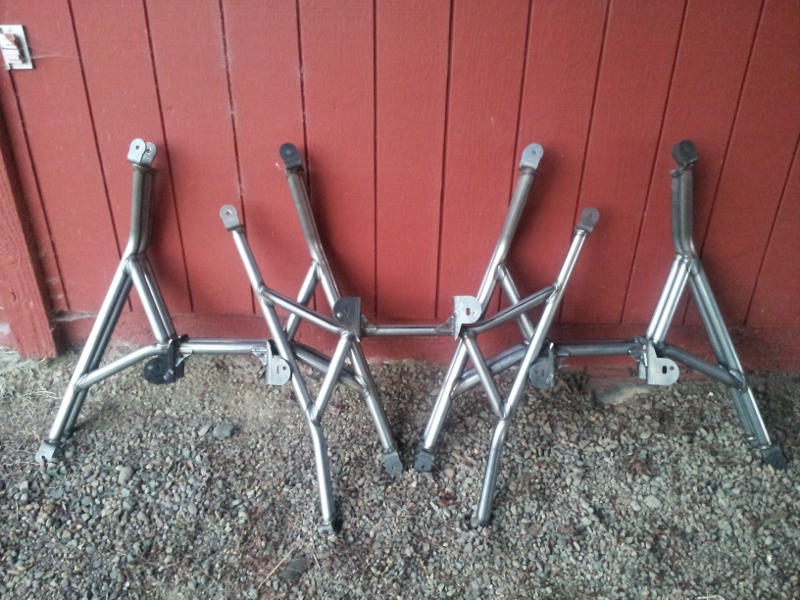
There's another option which may work for you, Todd. Small Car Performance up in Tacoma, Wa makes conversion parts which are very easy to use. I bought the two "bars" in the first picture. They are pointed at the car in the correct orientation. The front end gets bolted to a type 1 transmission mount, the center gets bolted directly to the Soob engine and the aft end got bolted to a transverse bracket that I fabbed up and soft mounted to the rear fore and aft frame rails in the engine compartment. It worked quite well for many miles. Sorry I don't have pics of the front attach points.
Attachments
JimV....is your Suby supported totally by the VW horn saddle under the bell housing ?
Do you not need a rear support like David S had ? Do you get any wheel hop when doing a burn out ? Do you have a rigid front transaxle mount ?..........Bruce
My engine does not have a real mount bar. It is totally supported by the frame horns and the kafer bar setup that triangulates the engine cradle, frame horns and the upper shock mounts. I have a special solid front transaxle mount that Rancho sells. I have a rhino transaxle case that is much stronger than a stock type 1 transaxle. The setup is as solid as a rock. Not wheel hop no engine shimmy no torque twist.
Attachments
Thanks Jimmy.....Very nice job ! Clean too ! In your photo # 165......Is the lower kafer bar helm joint mounted to a tab that's sandwiched between the horn and the engine saddle or is it welded to the saddle or horn ?.............Bruce


