IaM-Ray posted:In front is my choice
For the radiator or gas tank or both? I also decided to weld in those triangles in the corners of the front subframe.
IaM-Ray posted:In front is my choice
For the radiator or gas tank or both? I also decided to weld in those triangles in the corners of the front subframe.
I would put both radiator and gas tank upfront --- along with an AC condenser and the battery. Some have mounted the battery in front of the passenger's wheel well to get it out of the way and to compensate for often no passenger.
For all three as you need some weight in front the car is so light.
During mock-up of the engine mount crossmember, it turned out that the crossmember did not just bolt on. Yeah, I know. It never does, but I knew I was going to have to modify the ends to fit my coupe, but what I did not foresee was the support not fitting the stock Subaru engine mount. There is a guide pin in the stock mount, that does not show in the Busaru crossmember installation video, https://youtu.be/C1fgZb9EmK4 . See photos.
There is a slot for the engine mount stud, but it is not long enough to allow the guide pin to slip through. So, here is the question. Drill a hole in the crossmember support to allow the pin to drop, or cut the pin off the engine mount?
I vote hole.
Me, too.... gn
Ok. If I can fit the hole in there, that is what it will be.
Drilling a couple holes went well. I was nervous to drill into 1/4" steel without a drill press, but the bit catching only broke my wrist a couple of times.
Now the crossmember has to cut and pasted/welded to fit my frame.
The only reason I even get to work on the car today is that plastic resin glue needs a good 24 hours to set to hold a curve. In cars, you can never have too much horsepower. In woodworking, you can never have too many clamps. Oops, I see a spot near the bottom where I can still fit another clamp. Gotta go.
I have one here for you in case you need it. ![]()
Dude’s got a whole pile of them on the floor, ready to go.
Looks like “clamp central” over there.
fwiw my 1995 Legacy engine's mounts have no guide pins.
A step bit works really well for making holes like that. They make the hole incrementally larger and I’ve never had one grab like a regular bit.
Robert M posted:A step bit works really well for making holes like that. They make the hole incrementally larger and I’ve never had one grab like a regular bit.
Can you use a step drill bit on 0.186" thick steel? Is there a thickness limit on step drill bits?
Todd M posted:Robert M posted:A step bit works really well for making holes like that. They make the hole incrementally larger and I’ve never had one grab like a regular bit.
Can you use a step drill bit on 0.186" thick steel? Is there a thickness limit on step drill bits?
1) Only if you have a spare afternoon to drill 2 holes, can come at it from both directions, and are OK with wrecking the bit.
2) Ultimately, the metal can’t be thicker than the lands on the steps, but in order to get the step-bit started in thick metal, a pilot hole the size of the step-bit pilot is a great idea.
All of this presupposes you’ve got a good step-bit— double-fluted Irwin or Lennox— good ones are $50+. Cheap ones will barely drill light ga. sheet metal, let alone 16 ga.+ steel.
I don't often use a step drill on metal and if I do it is always aluminum, mostly for all the reasons Stan mentioned. I've got a good Irwin but don't want to mess it up and have to cough up another $40 bucks.
Never mind this "cry once" stuff - It is too easy for me to wreck a tool by getting overzealous with it.
We use ‘em every day. We buy Lennox 1/4- 1-1/8” double fluted, and we drill knockouts in panels with them— so it’s 16 ga (+/-) mild steel. I’ve gone through thicker, but I end up buying a new $80 bit when I do. The bits love 22 ga or thinner, or AL or plastic.
On anything more than about 24 ga, we drill a pilot and come from both ways. A single 3/4” knockout will use up a Milwaukee 18v XC 5a battery turning a Fuel brushless drill motor. It’ll break your wrist if you’re trying to be casual with it.
Step-bits are fabulous tools, but like zip-tyes and tin-tape, they tend to get overused.
Size-tiny to 3/8” we use Cobalt. 5/16- 5/8” or so, I use black oxide. Anything thicker than 16 ga, I’ll almost always use a hole saw, unless it’s drilling a stud or joist, then I’ll use a paddle or auger bit.
It’s super-easy for a tradesman to end up with $1000 in drill bits on his truck.
Really.
Try to remember that the next time a guy is out on your plumbing, HVAC, or wiring. Even at a hundred bucks an hour, nobody is making Lamborghini payments.
I have all 5 of the Harbor freight nitrided step bits. Smaller set of three, and the larger set of two. I use them all the time on Aluminum and thin steel, up to 3/16". They work really well in fabrication of brackets and such for my Spyder. A gentle hand can chamfer the hole on both sides with the next larger step. Quick and neat.
I'm on my second set in ten years just recently for a total outlay of $40, twice.
But I don't do this for a living like Stan. Mine are occasional use. I've got a 20v Lithium Porter-Cable with a few batteries. Always a fully charged spare on hand, the charger is mounted to the shop wall. And like Stan says, you go through batteries quick when drilling large holes. Anything bigger than an inch, I have the big mandrel and a bunch of Lennox hole-saws. They do get expensive, but are worth it as they last.
DannyP posted:A gentle hand can chamfer the hole on both sides with the next larger step. Quick and neat.
We chamfer every hole like this, and use 'em to ream pipe.
Chamfer the hole; good to know.
Shop supplies, when I do an estimate as to how much it's going to cost me to do a speedster build I pencil in $200 for shop supplies and go through that quickly. My friend had a VW shop in NJ . from th day his son was born he would take on an additional $15 for all larger invoices for " Seals gaskets and hardware..that designation sponsored his kid's education at the University of Alabama .
Where's @ALB. We're drillin' holes here...
When I was building pan #2 ,I needed a robust hand drill so I bought a Milwaukie Heavy Duty, 1/2" chuck, corded monster. I have used it maybe half a dozen times and each time it somehow finds a way for the bit to grab the piece I'm working on and crank my wrist something fierce. I should learn to always use the added side handle but no, that lesson never seems to sink in.
It has now been banished to the back of the drill draw, buried by other drills and a host of extension cords well piled so that I won't ever reach for that drill first. Someday it may again see the light of the shop, but not til my wrist feels normal again and even then, only with the side handle firmly attached.
I think it secretly hates me - Or it will now, for being buried in the drill draw.
A 1/2” drill is a manly tool.
Sorry for that slip of “Massachusetts Drawl” up above.
”draw” is what you people probably know of as a ‘cabinet drawer’.
The Whalbergs would have no trouble unahstannen it - or Al Gallo too, for that matter. Dennis Leary, too, even if he is from “Worcester” (pronounced “Wuh-Stah”, for you people ‘from away’).
I’m working on a long video of a week-long biking trip and my brain wasn’t fully engaged (MUSBJIM knows of what I type) and I slipped into the local lingua. If yah evah visit heah, yah pro’bly won’t unnahstan any of us (unless it’s someone else from away).
My apologies....... Yah hafta be from heah, I guess. ![]()
LOL," from away"... Reminds me of the old Mainer who's friends always said he was from away.
"But I was born not two miles from here!"
"But your parents were from away."
"What's that got to do with it?"
"Well...if your dog had puppies in the oven, you wouldn't call 'em biscuits, would ya?"
I now know why you call it madness. I am building a jig, that will enable be to cut an angled hole in the next jig which is for cutting the crossmember in the correct place and at the correct angle. Gonna use the first jig once, and the 2nd jig twice. It's madness.
At least you have enough clamps to use........
I take it that the stairs have cured up?
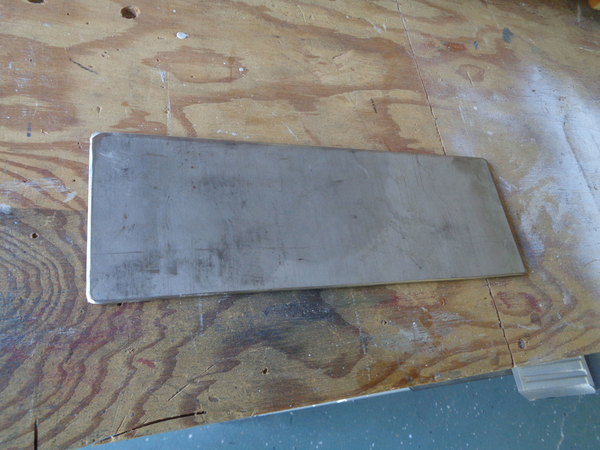
 Pictured above is a 3/16" thick piece of steel that I need to shape into the drawing below.
The curve has a 0.5" diameter. How do I bend it? From Youtube, it seems that I can build a small brake, score the steel across it's width about every 1/4", and then bend it one of the sections, move the material in the brake, bend again, move the material, bend, etc.
Does that sound like the best way? Any suggestions?
There is no way you are bending 3/16" steel on a 1/4" radius in a small homebuilt brake. How clean of a bend do you need? What I would do is get a piece of 1/2" diameter bar, mill it to a half round, them mill out the inside radius. Weld that to the end of your flat stock. Voila
Another method would be to heat and beat it around a piece of bar stock, but this would not be neat and clean.
Half-inch diameter tube, cut in half lengthwise and welded to the end.
edsnova posted:Half-inch diameter tube, cut in half lengthwise and welded to the end.
I don’t think .188 walled 1/2” od tube is produced. I know .120 wall is, hence the reason I suggested bar.
Todd M posted:
Pictured above is a 3/16" thick piece of steel that I need to shape into the drawing below.
The curve has a 0.5" diameter. How do I bend it? From Youtube, it seems that I can build a small brake, score the steel across it's width about every 1/4", and then bend it one of the sections, move the material in the brake, bend again, move the material, bend, etc.
Does that sound like the best way? Any suggestions?
What do you need it to do?
And what is more important for the end use, the ID of the curved part or the OD?
I’m in the “get a piece of suitable steel pipe, cut it for the function and weld it onto the end” camp.
LI-Rick posted:There is no way you are bending 3/16" steel on a 1/4" radius in a small homebuilt brake. How clean of a bend do you need? What I would do is get a piece of 1/2" diameter bar, mill it to a half round, them mill out the inside radius. Weld that to the end of your flat stock. Voila
Another method would be to heat and beat it around a piece of bar stock, but this would not be neat and clean.
Oops, I meant 0.5 radius, 1" diameter. Don't know if that makes any difference.
edsnova posted:Half-inch diameter tube, cut in half lengthwise and welded to the end.
I misspoke. I meant to say 1/2" radius, 1" diameter. Would you still do it with the tubing?
Gordon Nichols posted:And what is more important for the end use, the ID of the curved part or the OD?
I’m in the “get a piece of suitable steel pipe, cut it for the function and weld it onto the end” camp.
The ID is the critical side. I meant to say that and forgot. Also, I misspoke when I said 0.5" diameter. I meant 0.5" radius and 1" diameter ID.
Robert M posted:What do you need it to do?
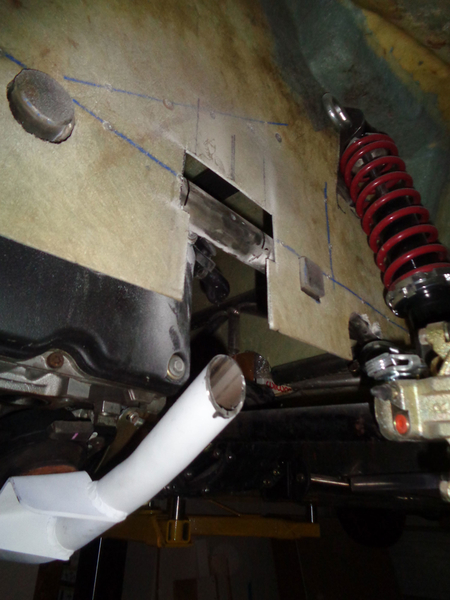
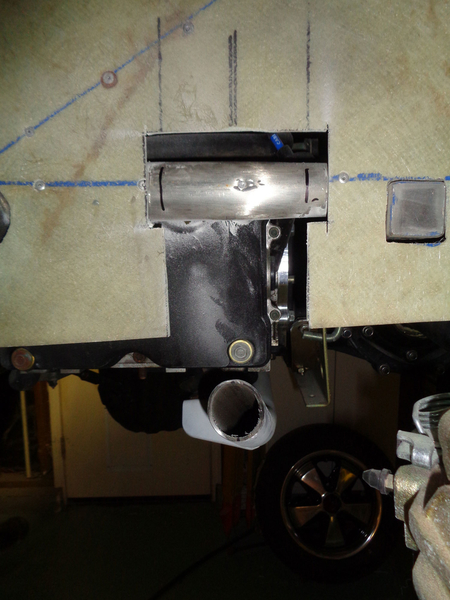
I need to hang it and weld it to round tubular frame. The other end will be welded to the end of the crossmember that supports the engine mounts. Below is a photo showing both the cut crossmember and the fiberglass cutout to the tubular frame from an angle. 2nd photo is the same, but straight on. And the third is with the steel in it's approx. position.


Actually, a plate will be welded to the end of the crossmember and that plate will be bolted to the plate I am asking about with the curved top. I am doing it in two pieces/plates, so that it is removable.
I think you are going about this the wrong way. What I would do, is fish mouth a piece of tubing, about 3” long, weld a 2 bolt flange to the straight end, then weld the fishmouthed end to your existing round frame with the flange hanging down. Then do the same from your removable crossmember up to another 2 bolt flange. A couple of 3/8” grade 8 fasteners and I would think it would be a strong and clean installation.
Access to this requires a premium membership.
Supporting members have donated about $4.00 a month ($49.00 US per year) paid annually.
AUTO RENEW: You membership will auto-renew after 12 months. If you prefer not to auto-renew, you can cancel your premium membership at any time and it will remain in effect until the end of the 12 months. To cancel, sign in at SpeedsterOwners.com and navigate to: (Your User Name) > Premium Membership.
PLEASE NOTE: Your credit card will receive a charge from CROWDSTACK PAY, the payment processor, not SpeedsterOwners.com.