That would be about 100 smackers.
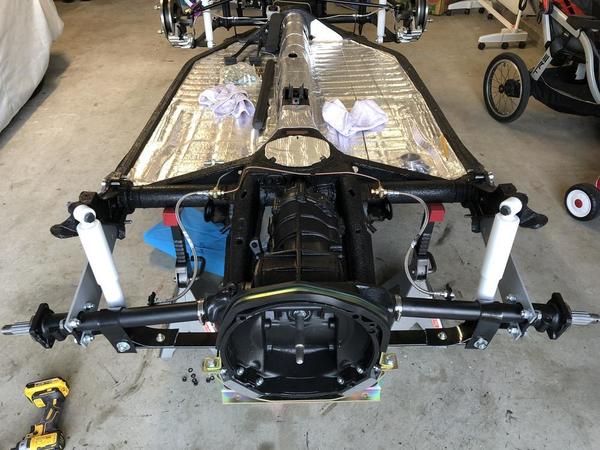
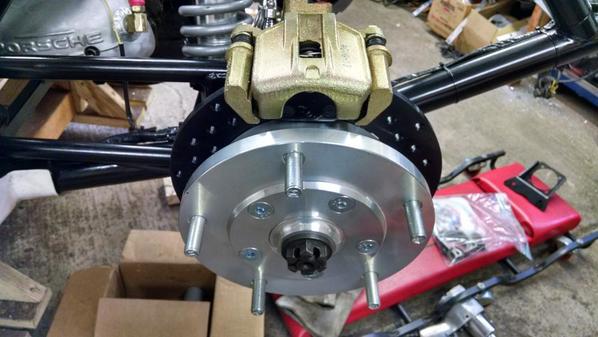
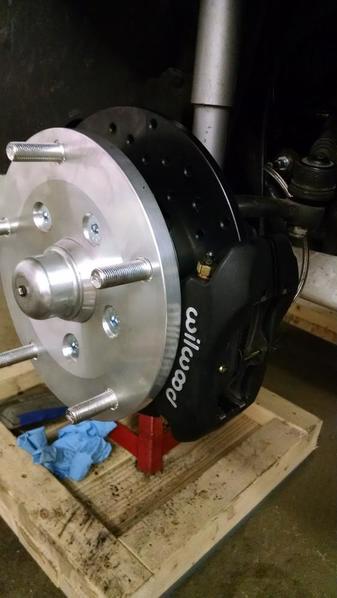
I have been thinking about what to do with the brake line to the caliper. With the AC kit and others, they use a hard line connected to a part of the caliper that moves, albeit not very much. Also, the hard line makes a 180-degree bend coming out of the caliper.
Should I be concerned about a hard line connecting to a moving part? Probably many, many people are driving their cars with this condition.
Airkewld sells a braided stainless hose with banjo fitting specifically for the AC caliper that replaces the whole hard line. I am tempted to use this, even though the cost would be about $64 plus shipping.
Another option would be a banjo fitting and short hose coming out of the caliper and then a hard line.
Any opinions?
Thanks.
I have always been advised that there needs to be some part of that line between the master cylinder and the caliper that allows for some flex, e.g. the short section of flexible hose between the hardline from the master cylinder and the hardline to the caliper that you see on early beetles. You might noodle around on google and You Tube for the prevailing wisdom (?) on that.
TRP posted:What did I miss? Can someone recap it for me?
The moral of the story...Get a "longboard"!
Attachments
The brake lines connected to the back calipers (on an IRS car) are generally hard from the calipers back towards the spring-plate pivots, where there are flexible lines.
Not from the spring plate pivots, but from the diagonal arm pivot points, instead. Then short, flexible hoses from the torsion bar to the diagonal arms. The lines down the diagonal arms to the calipers are both hard. You can see them here:

I understand your question though, Mike..... The caliper will move a bit as the pads wear and you want to allow for that movement. I found this photo on the Samba that shows a short, flexible hose from the hard line to the caliper. If it were mine I would weld a tab onto the diagonal arm on the other side of the hub to anchor the hard-to-flex connector to prevent vibration and then the caliper would be free to move as needed without failure of the brake lines:

Right. Really shouldn’t post from my phone. Thanks, Gordon.
So, are you guys saying that I shouldn't be concerned about the end of the hard line at the caliper moving with the resulting flexing of the hard line?
Above I was questioning the wisdom of how it was generally done.
Panhandle Bob posted:I have always been advised that there needs to be some part of that line between the master cylinder and the caliper that allows for some flex, e.g. the short section of flexible hose between the hardline from the master cylinder and the hardline to the caliper that you see on early beetles. You might noodle around on google and You Tube for the prevailing wisdom (?) on that.
I was referring to the front brakes, not the rears. I am currently fixated on them as I seek my own elusive "brass thingie", the brass flat brass retention plate that fits over the top of the pads. Lost it somehow and looking for another.
Lots of good insight in this thread.
Mike wrote: "So, are you guys saying that I shouldn't be concerned about the end of the hard line at the caliper moving with the resulting flexing of the hard line?"
No, the opposite, You SHOULD be concerned. And for that reason you should have TWO flexible hoses going to each rear wheel - the original flex hose between the torsion tube and the diagonal arm, a hard line going down the length of the diagonal arm and add a new, flexible hose at the hub end of the diagonal arm to go from the diagonal arm hard line to the caliper to allow the caliper to move.
@Gordon Nichols somehow I missed the text between your photos and the second photo. What do you think about replacing the who thing with the Airkewld braided stainless line?
Instead of welding a tab on the diagonal arm maybe I could drill and tap a hole on the caliper bracket.
Not fun replacing a warped rotor with hard lines in place.
Here is a few pics of my two builds (Speedster and Coupe). The Speedster has a 66' chassis and the Coupe uses a 74' (has IRS and swing-axle abilities). The last pic is the 74' and you can see how the hard lines are in different locations PLUS the need for another T fitting that has one hole plugged.
NO issues on the Speedster. Brakes are SOLID and stop on a dime. No leaks. No rubbing. Works perfectly.
Attachments
Mike: Personally, I would not be a fan of running flexible hose from the torsion tube/chassis all the way to the caliper. Why? Because I believe (and I think brake designers might, too) believe that you would lose some braking efficiency as the hose flexes as you apply more foot pressure on the brake pedal. For that reason, I would use as much (length) hard line along the diagonal arm as I could, with flexible hose as short as possible to provide adequate flex ability for the curve where needed.
You can anchor the line coupling near the caliper any way that works - nothing critical there, other than making it solid so it won’t fail due to vibration.
Remember, your IRS lines/hoses will be routed a bit differently than Longfella’s, just due to the difference in suspension design.
Gordon Nichols posted:Because I believe (and I think brake designers might, too) believe that you would lose some braking efficiency as the hose flexes as you apply more foot pressure on the brake pedal.
I'm curious to what the actual efficiency loss would be. Any ideas? I'm not an expert, but I can't imagine it being a world of difference on such a light weight car.
As you can see on my Speedster (first two pics), I run a few SS lines. Granted I have four wheel disc brakes... I have had to brake rather fast a few times and I don't notice any degradation or sloppiness in my breaks.
I have the kit in question on the rear of my swing axle car. Mine came with steel braded lines to replace the rubber lines. It also came with a 2" rubber line to go betwee the hard line and the caliper. Remember... The rear calipers 'float'. One side is fixed... the other side floats and pulls away from the rotor a weee bit. This is why you need the rubber line.
The 2" line is frankly too short. Mine wore out in 3 years (rubber dried and cracked) so Im about to replace them with 4" lines from CIP1. Had I known about the braded banjo lines from Pete I would have considered it.
I'll weigh in here, as I've got the full Airkewld setup. All hard lines from master and one teflon/braided flex line to each caliper. The rear flex line goes from where the torsion tube would be( my car has a heim joint/trailing arm with coilovers) all the way to the caliper. In the case of the Spyder it's not long enough as furnished so longer ones were purchased from Pegasusautoracing.com. They are secured through the holes that the hard line would go through. I used some German fuel hose split lengthwise and plastic ties. This way the caliper line can move a bit and the line also moves at the suspension joint.
It all works fine and there is no problem with a mushy pedal. Teflon/braided lines don't flex like rubber lines. I've been running like this for a couple years now. Brakes are superb, no fade ever. I got the 4 piston front kit and the single piston rear with e-brake. They weren't cheap and did require a bit of machine work on the front. The opening for the grease seal in the hub wasn't large enough and the diameter where the metal cap goes was too large as well. Both were cured by dissasembly and a turn on my friend's lathe. Just be aware that these are custom parts and may require a little fettling to get them perfect.
In the last photo you can see the braided line as well as Charlie helping! I chose to mount the calipers so the bleeders are all straight up and down for convenience when bleeding. And I change the fluid every other year, very important!
Attachments
Nice set up Danny.
Thanks Marty. I don't remember the longer rear hoses costing a whole lot of money, less than $50 if I recall.
With my drum brakes, I shortened the e-brake cables at the handle.
With the disc brakes, I am wondering if I might want to keep the cables stock at the handle and shorten at the caliper.
If so, what should I clamp or crimp on the shortened cable at the caliper?
On the other hand, I may not be able to feed the stock end through the tube. I lined the steel tube with a polyethylene tube to make it more slippery.
I'd keep it the same way. I used the set-screw ends at the brake handle that Pete supplied with his rear kit. Leave the ball end at the caliper intact.
I'm thinking I should replace my brake fluid. Should I empty everything before putting new fluid in? If not and I let new fluid replace old as part of the bleeding process, I don't know if I will be able to see the change from old to new. My old fluid has about 5000 miles but is several years old.
If I should remove all old before putting in new, I can use my pressure bleeder and push in air. Would I open the calipers in the same sequence as for bleeding?
I would NOT push out the old fluid with air. That might cause more problems than it's worth.
Just use your pressure bleeder with 1 - 2 quarts of new fluid. Chances are, the old fluid in there has already begun to discolor so you should be able to see the color change as the new fluid hits the bleeder valve. I can on mine, but I have clear vinyl hoses to drain the bleeders to a Mason jar. If not, just bleed through a quart of new fluid, doing all four wheels and declare victory. There's just under a quart of fluid in the system, including the reservoir, the Master Cylinder, wheel cylinders/calipers and lines.
I'm bleeding my system now using a MightyVac. Using clear lines from the bleeder screws it is obvious when you go from old to new fluid based on the change in color.
Thanks for your replies. I thought that with what I thought was relatively few miles on the old fluid it may not have changed color much.
Any fluid recommendations, including DOTwhat? SoCal said DOT3.
You know, I have an (old) Mighty Vac hand pumper, and while it works, it is the reason I built a few el Cheapo pressure bleeders - they work SO MUCH better and easier and I made a couple for the Carlisle raffle along the way. I can set it up with a quart of new juice and get all four wheels bled and done in, like, under 45 minutes, tops, including cleanup.
I used an ACE Hardware 2-quart bug sprayer to build mine. Somewhere on here in the dim past is my DIY article on how to make one. Total cost was under $25 bucks.
Now you tell me.
https://www.speedsterowners.co...694#2135445019039694
Mine is the new and greatly improved version of this:
http://vwparts.aircooled.net/M...04-p/motive-0104.htm
But I deleted the pressure gauge on mine in favor of a real, VW Type-1 fluid reservoir cap. That's really the only unique thing you have to buy. ACE should have lots of 2-qt bug sprayers on hand right about now....
Use a turkey baster or something other device to drain the reservoir. Pour in the new fluid and push out the old fluid as Gordon describes.
Regarding brake fluid, I just learned that there is a DOT5.1 standard. It is compatible with DOT3 & 4 and has a higher boiling point.
my understanding is DOT 5 is not compatible with 3or 4
5 is silicone based. 4 is polyglycol based like 3 & 4 and is compatible with them.
The wikipedia article on brake fluids is well written.
https://en.wikipedia.org/wiki/Brake_fluid
-=theron
Gordon Nichols posted:https://www.speedsterowners.co...694#2135445019039694
Mine is the new and greatly improved version of this:
http://vwparts.aircooled.net/M...04-p/motive-0104.htm
But I deleted the pressure gauge on mine in favor of a real, VW Type-1 fluid reservoir cap. That's really the only unique thing you have to buy. ACE should have lots of 2-qt bug sprayers on hand right about now....
Hey show us a pict Gordon... I probably want to do this myself in a few years. ![]()
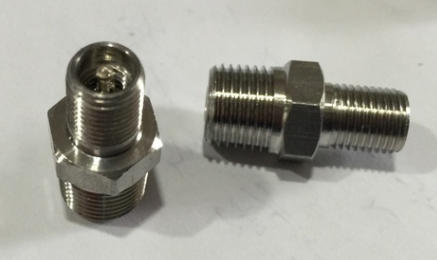 Really all you need is an extra reservoir cap, an air source, and one of these here schrader to pipe thread adapters. Drill and tap the cap and screw it in. Fill the reservoir to the tippy top and put 5 psi or less of air on it. Bleed as usual, furthest to closest to MC.
CHECK THE RESERVOIR OFTEN, DON'T LET IT RUN DRY.
When it runs clear and not brownish, stop bleeding and move on to the next. Done by yourself, and cheap too. I do this every 2 years, like clockwork.
I have found that if you crack a line open or replace a hydraulic part, manual 2-person bleeding becomes a necessity, especially if the system is new or dry(new MC?). I'll start with an air bleed by myself to get a pedal, then get some pumping help from the GF or a buddy. You really need to pump 3 times violently then hold. Open bleeder and close BEFORE the foot comes off the pedal(I know 99% of you know this). This 3 hard pumps will force the finer bubbles out. This can take a few tries until you get it all out and get a consistent hard pedal.
Attachments
Oh yeah, 1/8" npt on the other end of the schrader valve.......
Here you go, Ray...
Took a while to find it.
The cap on the end of the hose is the same as the brake fluid reservoir cap you now have. If you look closely, there is a short piece of copper tubing protruding to the left of the cap. The length of that tubing sets the proper final level in the reservoir when you're done.
Fill it with a quart of fluid, screw the cap onto your reservoir, give it 4 or 5 pumps and start bleeding. When done, place the bug sprayer on the floor (if it isn't there already), unscrew the pump until it depressurizes and the excess fluid will drain out of the reservoir into the sprayer tank and just to the bottom of that copper tube, the exact level of the "Full" line of the reservoir.
This is an older photo, and I have now added a quick-disconnect fitting near the cap so I can use it on my Speedster, while my neighbor can use it on his motorcycle disk brakes and his slowly-becoming-a-classic pickup truck with different caps/adapters for each one, so we get a lot of use out of it. The 2-quart size is what was on the shelf and has worked well - they also have a 1-quart smaller size if that works better for you.
Attachments
Thanks Gordon I had never thought of making one myself but this looks pretty cool I guess you could always make the BRAKEBLEEDER and if you make an error on the length of the copper pipe you can add a little. ..
Michael McKelvey posted:Thanks for your replies. I thought that with what I thought was relatively few miles on the old fluid it may not have changed color much.
Any fluid recommendations, including DOTwhat? SoCal said DOT3.
It may not have many miles on it, Michael, but brake fluid absorbs water over time (I think the word is hygroscopic?) and the cylinders (or calipers) and hard lines will rust out from the inside over time, hence the recommendation to change it every couple of years.


