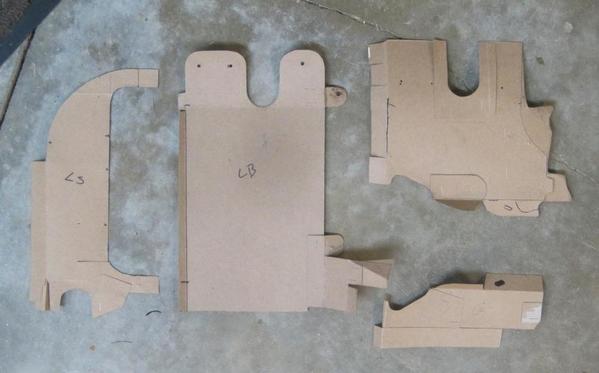
OK, since I'm waiting for parts to arrive in the mail AND I have some sheetmetal kicking around AND I have those sled tin templates that Al and Glenn provided, today I'm gonna make some sled tins!  Might as well - with the engine on a shop stand it doesn't get any easier to work on it than this.  

Once it's off the stand, I can pull the flywheel and replace the mainseal, button it up and get it back in.  

Question for you engine guys:  If I pull the flywheel and it's part of a balanced spinning assembly ( crank and flywheel balanced as a unit ), what should I be looking for as any possible alignment marks to put it back together?

Thanks.  gn  Pictures of the Sled Tins at eleven.....

Original Post

Replies sorted oldest to newest

My 8 dowel crank has one pin offset, so it only goes on one way.

Gordon, I made sled tins a couple years ago. Mine are aluminum but are reversed to dump the hot air rearward in the mood engine orientation. I used a pair of old bails to hold one end and the normal sled tin holes in the case for the other. Lowered my CHT an average of ten degrees Fahrenheit!

What kind of stand do you have? The factory VW allows flywheel removal in the stand.

The templates that Al "borrowed" from somewhere else will get you in the ballpark, but then they need to be tweaked to fit.  Metal used was the same steel I got for the heater plenum, so HVAC thickness (19 ga. ?)  Aluminum might have been easier to work, but this stuff wasn't too bad - used a vise and wood block, some pliers and a pair of metal benders (very wide jaw pliers) to work it.

I've seen the proper "VW" service stand mount - this is not that.  The engine stand is made for a typical in-line engine, like a V8 or straight 4, not a flat 4, but I made a set of stand-offs to accept the mounts.  Not ideal, but serviceable.  When I get it off the stand and onto the motorcycle jack, I can easily attach a torque bar and remove/replace the flywheel.


OK, "Cheerful Charlies".......     Question time!!

Something that came up in this little operation was what appeared to be a failed air vane thermostat.  This is the part that helps the engine warm up quickly and then regulates the cylinder head temperature by varying the air directed across the cylinders.  

One of these things is not like the other.  They are both at about 50 degrees F.  

Which is the "good" one, and why?

bellows

Attachments

Images (1)
  • bellows

Well, pretty much everyone got it right - the one on the right is a dead one and the one on the left is a new old stock german one from Bug City.  That one's going in today, along with the rest of the stuff taking up space on my workbench to make it a whole engine again, and then I'll get it off the stand, pull the flywheel and replace the seal.  Hopefully, I'll be back on the road this weekend!

Luis!  Awesome Powdercoat is a great site.  Not only sells you stuff, but explains why you need it in the first place.  I wish more sites were as good as that!

BIll:  Don't unnahstand "face of the motor" so I'll just take a bunch of photos from all sides, the northwest corner and southwest corner and, of course, the aerial photography, and see if  they're what you want.  

Once painted to match the motor, they become almost 'invisible' and look like they belong there.  Danny P says they reduced his head temps about ten degrees - who knew something so simple would be that effective?  And he has to run them backwards!!

OK, here you go:

Driver's side, from the rear.  The new tin attaches to the two bottom threaded holes (6mm screws) on the sump, goes straight out from the sump holes and makes a right angle straight up, then another right angle out over the top of the J-tube and has a lip on that end to catch the ridge around the head.  There is no reason to remove the J-tube to install these pieces - they slip right in, once you get them lined up right.

DSC02898

Passenger side, same thing as Driver's side, only it clears (and protects) the thermostat bellows.

DSC02899

A aerial shot from the "Five Cent Racing" Drone, of the driver's side piece.

DSC02893

Here's a better view of the Driver's side piece.  I added 3/8" extra metal along the curved part of the tin, to make a 90º bend in the metal so it covers existing tinwork holes that are there to accept the heater boxes.  Having that extra metal there allows it to seal up really nicely.

DSC02890

I used Al's templates, but found them to be very slightly off for my tins (but well inside the ballpark), plus, they didn't have that extra lip along the curved parts.  I suggest that you make some paper templates using Al's info, then tweak the paper ones til they do what you want and THEN flatten them out as a template for the metal versions.  Mine were overkill for metal thickness - you could easily use galvanized HVAC sheetmetal which is much easier to work, or just get some aluminum flashing and use that (John Steele would, why not YOU?)

Attachments

Images (4)
  • DSC02898
  • DSC02899
  • DSC02893
  • DSC02890
Last edited by Gordon Nichols

BONE HEAD ALERT!!!!

 You're right, and I was thinking about lunch when I wrote that above, and NOT how they actually attach.

The new tins do, in fact, attach to the existing VW sled tins and the existing tins are what's screwed into the sump.  (Hey....There's a lot going on down under there and an old guy can get confused....)   Those existing tins have welded-on, captive nuts for the 6mm screws used to attach the new tins you make up (originally there to attach to the heater boxes).   So there's a 1/2"-3/4" wide tab on the bottom of the new tins and that long tab has a couple of holes that should line up with the screw holes in the existing tins.  You can see the tab here, at the bottom of the piece:

DSC02890

Yes, I straightened that part out flat after I painted it.  Big deal.....What'sa scratch or two? - you can see these things anyway and I'm wicked careful.  So that, being the Driver's side, is actually assembled turned left-to-right.  

Here are a few more pictures to confuse you even more:

Here is the driver's tin attached to the existing sled tin:

DSC02901

The new piece attaches to the top two screws, does a 90º up past the J-tube, then another 90º left to go across the bottom of the head and get caught on the lip.  

DSC02904

This essentially forms a rectangular channel for the air to be blown out the back of the engine.  I don't have a decent photo of that rectangular space on the driver's side (for that I would need to hire Troy), but here it is on the Passenger side, with the thermostat in the channel.  The existing tin is at the bottom of the channel, and the new tin starts at the two screws on the right (just to the left of the muffler clamp) makes a 90º turn up past the J-tube, then another 90º turn to the right and catches the lip of the head.  With proper bending here and there, everything stays in place with just two screws holding it together as it's all held in tension.

DSC02905DSC02906DSC02907

Hope this helps, Bill.

Attachments

Images (6)
  • DSC02890
  • DSC02901
  • DSC02904
  • DSC02905
  • DSC02906
  • DSC02907

Remember, way up near the top of this thread, when Dr. Clock wrote about the flywheel: "After removing the Gland nut, make your own mark on the crank end and flywheel Be sure to replace the exact # of shims.....for peace of mind do check the end play" ????

Peace of mind.......In a person who's OCD.  Yeah.......right.

So I thought about it and thought about it and then worried about it and on and on.

In the end, I figured, "Why Not?"  I have the flywheel off, anyway, so let's check the end play!

Trouble is......I don't have a dial indicator or the setup for a VW engine.  But.....my late brother did so I went over and borrowed his.  Should have it set up and ready tomorrow (Tonight is Gluten-free night at the Red Rock Cafe, plus they have a bunch of new Micro-Brews this week so that might take a while to get through).  Then, once I test it and know how bad it might be, the next question is "Where the hell do I find a specific-thickness flywheel shim for a 1970 VW engine????????  Maybe I can hit up Al Gallo's builder - he's pretty close.

One little thing ALWAYS leads to several others...........

Thanks, Merklin.  

So I finally checked the damn end-play thing.

Running three (as specified by herr Doktor)  .0142" flywheel shims.

End play is .005" at 200 Ft. Lbs.

VW doesn't offer any thicker shims and I'm tired of screwing with it.  It is officially done at that end play (which I expect to decrease to .003"-.004" when torqued to 300 ft. lbs., anyway).   The seal is going in and I'm moving on.

Of course, I did end up buying a nice end-play gauge, so I win, in the end.....Right?

He who dies with the most tools, wins!

Well, looks like I'll be shooting for a DECEMBER Loafer's lunch, this year, but even with the Holiday and a young grand-neice in hospital this week, I've managed a few minutes here and there to work on the car.  Clutch is on, everything's buttoned up except for the Intakes and carbs (they won't fit past the frame rails if they're on the engine - Thank you CMC frame designer     and it's going in TODAY!

engine jack

Taking a little longer than normal as I've gotten a pinched nerve in my neck, but it's going.  Those Craftsman motorcycle jacks are great.  Get the car rear way up to clear the fan shroud, roll it in under and center it (more-or-less), bring the car down to level, bring the engine up to meet the tranny input shaft and guide everything together.  If things don't quite line up I usually tweak the angle of the car jackstands to match the engine jack angles and eventually (with the proper level of grunting, looking from side-to-side and then escalating levels of swearing at it) it finds its way to where it's supposed to be.   The four mounting bolts do the rest.

That's one small push for a man, one giant leap for Speedster-kind!

Well, maybe a whole buncha small pushes and jiggles and shaking and messing with the crank pulley to get the splines to line up.  Should be in by leftover Turkey time, in about an hour!

Attachments

Images (1)
  • engine jack
Last edited by Gordon Nichols

So my car has sat, since Thanksgiving, never been re-started and with not a lot of work going on until last weekend when we had some really warm weather, so I tried starting it.  It cranked a lot, but wouldn't catch, almost like there was no spark.

Nuts.....    

I peeked down the carb throats and, for sure...., the accelerator pumps are working so it's getting gas but won't start or run.

So I thought maybe I missed a wire when I was putting the engine back in and maybe there was no spark, but it's a real bear to pull a plug, put the plug wire on it and anchor it somewhere that you can see the spark plug tip when it fires.

Then I remembered a nifty little tool my Dad had for checking the spark on lawn mowers and small engines - a non-conducting Phenolic donut with a couple of pointy-end screws going into it, a big electrical clamp on one screw and a stud with a spark plug cap on the other and it was used to see if the points/coil were working.

So I made an "el Cheapo" version:

Sparky 

I can adjust the gap wider or narrower by turning the screw with the green lead attached in or out and it's pretty easy to see the spark happening in there and tell the strength by the spark color.  The white tube is a piece of 1-1/2" PVC pipe I had kicking around and an old snowblower spark plug was sacrificed for the end cap.   Works great, and quickly showed me that the coil was putting out LOTS of spark - all the way past a .060" gap!

Now, I've got a good spark, and fuel is squirting in, and I got it to start by pumping the heck out of it, but it won't stay running.  Then I remembered that, (1.)  it really sucks, getting old, and (2.) I made the idle jets a lot smaller when I did the rebuild, and maybe the mixture screws might be a little too lean?  So I checked them all and they were 1-1/2 turns out, when the Thomlinson book says start at 3 turns each and go from there.

So today, at about 32º out, after turning one screw all the way in and then out 3 turns, with my bare fingers, I decided this really sucks, too, and went to Home Depot for a stubby screw-driver that I can cut down to just under 2" long so I will have something to turn AND know how far I've turned them.  Yup, a dedicated Dellorto/Weber mixture screw screwdriver.  I'll put some sort of a bump on one side of the plastic handle (once cut down) as a reference point to tell how far it's been turned when adjusting the screws.

You can tell there's not a hell of a lot to do here when it's snowing out, right?

I haven't had this much fun in the cold since trying to get a dead Artic Cat snowmobile going at -10º in Vermont.  At 9pm.  We ended up towing it behind another sled for 12 miles.    

I sure miss Beaufort:

Beaufort, SC
Friday 3:00 PM
Mostly Sunny
Mostly Sunny
Temperature:  54ºF
Precipitation: 0%
Humidity: 24%
Wind: 14 mph


Attachments

Images (1)
  • Sparky

Add Reply

Post Content
×
×
×
×
Link copied to your clipboard.
×
×