I made tall saw horses from 2x4s. Your setup looks great.
Attachments
It was fun to build, and low cost since I scavenged material!
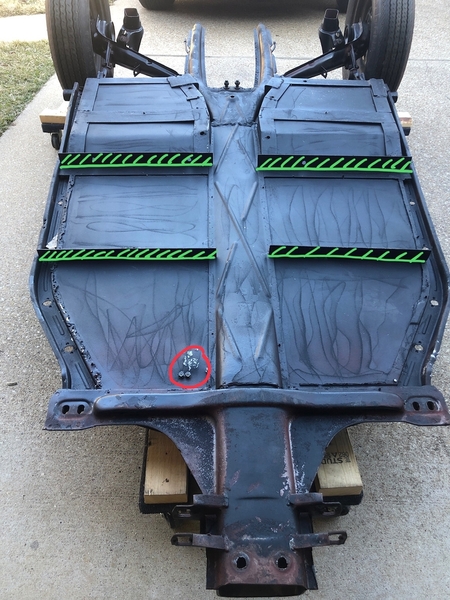
I flipped the pan over while I had some guys there to help. Next task is to start cleaning up the supports that were welded to the bottom of the pan. I’m going to remove the vertical leg of the angles that were welded across (marked in green), leaving just a flat bar across the bottom of the sheet metal.
The rear area where the seats go are plenty strong, look at all that steel!
Also, I have to do some work around where the pedals go (circled in red). The sheet metal needs to be “stretched” down like the original pans to allow the bottom of the pedal to clear the pan to properly engage the pedal stop. The pedal stop itself will need to be replaced to, the one that is there is a a “custom” piece that doesn’t allow for adjustment.
Attachments
Ok, not trying to get off track, but now that my body is up in the air on the cart, I can easily get up under there and look around a bit.
Red Xs - I am not going to use heat in my build, replacing the heat exchangers with j-pipes etc. Here in East Texas, there are pretty days to drive a topless car each month during the winter. I am going to put heat in the seats, get a good bomber jacket...anyway, I digress. I’m going to cut off the two pipes meant for the heater and weld a patch over the hole.
Yellow circles - According to the assembly manual, the plates circled are for the show bar supports. These could be removed since I’m not using the show bar.
Purple circle - from what I remember when my body was sitting on the pan, the tunnel cover to access the shift coupler was about half covered by this area. Does this part of the body (or frame?) need to be modified to be able to get the tunnel cover off?
Blue circle - this connection for the rear part of the frame, this doesn’t seem like a great joint to be supporting the WHOLE back of the car. Should this be reinforced somehow?
Green circles - these are glassed in 2x4s. These appear to be acting as spacers to hold the firewall in place. Is this correct? And has anyone had any problems long term with this material or method?
Attachments
I wrapped the 2x4s with fiberglass.
Why not just cap the pipes so you or someone else could add heat in the future. That would be less work too.
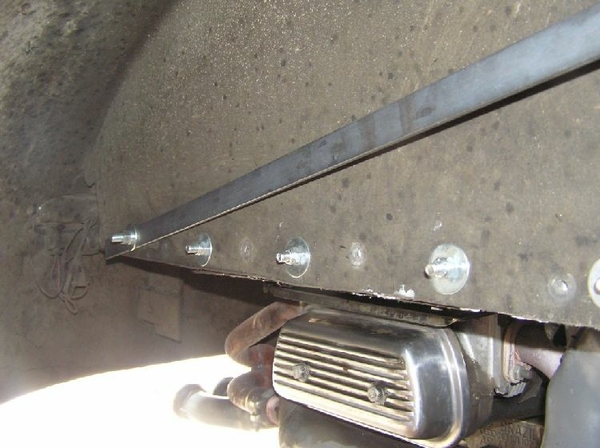
Easy to cap the pipes as Mike said all I do is stuff a piece of foam 3/4" " in and make a plug from silicone caulk. 2 x 4's should be wrapped in FG for add'l support. Also to retain a good vertical door gap, support the rear of the body tan drill out the rivets on the horizontal steel 2 x 2 in the wheel wells replace with five 5/16" bolts and exterior construction adhesive.
No issue with the purple circled area - the fiberglass "rear lower seat" can be cut out to access shift coupler access cover. Not my car but where the dark black square is.
Attachments
I used suitable size plumber's test plugs in both of the heater pipes (mostly to keep mice out). It's an expansion plug - push it in, tighten the nut in the middle and you're done.
I happen to use the show bar supports, but even if I didn't I would leave them in there. All you'll save is 4 - 5 pounds. I did weld in diagonal supports just behind the doors once I had the rear of the body straight.
Yes, the body overlaps the shift coupler access panel by a few inches. Most of us just cut a piece out of the body just above the pan plate, then install a hinge to let you flip it up on those two times in 20 years when you might want to get in there.
Blue Circle Joint: That's not all that's holding up the rear of the car. There are also the two vertical wheel well panels which we release, then get the door gaps right and then glue and re-bolt the panels to hold the body in place. See Alan's suggestions, above:
"Also to retain a good vertical door gap, support the rear of the body tan drill out the rivets on the horizontal steel 2 x 2 in the wheel wells replace with five 5/16" bolts and exterior construction adhesive."
Personally, I have never heard of that joint ever failing, but That's about where I ran my diagonal from the top of the vertical tube behind the doors (hint, hint).
I feel really cool, too, because my CMC was one of the last that they built
and my 2 X 4's came already wrapped in fiberglass. 
Attachments
On the potential butt sag, many have also added some diagonal support to each side. I used some flat pieces of steel bolted in. I extened the square steel brace behing the door with a piece of angle iron to get a higher support angle to the rear. Others have even used turnbuckles and threaded rod.
I don't recall seeing the 2x4"s but there is a tremendous amount of wasted space back there. The photo of the rear shifter coupler access - says "Leon's oil cooler cut out" - lots of room back there for an oil cooler, gun safe, gas heater, speakers or other contraband (beer cooler?)
Attachments
Great information, thank you! Plugging the heater tubes is a better idea (I tend to create more work for myself), and I like Gordon's idea of the plumber test plugs. I'll leave the show bar plates in place, again, why create more work, right?
I will add the bolts and extra support for the butt sag to my list to do when I get to the body.
For the tunnel cover, is that square tube in the frame not touching the tunnel, therefore allowing the tunnel cover to slide out from under? Then you can lift the access hatch y'all talked about creating in the fiber glass and service the shift coupler (every 20 years!), right?
Yes - that's why they added that jog in the steel cross member - it would be stronger if straight across.
Well its been awhile, and the Porsche project still sits neatly tucked in the corner of the garage. Spring activities and school are winding down, so maybe some work will get done this summer.
I did buy an engine for the Porsche, sort of a long term plan, follow along carefully for a second: My oldest daughter has her drivers permit and turns 16 in February. I want her to learn a manual transmission, so I bought her a car to give her plenty of time to learn the stick shift. Each of my daughters will get a turn in this "learner" car as they get their licenses. So in 6 years, this car will be mine again.
The car I bought is a 2005 Subaru Forester with a non-turbo 2.5L. SO, see where I am going with this?
After the girls are done learning I have a donor for a Subie swap in the Porsche!!
It’s been awhile but I may have some time over the holidays to work on my project.
Referencing a few posts back about trimming those angles supporting my sheet metal pan, I have been thinking more about how my pans were replaced.
The local shop that originally re-fabricated the pans is not a car shop but rather a general welding shop, which explains the heavy duty and cobbled together nature of the repair. Also, they used thin galvanized sheet metal that is riveted in and flaking off the paint. I am thinking about cutting out the homemade pans and starting over.
I think the easiest way to do it would be to remove what is there and prepare for new pans. But instead of buying new replacement VW pans and then shortening them, removing seat brackets etc, build a 1” steel tube frame to bolt the body to and then weld in new 20 ga sheet metal for the floor. I could also form the seat area a little bit deeper since I am a tall guy (I saw that in another thread).
Thoughts? Anyone done this, maybe have pics?
Or is this a waste of time and I should just start with stock VW pans and shorten them?
Strange that no one from the brain trust here has offered suggestions. I can't offer any since I am not on that level. Your project is taking shape and will be awesome.
Hi @TreyG,
I thought of this also and "IF" i was not trying to just get the car together to start with, I would do this.. Maybe when I retire I'll redo the floor pan to my liking. It can be done and I'm sure there are many fabricators that could do it. It just depends on how much you want to spend. also, I'd probably go a little thicker than 20 ga on the steel sheet.
Good luck if you go that route.
@Wrenn Smith posted:Hi @TreyG,
I thought of this also and "IF" i was not trying to just get the car together to start with, I would do this.. Maybe when I retire I'll redo the floor pan to my liking. It can be done and I'm sure there are many fabricators that could do it. It just depends on how much you want to spend. also, I'd probably go a little thicker than 20 ga on the steel sheet.
Good luck if you go that route.
I believe original VW pans are about 18 ga. It’s a good suggestion to go with at least that much.
Good suggestion on the thicker sheet metal.
This project is going to take me a while so I think I’m going to go ahead and do it all the way the first time instead of coming back later and redoing things.
Since posting about this I have seen quite a few of the Manx buggy guys on various forums and how they do to their chassis to strengthen them so I think I’m going to fabricate the pans.
Plus I like the idea of lowering the seat area just a bit. Anyone ever see those old Magnum PI episodes where Tom Selleck’s head is sticking out the t-top of the Ferrari?😬
It’s been reported that Selleck couldn’t drive the 308 with the T tops on. I also remember hearing that Ferrari gave him a 308 in appreciation. If that’s the case it was hard for him to use it....
Stay inspired, Wrenn, as you have a deadline of 21 September next year for the next Tour de Smo'. ![]()
@Impala posted:I believe original VW pans are about 18 ga. It’s a good suggestion to go with at least that much.
18 ga steel is .05". VW pans are flimsy and rely on the assembly for strength. I haven't measured the pan thickness but would guess they would be 22 - 24 gauge. In Speedsters, seats and sliders will cause the floor pan to stress fracture over time. You will want to add some reinforcement where the mounting bolts will go.
18 Gauge would be a good choice for the floor. I doubt any of the aftermarket patch pans are that heavy.
Flat sheets are absolutely nowhere near as strong as rolled, dimpled, or corrugated.
VW pans may be thin, but they are stamped increasing the strength.
@Lane Anderson... yep that's why I'm skipping the highly custom fabrications on this round.... Smo22 will very likely not be a cosmetic-complete drive but will be a scenic and fun --- if I get it together. I set the body on the chassis just for kicks... with the motor on the floor and the chassis on jack-stands it is at least starting to look like a car.
On a thread tangent anyone going to the Moultrie car swap meet this year? It's not really a speedster type event a it's mostly American older cars and car stuff. But still cool for gear-heads in general.
How do you quote someone?
See the little gear in the lower right hand corner? Hover over that and you'll see "Reply with quote. Alternatively you can do a simple cut and paste.
@DannyP posted:Flat sheets are absolutely nowhere near as strong as rolled, dimpled, or corrugated.
VW pans may be thin, but they are stamped increasing the strength.
Danny is correct. the forming on the pan's floor panels make them much stiffer than flat sheet.
I have created my car's (CMC) "frame" in CAD (solidworks) from rough (tape measure) measurements. I have also made a pan/chassis in cad from internet dimensions. The 2 actually lined up pretty well with what I see in reality on my car. If you want some help with drawings for the fabrication, I may be able to give you some starting points. A good Fab shop that does metal forming would be able to put dimples and features into the floor panels that would add the stiffness Danny is referring to. (or you power out with thicker sheet and secondary ribs.)
I wouldn't put those thin floor panels in my car. The dimples add NO strength to support the seat. None. ZERO. They keep the floor from sounding like a drum. VW's seat rails are removed during the build. Unless you reinforce the bolt holes, that you have to drill to mount the seats, they will stress fracture if you use the car.
If you're just going to look at it the dimples will be fine.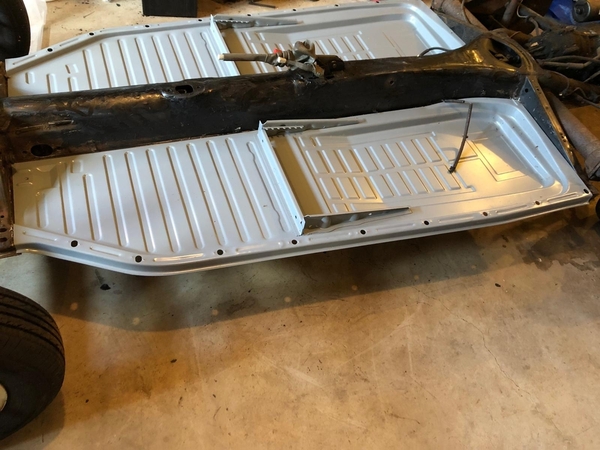
Attachments
When I rebuilt my IM, I added 3/16ths flat steel rectangles between the seat bolts (front to front and rear to rear). The idea was to make sure the seat belts couldn't pull the seats out of the floor. A coat of truck bed liner and Bob's your uncle.
When I bought my CMC project from the previous owner it had a shortened pan with fabricated floors included. The pans are framed from 1x2 thin walled tubing and floorboards are sheet metal that is about 3/32" thick. It is very rigid, the only thing that I wish I had changed would be to weld in recessed areas about 1 1/2" deep for the seats.
Attachments
We’ll the time to do it is now ![]() .
.
Thanks guys!
James, those are great pics and almost exactly what I was thinking of doing, and recessing for the seat similar to a stock VW pan.
I also plan on reinforcing the seat and seat bolt mounting points as Jim suggested.
You will need to recess the floors a little; otherwise your head will hit the convertible top frame when driving with the top up and will stick over the windshield frame when driving with the top down.


