I thought I would start a topic for us to discuss this point. Most of us who grew up with VW or early Porsche know the Air Cooled issues but now that we are starting to see the Subie platform being used... being a boxer motor with water jackets this bring the biggest start of the season issue to assure the cooling system is up to snuff and well sealed and free of air pockets to assure trouble free first drives.
Replies sorted oldest to newest
Porsche factory service manual on the Boxster instructs that the car be run up to full temp, then jack up the nose of the car using only 2 posts of a 4 post lift, essentially as high as you can get it before the exhaust tips touch the ground. Let it sit and cool and it will purge the air to the high point, untrapping it from the engine/crossover/previous high points. We use this same trick on Subaru powered Becks and it works very well.
We also use a vacuum bleeder for our initial bleed and that is really handy in removing all the air. Pull the system down to 30" of vacuum, let it sit for 10 minutes for a leak check and then let the vacuum pull the coolant into the system. Generally speaking it will keep 95+% of the air out of the system and make for an easy initial purge. This doe snot work on a system with coolant traces, only a new bleed/dry system.
I personally do not like purge valves or petcocks in the system, as they are potential failure/leak points, so I run a seamless system from stem to stern, but I read that guys have good luck using some sort of purge on the high points also... just not for me.
OK, back to work for me... :-)
Thanks Carey, I appreciate your feedback and experience with this as a builder.
If you already have fluid in the system I wonder if some sort of vacuum pump could still be used? Probably not
A good sealed system is what we all are really trying to achieve and some are better at it than others at achieving this. Maybe using AN fittings everywhere would help
We use all AN fittings and got rid of hose clamps a few years ago.
I have not had any luck with vacuum on an existing system, only new.
Is this something that needs to be done periodically or only when flushing and refilling the system. My car will not sit for long periods of time since our driving season is year-round.
We don’t do this on our daily drivers. I don’t see why we’d need to do this on Carey’s setup.
>
Well that depends ![]()
Bleeding the system is only needed if there is some area where the system is not completely sealed.
The cycle usually goes like this. Air can get sucked in and can cause an air bubble on the high spot, sometimes the coolant expands and it out flows on your garage floor, and then the water temp can climb especially at idle which is not something you need or want.
Hence the story from Ed and others that they have a bleeding routine yearly.
Bleeding the coolant system for most Subie I think, except those who have been able to achieve a completely sealed system seems the caution tale for saving your vehicle especially due to the length and complexity of our cars plumbing.
Update, I believe that this is the achilles of subaru installs and your mileage can vary.
All our Subi cooling systems may be slightly different, but some general rules apply.
Don't overfill your expansion tank. If/when you do, you will get the coolant spillage mentioned by Ray above. That's why the FULL mark is about 1/2 way up the side of the tank.
The easiest way I have found to purge a Subi rad is to use a funnel that effectively raises inlet of the rad. This seems to work the same as elevating the front of the vehicle. Try Amazon or your local parts store. They are plastic, cost about $25 and have a variety of fittings for different applications.
If you google "bleeding Subaru radiators" or similar, you'll find that there are dozens of you tube instructions, interpretations, texts, regimens, and strict orders that CANNOT be deviated from, etc. After all, we're car guys, right?
When I read Chines reply above, I realize that there may be similarities between boxer-style engines and boxster engines, but the query was regarding Subaru engines specifically, at least in the heading. The Subaru platform does have a few unique issues. I know that the Hines family and SE knows this, but others may be confused.
The similarities between a Boxster cooling system and our (Beck) cooling systems was the reason for my comparison. Both have front mounted radiators that are essentially the low point of the system and like to trap air. Having worked on several Boxsters and referencing the factory service manual, we figured we'd try the same technique on our Suby powered cars and it works well.
@Lane Anderson @Tom Blankinship No, there is no need to bleed your coolant system unless it has picked up air. On rare occasions we'll get a stubborn bubble in a new system and it will purge out during a drive, in which case you simply top off your rad and/or overflow. Once that is done there is no need to mess with it.
@chines1 I do believe your tips apply to all watercooled speedsters due the basic layout of the car. While I have two radiators the same issue occurs, the length of the pipes and the location of the rads.
Have you found that the auxiliary pump oozing at all? I have seen some oozing sometimes at the O-Ring seam (pump is made in two parts) and was wondering if it could allow air to be sucked into the system. I have been using Evans coolant as a precaution and it may be the reason for the oozing it seems a bit slipery compared to normal prestone.
I have a Mezière in line pump which seems to work well for boosting at idle.
Ray
P.S. I have been thinking of installing a buzzer that activates if the temperature gets hot, or out of the High operating range. It would help with those emergencies where something goes out of wack or fails. Any thoughts?
We stopped using aux pumps several years ago, found they weren't needed...
Good for you! I think your piping is straighter and less convoluted and thus less restrictive than my setup...
Mine goes up from the back, up the left side then below the rocker panel to the front up the wheelwell and then down to the rads across the front to the next rad then back over the wheel well, passenger side, down the pass, right side rocker and back up to the engine. The pump is in front between the rads.
Just writing it is convoluted. ![]()
Buzzer won't hurt anything. We just convert the oil temp to water temp, or run a secondrry water temp (if requested and they want additional gauges). While I don't stare at my temp gauges, I find it habit to pay close attention to them
I'm learning ! Thank you ! Just a comment on the temp. warning buzzer. You need a temp. switch not a sending unit for a gauge. Temp switches can be ordered with a specific temp. range that they must reach before they come on. Usually they will start to tickle the buzzer as they approach the bottom end of it's temp. range. It's a good audible feature to slap you in the face to tell you to look at your temp gauge. I had both oil pressure and temp. audible warning in my Speedster.
I really like the AN fittings concept for the cooling system. I think Greg at VMC uses them..............Bruce
Just a slightly off topic thought. Should there be a watercooled section to the site and an aircooled section?
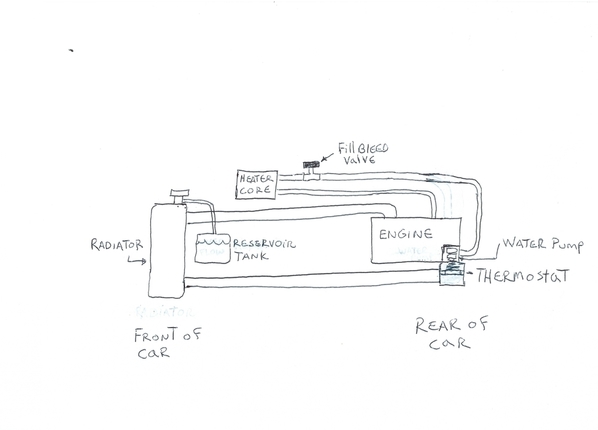
I just went through bleeding the coolant system on my Special Edition converted Fiberfab. I was changing out a bad thermostat and couldn't get the system to bleed or even start coolant flowing to and through the radiator. I realized the thermostat I removed had a 6mm bypass hole drilled in the lip by Special Edition. They have found that this helps get the system started and bled. I checked with Carey and he told me the hole wasn't mandatory and many don't use it but they found it makes it faster to bleed out the air. After a day of trying the bleed the system I broke down and removed the thermostat and drilled the hole. I got all the air out of the system in less than an hour. Lesson learned, pay attention to the part you remove compared to the new one going in. I also had a heater core to deal with that sets higher than the radiator. I installed a Prestone fill/flush valve on in line to the heater core. This allowed me to get the heater core filled with coolant. The entire process was a big learning experience.
aircooled posted:I'm learning ! Thank you ! Just a comment on the temp. warning buzzer. You need a temp. switch not a sending unit for a gauge. Temp switches can be ordered with a specific temp. range that they must reach before they come on. Usually they will start to tickle the buzzer as they approach the bottom end of it's temp. range. It's a good audible feature to slap you in the face to tell you to look at your temp gauge. I had both oil pressure and temp. audible warning in my Speedster.
I really like the AN fittings concept for the cooling system. I think Greg at VMC uses them..............Bruce
Bruce, I too am learning. Do you have some suggestions on doing this. My goal is to see what the max temp should be and then have it activate the buzzer at that point. It makes perfect sense to have this as a safety precaution in a watercooled car.
Ray
Hi Ray...... The last temp. switch I used was set to close between 195F and 210F. It would start clicking the buzzer right at 195F and be fully closed at 200 so it was pretty accurate. I can't remember which company made it but it came from either Kaysor or Cadillac (not GM). They were used to trigger the radiator shutters on large 3 axle diesel truck/tractors. The buzzer was one used in an air brake equipped truck for the low air pressure warning. I think it was made by Cole Heresy. However, I think any 12 v warning device would work. In my speedster I used electronic sirens from Radio Shack
I did have a shut-off switch under the dash. This was so I could listen to the engine while starting and in the event that I wanted the ignition on while I was doing something that required me to do so. That shut-off switch was a double pole-double-throw. There other half of the switch was to turn on one of the extra warning lights in the instrument cluster. When the light was ON, it told me that the audible warning alarms were turned OFF. This way I was reminded to "activate" my audible alarm system. It was a nice theft alarm of sorts too ! If someone hot-wired the Ign sw. the low oil pressure siren would activate. Simple but useful
Using "sirens" turned out to be a good choice . First, I can't hear so well. Second, it's hard to hear anything with the top down ay 70mph !...........Bruce
so
Welcome to presbycusis. ![]() Old age hearing issues. and of course presbyopia, old eyes.
Old age hearing issues. and of course presbyopia, old eyes. ![]()
Ray...I'm not too bad yet. I'm just deaf in one ear and just can't hear with the other. My hearing aids use 8D batteries ! I use a fog horn for an alarm to get up in the morning. My ears produce twice as much wax as Shrek's and I own a candle factory....Bruce
Jimmy V. posted:I just went through bleeding the coolant system on my Special Edition converted Fiberfab. I was changing out a bad thermostat and couldn't get the system to bleed or even start coolant flowing to and through the radiator. I realized the thermostat I removed had a 6mm bypass hole drilled in the lip by Special Edition. They have found that this helps get the system started and bled. I checked with Carey and he told me the hole wasn't mandatory and many don't use it but they found it makes it faster to bleed out the air. After a day of trying the bleed the system I broke down and removed the thermostat and drilled the hole. I got all the air out of the system in less than an hour. Lesson learned, pay attention to the part you remove compared to the new one going in. I also had a heater core to deal with that sets higher than the radiator. I installed a Prestone fill/flush valve on in line to the heater core. This allowed me to get the heater core filled with coolant. The entire process was a big learning experience.
Jimmy...if you could do up a simple sketch of your cooling system showing the elevations of the various parts and post it here I think that would help a few viewers.
Here's one that looks simple yet workable. Not mine.
Attachments
Attachments
>
>
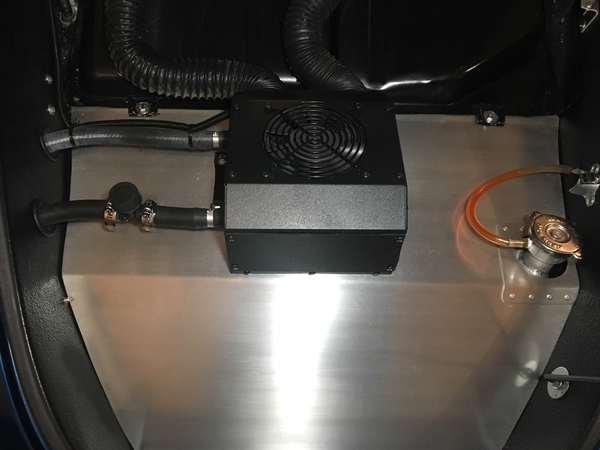
No room for it under my dash without it looking awful so Carey fitted in in my front trunk space and has the hot air blown into the passenger compartment via the two flexible hoses plumbed through the fire wall. It works great and You don't have to hear the fan blowing.
David Stroud posted:Jimmy V. posted:I just went through bleeding the coolant system on my Special Edition converted Fiberfab. I was changing out a bad thermostat and couldn't get the system to bleed or even start coolant flowing to and through the radiator. I realized the thermostat I removed had a 6mm bypass hole drilled in the lip by Special Edition. They have found that this helps get the system started and bled. I checked with Carey and he told me the hole wasn't mandatory and many don't use it but they found it makes it faster to bleed out the air. After a day of trying the bleed the system I broke down and removed the thermostat and drilled the hole. I got all the air out of the system in less than an hour. Lesson learned, pay attention to the part you remove compared to the new one going in. I also had a heater core to deal with that sets higher than the radiator. I installed a Prestone fill/flush valve on in line to the heater core. This allowed me to get the heater core filled with coolant. The entire process was a big learning experience.
Jimmy...if you could do up a simple sketch of your cooling system showing the elevations of the various parts and post it here I think that would help a few viewers.
Here's one that looks simple yet workable. Not mine.
Yes, they are both helpful. The photo also.
Todd M posted:David Stroud posted:Jimmy V. posted:I just went through bleeding the coolant system on my Special Edition converted Fiberfab. I was changing out a bad thermostat and couldn't get the system to bleed or even start coolant flowing to and through the radiator. I realized the thermostat I removed had a 6mm bypass hole drilled in the lip by Special Edition. They have found that this helps get the system started and bled. I checked with Carey and he told me the hole wasn't mandatory and many don't use it but they found it makes it faster to bleed out the air. After a day of trying the bleed the system I broke down and removed the thermostat and drilled the hole. I got all the air out of the system in less than an hour. Lesson learned, pay attention to the part you remove compared to the new one going in. I also had a heater core to deal with that sets higher than the radiator. I installed a Prestone fill/flush valve on in line to the heater core. This allowed me to get the heater core filled with coolant. The entire process was a big learning experience.
Jimmy...if you could do up a simple sketch of your cooling system showing the elevations of the various parts and post it here I think that would help a few viewers.
Here's one that looks simple yet workable. Not mine.
Yes, they are both helpful. The photo also.
Here's another system that will work. Proven in service with many miles and the rad is the "almost horizontal" configuration.
Attachments
I just had a second tank done for my car cooling my tech at LP says that the tanks should be at the same level so that the fluid can overflow into the second tank and be sucked back in when the car starts up again and the negative pressure starts up.
They made it out of stainless steel and all shined up. Location: It was placed right beside the overflow tank at the same height.
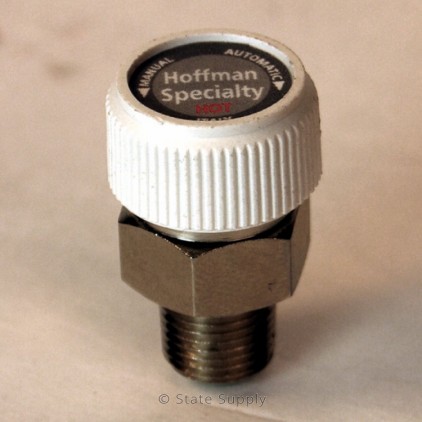
Help with Valve......So to restart this thread I had my cooling system bled and I changed one of these valves on the top of my aluminum it seems pipes that takes the coolant to the front and back. We have been using a wrench to get at these and it is not easy.... and was wondering if anyone of you guys had seen a brass fitting that might be able to have a bolt head rather than a pepcock so I could use a racheting tools to get there.

Attachments
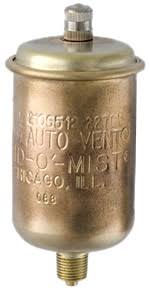
This I can help with. There are myriad air vent types typically used in hot water heating systems, including automatic vents (Maid-o-Mist is a inexpensive and common brand). Otherwise there’s something called a coin air-vent, sold for about $2 at every HVAC wholesale house in North America.
They’re typically 1/8 MPT, but a bushing gets you to whatever you might need.
Thanks Stan I may go visit an HVACdealer shortly.
Let me get back to my desk, and I’ll PM you.
Stan....What does this valve look like ?............Bruce
Stan Galat posted:Let me get back to my desk, and I’ll PM you.
Please detail it here also.....others might find the info of benefit.
I take it that the valve is good for so many pounds of pressure does anyone know off hand how much pressure is in a sealed coolant system>
aircooled posted:Stan....What does this valve look like ?............Bruce
I'll put up a variety of options in 3 posts.
IaM-Ray posted:I take it that the valve is good for so many pounds of pressure does anyone know off hand how much pressure is in a sealed coolant system>
The linked auto-vent is good up to 75 psi. Your radiator system runs at 15 psi or less.
Attachments
The Hoffmann 508 is an interesting auto-vent, in that it's low-profile, and has a manual ("coin vent") option. 1/8" MPT, 50 psi max operating pressure:
Attachments
Those are usually installed at the high point. Is there a high point in our system? Maybe near the engine but the flow of the coolant at that area might affect it. What say you kind Sir, Stan ?


