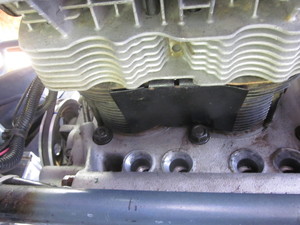
I thought my exhaust note was a bit loud, but discovered that my left cylinder head wants to leave my block.  I've only had my Beck for about 4 days and inspite of the 6000km on the clock, I think I have to pull the engine and check out the case.  My valves needed adjusting as soon as I got the car, so while I had the valve cover off, I put a torque wrench on the front cast nut...and it turned.  I pulled the rocker assembly off and proceeded to retorque the 4 exposed nuts.  Only one of them would take the 23# torque; the rest wanted to continue turning.  I'm going to pull the engine today.  Any thoughts???

Also, my hood latch won't catch. Why won't that 'li' in the receiver stay closed so that the male end will engage it?  That little lip doesn't slide over and stay there.

Meade


Original Post

Replies sorted oldest to newest

Depending on size of head studs used on engine there are different torque settings.  OEM pre-72 cases used 10mm studs which get torqued to 22 ft # and the later used 8mm studs which get 18 ft #.  The 8mm tend to have case savers installed (these are steel thread inserts screwed into the case with Locktite).  The case savers "prevent" the steel studs from pulling out of the soft alloy case.  

Typically the studs can pull out by overheating the engine or over torquing the heads.  I see cases bored for 94mm jugs and the threads of the case savers are actually exposed in the cylinder bore opening - seems that creates a weak area should the engine get really hot.

You maybe able to see where the studs go into the case and even see if case savers are there?  There are oversize case savers available should the original ones have pulled out.  Suspect the engine has to be torn down to add or redo the case savers so as not to get shaving into the case and keep the bore straight.  If only 1 or 2 need replacing it could maybe be done without tear down using grease and rags to contain shavings. 

Thanks for the information, Wolfgang. I'm familiar with the process and have installed casesavers before.  I was really curious about the overheating. My engine is a CRS 1915 (10)? and was wondering if these engines need the two tin pieces that hang down behind the #2 and 4 cylinders, as on the VW engines. The car is showing about 6k km but the nuts on the exhaust system show a fair amount of rust.  The previous owners trailered the car to various events in the Southeast and they claimed to have only driven it no more than 30 miles at a time.  I immediately adjusted the valves upon receipt of the car and found that the majority were closed.  They didn't have the fresh air heat tubes connected to the heater boxes either.  I did notice that the engine seemed to be excessively hot after a short 20 mile drive. (I couldn't touch the fan shroud or the carburetor linkage.  Any ideas?

Meade

Meade - On the hood (trunk, frunk, front thingie) the receiver's operation is very sensitive to cable tension.   Over time the cable stretches a bit and I'll bet that it just needs tightening.  I've had to do that a couple of times in the 10 years I've had mine.  Carey can fill you in on details if you have questions, but the easy way is to use a pair of needle-nose pliers or small vise-grips and grab the end of the cable under the trunk lip.  Loosen the screw on the latch and pull on the cable just a bit.  Then tighten the screw and see if that helps.  I would recommend removing the spare tire for safety's sake just in case you get it such that it won't open.  That will make it easier to get you arm in through the emergency access opening (if your car is new enough to have one) in the left fender well to release the latch from inside.  that opening was added after I had such an event happen and had to cut into the trunk from the fender well to get it released.  With the spare in place it was a real pain.  I mentioned this to Carey and they added the access hole soon after.

Sorry I can't help with your bigger problem.

You should have all the tins installed so you should not be able to see the ground through the engine compartment. Also, most of the cars use a VW bus foam seal to close the final small gap between the tin and the rest of the fiberglass pieces that surround the engine. At least in a Vintage Speedster built car and the CMC's. I'd imagine it'd be the same for an IM.

I'll look for a photo when I come back from physical therapy.

Lane, I think Meade's problem is just the opposite - the hood won't stay latched down. That can either mean that the cable is too tight, or that the actuator pall is hanging up from rust or crud in the mechanism, or the return spring is wrong or too weak, or the male stud on the hood is adjusted too short.  

I've had good luck blasting the moving parts of the latch with carburetor cleaner, then shooting a little automotive oil in there (Mystery Oil or PB Blaster is good, too), then applying some white lithium grease to the moving parts.  Make sure you grease the male stud on the hood itself, too.

If the spring is too weak, you can usually find something stronger and roughly the same dimensions at a local ACE hardware or equivalent.  Don't go overboard with the spring strength, as that just makes it that much harder to pull the cable knob and open the hood.  It might take a couple of spring iterations before you're happy with the action.

If the hood stud is too short, look up behind the stud for the lock nut, loosen it and use a screwdriver to turn the stud out longer then re-tighten the nut.  Only go about 1/2 turn out at a time until it latches well (I use both hands, palm-down and push hard on mine to compress the weather strip and latch it).

Hope this helps.  Oh, and it's a great idea to have that secondary hood latch cable for emergencies, too!

#5?

Edit- The type 3 tins shown above are not necessary, and are (said to be) actually detrimental to cooling (unless modified) on a type 1 engine. They do work when the bottom sled tins (#2 in diagram below) are left off, but the type 1 sled tins do such a better job at protecting the cylinders from the wind (preventing them from being cooled unevenly and they protect the pushrod tubes from being damaged from anything off the road) when the car is moving that I don't get why anyone would go to the trouble of fitting the type 3 pieces. At highway speeds the type 1 sled tins also allow the spent cooling air to enter the under the car airstream unimpeded; without them the air comes downward out of the bottom of the engine and hits the moving under the car airstream at a 90 degree angle. This causes turbulence and hotter running, where the sled tins almost use the under the car airstream as a venturi, pulling the air out of the engine and making the fan's job easier.

Remember, the type 1 sheetmetal package only works when it's all there and is complete system; leaving any of it off is detrimental to cooling and/or the life of the engine. I don't think leaving off the #5 pieces is a big deal, but it is there for a reason. VW reportedly spent over a million (late '60's) dollars in research and development on the doghouse modifications, so I see no reason (without more research than "yeah, it didn't melt down on the way over to your house so it runs fine!") to deviate here.

I will qualify all this with that you can leave off the front bellhousing breastplate (#3); it prevents dirt, leaves, paper, plastic bags and (supposedly) hot air from #1 & 3 exhuast tubes (during stop & go traffic) from entering the engine compartment from the front. The big hole most of us (or in some instances, the "factory" that builds our cars) cut in the firewall above the bellhousing breastplate takes advantage of the  positive under the car air pressure, and being further up, junk from the road (and heat from the exhaust) is less of a problem. 

dual port engine tin

Attachments

Images (1)
  • dual port engine tin
Last edited by ALB

I found this posted on another forum by an engine builder. A bit long winded but great info. This is something that I think I'll try. The last sentence is particularly encouraging.

"These cooling tins you are refering to are, as everyone said, indeed T3 cooling tins. Contrary to popular belief, these T3 tins do infact assist in cooling a T1 engine than the small flat square tins. I Have been building T1 based engines for 10+ years and my father has been building these engines for 40+ years as well. We have built most everything from a 27HP to 2400cc monsters. THESE T3 TINS ACTUALLY WORK! Though they only fit on engines 1500cc and bigger. The stock, flat, square tins that are commonly used tend to create cylinder 'hot spots'. These tins do not direct airflow all the way around the cylinders. These 'hot spots' are more common on non doghouse style engines. I have seen these 'hot spots' on dozens of engines, especially those in hotter climates. These 'hot spots' have caused cylinder/piston scoring and ring failure in extreme cases. (This would be more convincing to you all if I had a set of 'hot spotted' jugs to show, but I do not have any at this time). By using the T3 tins, the cool air flow is more directly routed around the bottom of the cylinders thus GREATLY reducing the potential for 'hot spots'.  I have used both styles of cylinder cooling tins. I have, to this day, never disassembled an engine, that utilized these T3 tins, and found 'hot spots' in the cylinders. For that reason, I install them on ALL of my T1/T2 engines, from bone stock to high HP beasts. THIS IS MY HONEST OPINION AS A VW ENGINE BUILDER.

If anyone does decide they want to install these tins on a T1 based, upright engine, the bottom wrap around tin still needs to be utilized (the ones that screw onto the heater boxes). They will need to have the air deflector 'bump' removed for them to fit. The bottom wrap around tins direct the hot air exiting the bottom of the cylinders out the back of the vehicle, preventing said air from being forced back up into the engine. The pulley side small deflector tins (the ones that bolt to the bottom of the upper cylinder tins on the pulley side of the engine) are not needed now if the T3 tins are installed.

If you have an exhaust system that prevents you from installing the bottom wrap around tins (Merged header, high flow j-tubes), they can and should be modified to accomidate the exhaust.

By utilizing the T3 tins, I have actually seen oil temperatures be reduced as much as 15 degrees F, and I have seen, in some cases, as much as a 50 degree F drop in cylinder head temperatures!!!! This is the other reason I use them. "

Attachments

Images (1)
  • t3-cyl-tin
Last edited by Rusty S
Robert M posted:

You should have all the tins installed so you should not be able to see the ground through the engine compartment. Also, most of the cars use a VW bus foam seal to close the final small gap between the tin and the rest of the fiberglass pieces that surround the engine. At least in a Vintage Speedster built car and the CMC's. I'd imagine it'd be the same for an IM.

I'll look for a photo when I come back from physical therapy.

Robert,

What is your opinion on a 36hp doghouse fan and a ram air fan? Which cools better?

Post Content
×
×
×
×
Link copied to your clipboard.
×
×