Great news about the being back at work, Ed! Hope it all turns out well. ![]() @edsnova
@edsnova
I give up.......
Seduction Motorsports?
(although the door looks like a Ford F100 pickup)
That looks CG to me, and I don't mean my initials.
Gordon Nichols posted:I give up.......
Seduction Motorsports?
(although the door looks like a Ford F100 pickup)
55 Buick
I don't understand what that Buick door pic is doing in this thread. wuzzah?
It's 3rd base, Ed. Don't pay any attention........
Sorry Ed, all your "holy" work reminded me of those door panels/craftsmanship.
Well now that Ed has a job, btw congrats, you can now get a Holy Day off of the spyder project.
Attachments
Common Ed, you really wanted to put a hole in there ![]() ... just kidding.
... just kidding.
And that is a...?
guessing gas tank go cart?
Oil reservoir?
It says “Oel” on the cap.
Looks like a dry sump tank, too.
Gordon Nichols posted:Oil reservoir?
It says “Oel” on the cap.
Looks like a dry sump tank, too.
Some of them say 710 on the cap. It confuses some people...
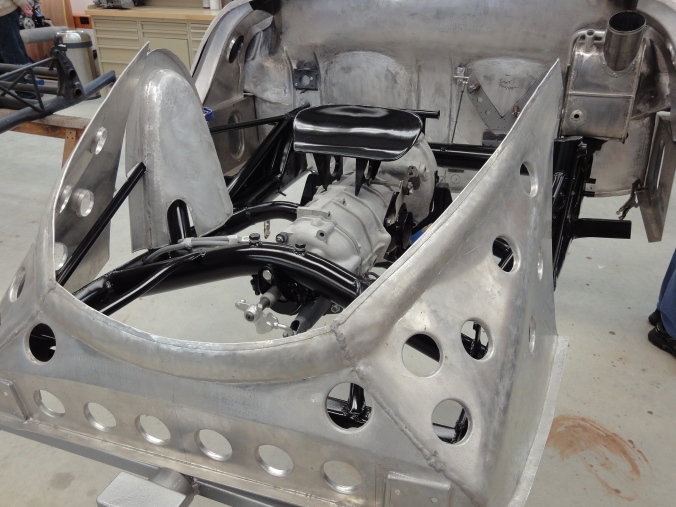
Fake dry sump tank/breather. It will function as a breather box and be positioned in the correct spot for a Spyder dry sump tank; it is scaled-down somewhat to make room for the Accusump, with which it will be cheek-by jowl.
Thus, my car will have its behind-the-passenger area of the firewall occupied by the correct(ish) looking and functioning "oil tank and breather components," as original.
[bows deeply; runs away cackling]

ooooo..... mores holes... looking good ![]()
Couple weeks ago, me boi Jimmy-da-welder took back my gas tank and the 3/16 plate I made to strengthen and shim-up the filler assembly. He was excited to use stainless this time because it leaves fewer voids, so he promised a nice smooth, no-leak finish.
Couple days ago I got it back from him and sho-nuff: smooth, shiny; great.
Now to drill out the five holes for the filler....
what the..
HEY!!
Three hours (and several bits) into it, I now have half a hole. Tried the small bits, the step bit, went to the store and bought some Milwaukee colbalt bits. Broke two of them.
Tried cutting fluid, tried without fluid; slow, very slow and not-so-slow. I tried pulsing the drill, pushing hard, not so hard and too hard. Pilot holes, straight in with the 5/32, everything in between.
I tried getting the tank up in my drill press. No-go.
I tried the internet. The consensus there, among welders and drillers, is, when welding with stainless stick: DRILL THE HOLES FIRST, THEN WELD.
Now they tell me?
Jimmy says he can drill it for me but I'm not so sure. I guess I'mma just give it back to him and cross my fingers.
Attachments
Yeah I could have told you stainless sucks to drill. Did you try oil?
An "OLD" trick we used on difficult to drill alloys was a blend of lard and sulphur.....
Never used it on stainless..... Just a thought....
“An "OLD" trick we used on difficult to drill alloys was a blend of lard and sulphur.....”
I think they use that at “Shultzy’s Diner”, too. At least it smells like it.
cutting fluid="oil."
You're gonna need a very thin oil to cut stainless steel weld. That stuff is beyond "wicked hahd".
Cobalt steel drill (nothing else seems to do it) and drill slowly with lots of pressure to get the drill to "bite". High speed on the drill just creates excess heat which anneals the drill tip and almost instantly dulls it while polishing the metal you're drilling so the drill can't "bite". Be very careful - it's easy to break off the drill using this technique.
Cooling and lubrication are key, too, but use a thin cutting lube, like less than 5 wt. I've had OK luck with 3-in-1 oil, but the best stuff I've found is sewing machine oil - about 1wt and clear - it drips like water. Walmart fabric department - Singer/Brother/Husqvarna all work well.
I had to drill through 1/4" stainless plate for my driving light mounts and went through two sets of Home Depot regular drills before I heard about the Cobalt Steel drills and oil from a guy who makes safety railings for sail boats. Old Navy CB who knew his stuff, but what he also said was "Always drill first and THEN weld Stainless."
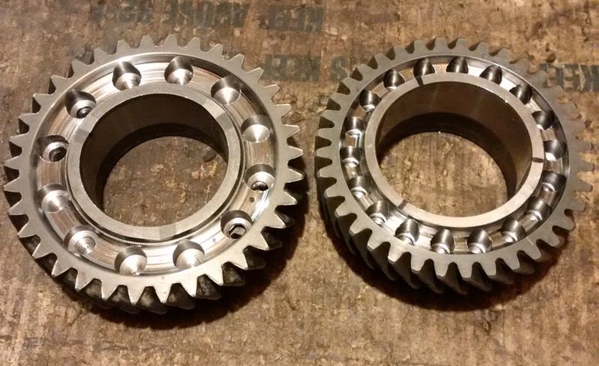
@edsnova- have you tried carbide drill bits? They're expensive, but what I had to buy when drilling holes in hardened transaxle parts. Cobalt wouldn't as much as mark the side of a gear. One thing to note- they are brittle. When drilling through surface hardened gears (the hardening was a 30- .040" layer) I broke 3 bits when transitioning from the relatively soft middle to the other side. Up here a good carbide 1/8" bit is just over $20 (broke 2) and a 1/4" bit is well over $50 (only broke 1 but you can still guess how loud I yelled "F*&%K!!!!") but they're the only way to make holes in hardened steel.
The sides were cut with ceramic inserts; again, the only thing that would last.
Attachments
It is interesting how many old manufacturing sites all over the place have been converted to computer Data Centers in the modern era.
Why?
Because lots of places making, say, gears or castings or hot forgings had to either heat the metal up before forming it or harden the steel after forming (like Al's gears) and they did that in electric ovens. Those ovens got WICKED HOT and they got that way via electricity.
So.... Having that much electric capability in the site in the first place makes it easy to build up an electricity-eating Data Center. One of my old 492-drive storage cabinets ran on 208 volts, 3-phase at a steady-state of about 43 amps and we used a 60-amp wall plug - BIG sucker, half the size of a football. Gimmee POWAH!
Guys, I tried cobolt, dry and slow, pushing hard (broke a couple). I have a divot to show for it.
Carbide I don't have, not sure where to get since Scarie closed a few years ago. Hoping the guy who welded it can drill it. If not, I'm kinda screwed...
Desperate times, desperate measures, Ed.
Have you considered shipping the piece off to someone in Texas to have the holes done? Most folks there over the age of 12 are well-equipped to do the job for you.
What caliber holes do you need?
If Jimmy can't get it I'll get it to a machinist. Got a couple little jobs I need done.
Use an acetylene torch with very small tip. Heat drill spot to cherry red....not yellow or orange. let cool and drill with your cobalt.....Bruce
Now that's working smart instead of hard!
Bruce, thanks. I'll pass that advice on to Jimmy. He's not touched it yet; the tank was still leaning on his garage when I walked by today...
While waiting for my gas tank I'm fully all-up in the wires.
Also I got the "Black Box" from Pat Downs so I can make the bracket for that when I'm stumped about the wires...
Attachments
If anyone here has or knows someone who has a TR Spyder, I want (maybe need?) the supplemental wiring diagrams and instructions. My assembly manual refers to these but did not include them. Instead, I have
I believe this to be the wiring diagram for an original 550. As you can see, it is in the original German. If anyone (Anand? Looking at you) wants a copy I'll gladly scan it and send. It's not really that useful for what I'm trying to do.
Thanks all.
I've been away from the car for about a week (Bridget is now oil-changed, bearing-packed, washed and almost fit for Carlisle duty), and during some of the frustration gaps while slowly tracing Spyder wires I have completed the firewall bracket for the Black Box.
Here's a Spyder Factory copy of 550-0090's firewall, under construction:
And mine:
Attachments
No pic but momentous news: one of the Spyder club members gave me the key to the Thunder Ranch wiring harness. All color codes, saying what plugs into what. And it works! It's almost all correct, far as I could tell today in an hour or so reading the grid and checking/marking what I have.
So I should be able to get the car actually wired sooner than later.
..And now SMS informs me that the barber pole vinyl I ordered is ready to ship. Looks like I'm gonna miss having the car done for Carlisle by about a month.
"barber pole vinyl?" Please elucidate.
I would be great if you towed the Spyder to Carlisle as it would be a draw to see it " in progress" on the show field
Do you want a day or two of help on wiring and motor install? I may be able to help.
Thanks for the offers, guys.
Can't tow the car before it's titled and registered, and I don't think I'll get there in two weeks.
Also, still haven't made the tow bar system.
Also, I can't tow a trailer with Bridget. No ball hitch.
Wiring I'm pretty sure I've got a handle on, Danny.
The motor though—that might be a thing. My plan is to get the car wired and painted, bit by bit, hang the clam from the ceiling and put the back half of the Spyder on the body dolly that Alan forced on me last year, then get the engine hoist out, attach the engine to the transaxle and lower them onto the motor mounts. Then jack the car up and pull the dolly out, mount the rear wheels & hook up the lines, bleed the brakes, wire the engine stuff and start it...
then lower the clam back down, bolt it on, plug in the lights, and go for a spin.
I know I could do it all alone but, damn, having a dude whose actually built a couple of these—even just standing back, sipping a brew, pointing and laughing at me—could be a big help.
So hold that thought. Should be getting to this point in a month or two (depending on the paint situation). I'll put you up if you want to blast down here for a weekend.
Lane: go to the Google. Type into the search box: barber pole vinyl 550 spyder


