I thought I recognized that, Anand!
It's the same pattern Teby had his blazer made from for last year's Henley Regatta:

@arajani @Former Member
 Speedster Owners - Automotive Enthusiast Community

aaaaand... I shot decaf out my nose.
Yep, that's what I'm shooting for, Anand. I hop you don't mind if I steal those pics for my upholsterer.
In other news, I got my lift cylinder out and apart, and I'm pretty pissed off. I noticed something odd last night when I set the thing in the vices:

That's the spot the fluid has been leaking from, right at the top of the tube. The hole faces up so it's out of sight, about a quarter inch from the bottom of the ramp. You can't see it without removing the cylinder.
I know what you're thinking. You're thinking, "Hey. Ed, that's just a threaded hole. Shouldn't there be some kind of one-way check valve screwed into it?" At least, that's what I was thinking.
I set that thought aside while figuring out how to get the thing apart. Managed that feat about a half hour ago, and


Wow. Kinda gunky innit? Let's clean off that gunk and see what we have here....


Rust. How about that? Kind of surprising given how young this thing is, and it's never been wet and...oh but wait. It's had a hole in it the whole time I've owned it. Plenty opportunity for some lovely condensation—to say nothing of the shop dust I've been making—to get in there.
I checked the innerwebs and guess what? Turns out there is supposed to be a pressure relief valve. Something like this.
I know what you're thinking though. You're thinking "well, that rust isn't gonna hurt nothing. Now, if the cylinder walls were pitted, THEN you'd have some problems." Right?
So why don't we shine a light in this ol' tube here and see, shall we?

Yep.
So now I've got something of a dilemma. I could rinse the cylinder out with a mild acid, make a big copper wool Q-tip out of PVC and clean it with that, flush it out with water, hose it down with WD 40, put new seals on it and see what I got.
OR I could raise holy Hell with Derek Weaver on Monday because this **** is bullshit.
What would youse guys do?
Sorry, Ed, I don't remember the details- did you buy it new? If you did I think you should be on the phone first thing tomorrow morning...
Ed;
Who is the manufacture again?
Ed,
I would give the manufacturer a chance to make it right before I mustered my righteous indignation. Keep that powder dry in case you need it later on. Your pics present a compelling case.
Thanks guys. Yeah, Derek Weaver, Direct Lift Pro Park 8, purchased new just about two years ago. They were good on my first call. The unit shipped missing a one or two of the big hanger bolts for the ramps. I was able to assemble it with the almost-as-long bolts that shipped with the steel "crate" they used to ship it, and swapping those out for the right ones a week later was painless.
When it leaked the first time a few months ago I called them and was told it could be normal. A little juice often gets past the seals when you first assemble it, yadda yadda. I wanted good news so I cleared it (raise it to the max with no load) and carried on.
The bad leaks a couple weeks ago were much worse than the first one, and the ramps weren't very high. That's when I called again. This time they're like "you need new seals." I was all like "Fair enough, you should give them to me." They answered, "your warranty on the hydraulics is one year."
So I paid $110 or something for the seal kit, grudgingly, thinking why should the seals fail so quickly on a little-used lift that seldom has much weight on it?
And now I know.
The old seals are very clearly abraided flat where they ran along the now rusted bottom of the tube.
So yeah DW gets a pleasant call tomorrow and they will be given the opportunity to send me, at no charge, a new cylinder.
But if they decline I'm not sure what I can do. It's maybe a $600-$800 part retail, I guess (so far I can't find the exact one for sale), so there's no way I win with a lawsuit.
I suppose I could just clean it out best I can, buy a proper one-way pressure relief valve (also not apparently available on the DW site), muddle on and bad-mouth the company forever but that's not a real palatable option either.
Guess we'll see how they do.
Ed,
In your case, Maryland Small Claims Court would be a viable option, with its $5000 limitations. You may want to mention to the maker that you hope you can avoid the above, but you will exercise all legal options if you can't work out a deal that is satisfactory to you.
Suing a corp. has some specific conditions, but nothing you can't overcome. PM me for more info if needed.
I find a lot of companies with the proper picture proof and a bit of persistent will come good for you. Patients and persistance is all you need... You can say the same thing nicely and persistently ![]()
I have an old brake cylinder hone - fits on a hand egg beater hand drill or slow speed drill.
Yeah, like my wise old aunt used to say, you catch more flies with honey and intimations of looming legal action than with vinegar.
Thanks, all. Jim, as a function of my current job I visit four different courthouses every weekday. I know I could file but I'd hate to have to; never yet sued anyone or been sued and I like it that way. I will be contacting you however if this goes wrong. Ray: yes, me too. I've written many a persuasive letter over the years, and so far almost everyone I've had to contact has been reasonable. Greg: thanks very much for your kind offer. Don't dig that thing out just yet; instead please use the time to attach parts to your Speedster and wait for my contact.
I just emailed DW my illustrated story. I'll follow-up by phone tomorrow and hopefully we can sort it.
P.S.: Mitch: your barberpole vinyl sport coat is art. Thank you for classing up my build thread with it.
Ed, thanks for a million little details that most of us probably never even suspected about the 550.
Barber....whaaa?
Mitch, nice photoshop!
Ed, that sucks about your lift. Mine has two cylinders(Harbor Freight). I hope mine doesn't do that!
Update from Derek Weaver: The hole is as it should be: a single-action cylinder needs to let air in when it relaxes, so on one-way valve would work. They say they're going to forward my issue to the mfg anyway to see if they'll treat it as warranty.
I'm gonna start making my giant copper wool Q-tip though & see about @WOLFGANG's hone.
@edsnova Let me know if you need any more info -- I'll send you as many pictures as you'll tolerate!
@chines1 has done a really nice job with these seats. We've put a slightly thicker cushion like the speedster on the bottom (it isn't as thick as it looks in this photo). Carey's in house upholsterer, Bill, is unreal. He's got an original Pfaff sewing machine too. It's pretty cool.


Arjani, thanks. I wonder how they made the back panel on it. My guy suggested using carpet & I figured that's fine, but what've you got going?
All: Derek Weaver says Direct Lift (the mfg) is not gonna give me anything: "If you would like to replace your cylinder the part # is
YG02-9100G 633.40
Interesting. So that's gotta be hand-stitched to finish, yeah?
Update: Jimmy brought my tank to me after work. Now I just gotta POR 15 it this weekend & we'll be all done.


--Well, that's not quite true. The filler cap will need some attention and fettling, and I've still got to file away a little more 'glass around the hole. But still.
Sure a lot of messing around to get some things right and be pleasing to the eye when finished ! Good job ! Sr. Ed
Update: The lift broke and I ended up honing out the hydraulic cylinder before replacing the seals, plugging the breather port on top and tapping a new port underneath which is now plumbed back into the oil tank so that any future leaks just return to the source and any air getting into the tube is from the tank, five feet off the floor, instead of two inches from the concrete. PITA, as they say, but it seems to work now.
Gas tank is sealed with POR 15, the few pinholes in the exterior welds (which did not leak) were epoxied, and the tank is primed and painted matte black for now
Interesting fix, does it drain by gravity to the tank. Any pictures, of that cylinder fix.. ![]()
Yes.
Here's the cylinder back in, with the hydraulic line reattached.

Here's the new drain line on the other end. It's 180 degrees and about two inches inboard from the old one, which was drilled into the rough iron "cap" that's welded to the end of the pipe and carries the big holding pin (not visible) that anchors the unit to the ramp.
I tried to do this one the same way at first, but trying to drill an L-shaped hole into that stuff cost me a few drill bits. After the second one broke off below the hole I just called it a day, filled it with epoxy and started over.
I tapped the new hole just at the outside edge of that weldment, and had to dig around for adaptors to get the elbow with that quarter-inch hose to screw in with a low profile so the ramp won't land on it when it goes to the floor.
strung the hose to a spot near the main hose and drilled a hole, added a grommet, and...
Taped (and then zip-tied) the two hoses together, and drilled another little hole in the top of the oil tank. The drain hose extends in like an inch or so. You don't want it down in the oil, or the cylinder will suck oil into the "air" side when the lift is lowered.
Lift is back as good as new. Better, probably—except there's some pitting inside the cylinder I couldn't do anything much about.

Decided to get after the front inner fenders today. Smoothed out the "lip" where the body meets it and skimmed the rough fiberglass mesh and chopped areas.


Another skim coat or two, a bit of sandpaper and this part will be ready to prime. Still pondering whether to close off the inners around the shock mounts like Arjani did. Leaning toward not.

So here is a pro tip I discovered serendipitously that you-all probably already know—but maybe not?
If you want the tail sides of pop rivets to look like regular rivets, just hit them with the flapper wheel on your grinder. Et voila:

Final stuff on the firewall today: wire harness clips and fuel line clips.

Again, comparing:
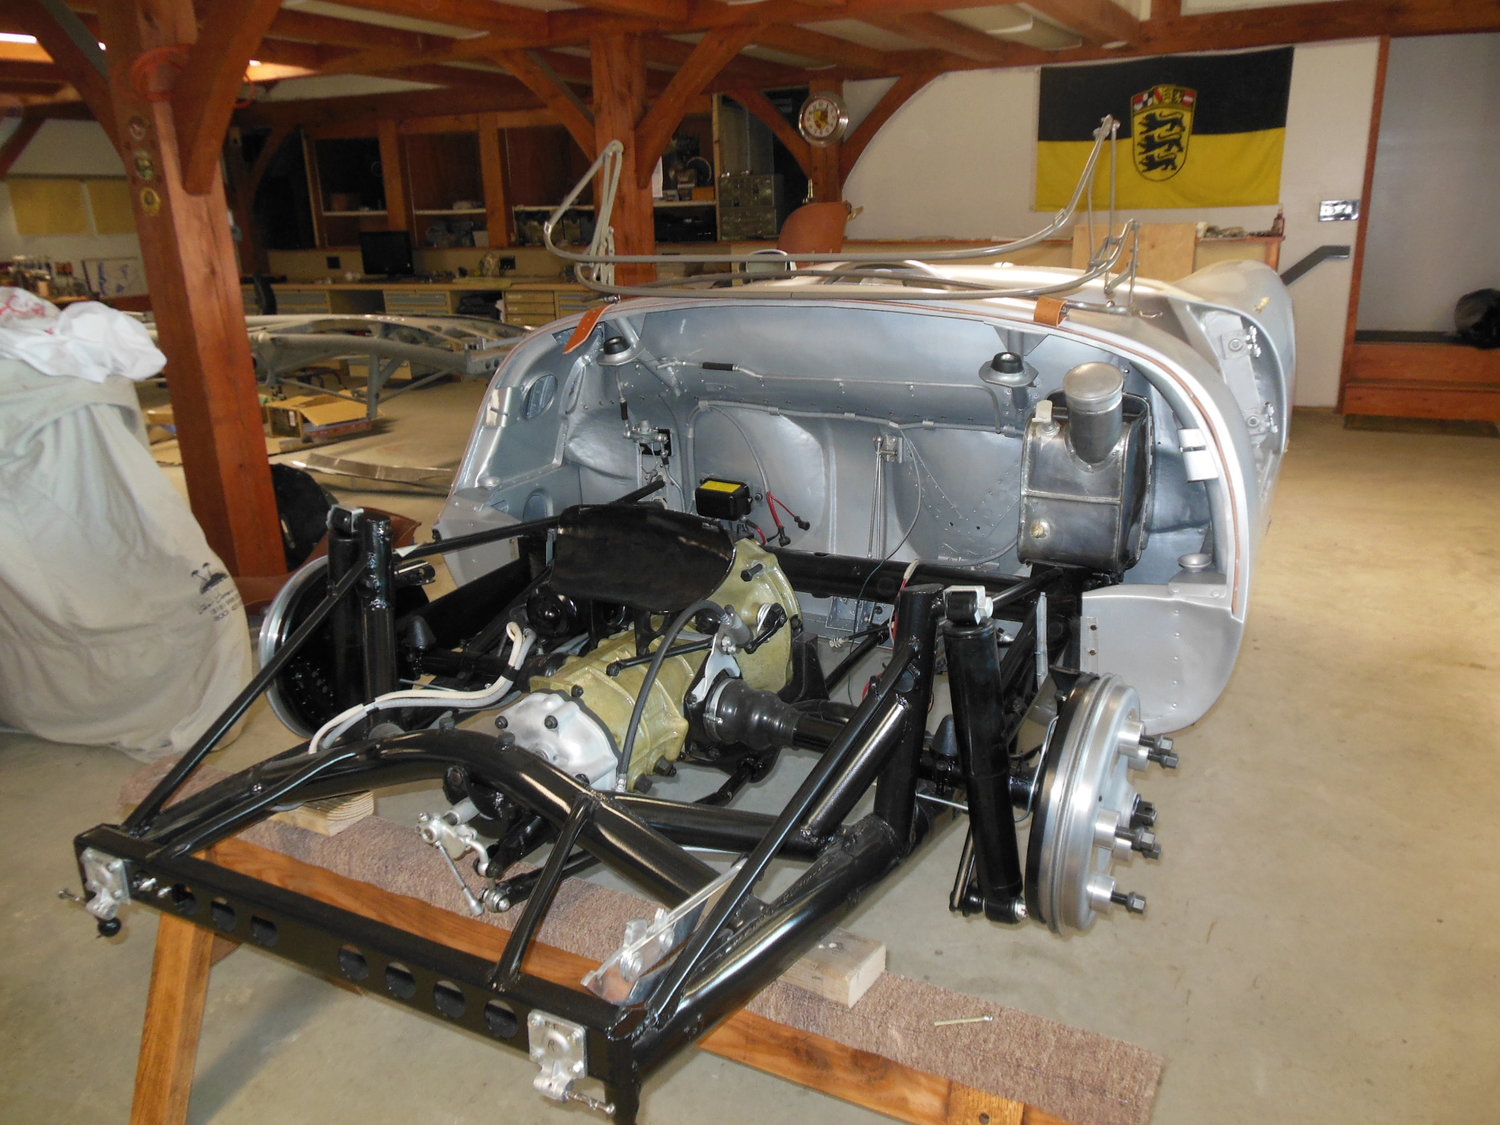
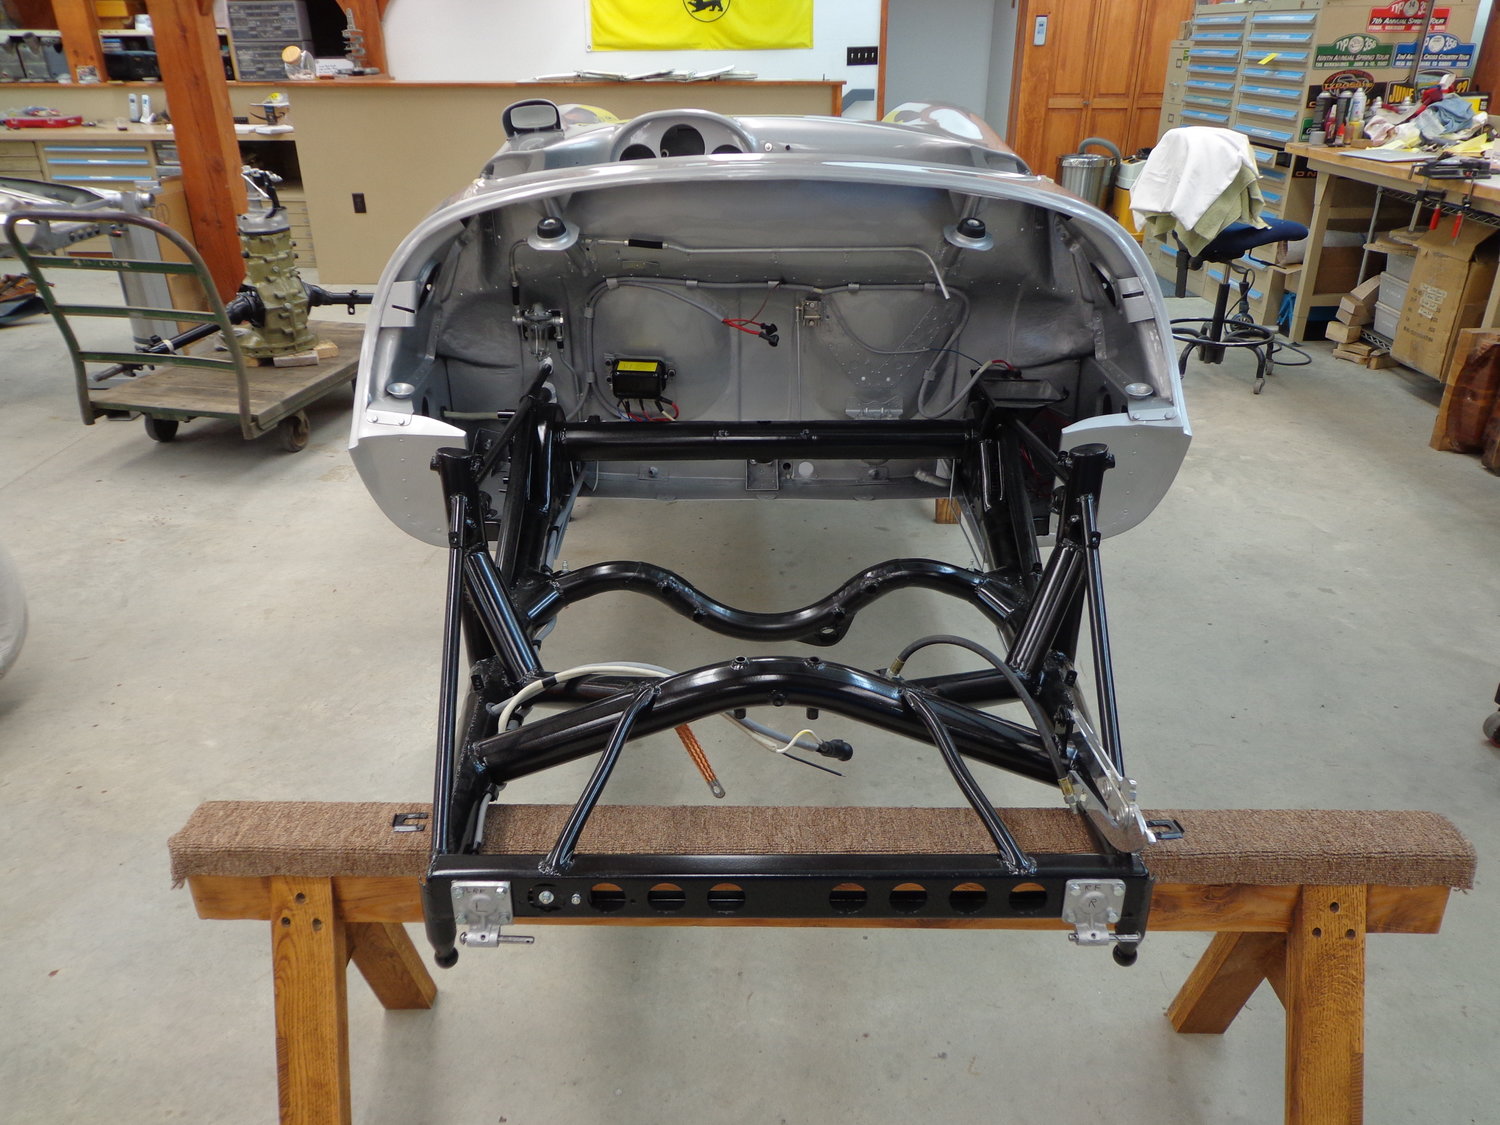
Scrubbed-out the tub pretty good and hit all the bare metal with some etching primer:

Ed,
I'm impressed , mentioned the Spyder to my painter today. PM when paint is in the near future . BTW black in not on the menu ~


If that's the color you're going with, Ed, I'm on board. Are you painting it yourself, then?
Tip on the e-brake mount:
After you figure out the angle you want the lever to sit at, drill a hole through the clamp and the mount for a set-screw. There is no way that the clamp will squeeze tight enough to stop the lever from rotating. Ask me how I know LOL!
Thanks for the tip, Danny. Will do.
Lane: I'm gonna paint some of it—mostly insides and underneaths—and then look at it very carefully and consider my options. The smart money is on me getting a real painter to do it in the places people are likely to notice.
Next up: inside of the wheel wells.
I have some truck bed liner.
Pretty sure originals were smooth in the wheel wells and body color.
Yep. Plan to do the 2k liner smooth, if/as possible, then paint it blue afterwards. We'll see how it lays down.
...Ed, Today, used a good quality black chip guard rattle can in the trunk of a speedster , it came out great and could be painted over.
Stuff I got is branded "Custom Coat." It's a urethane 2-part and the hardener is from UPol. It's got some texture and I plan to at least get it inside the tops of the fenders to keep any rock chips from spider cracking it. There will be some in the frunk too and inside the body voids along both sides behind the seats but in front of the clam shell.
We'll see how it lays down then figure how much to put where.
It's also gonna be tinted silver, the idea being that anywhere that is not covered with French Blue paint will reflect light in a manner similar to aluminum.
Inside of front fender (per Spyder Factory):
 Looks to me like a little roughness in there is "period-correct."
Fuel tank is very big and made of hammered steel.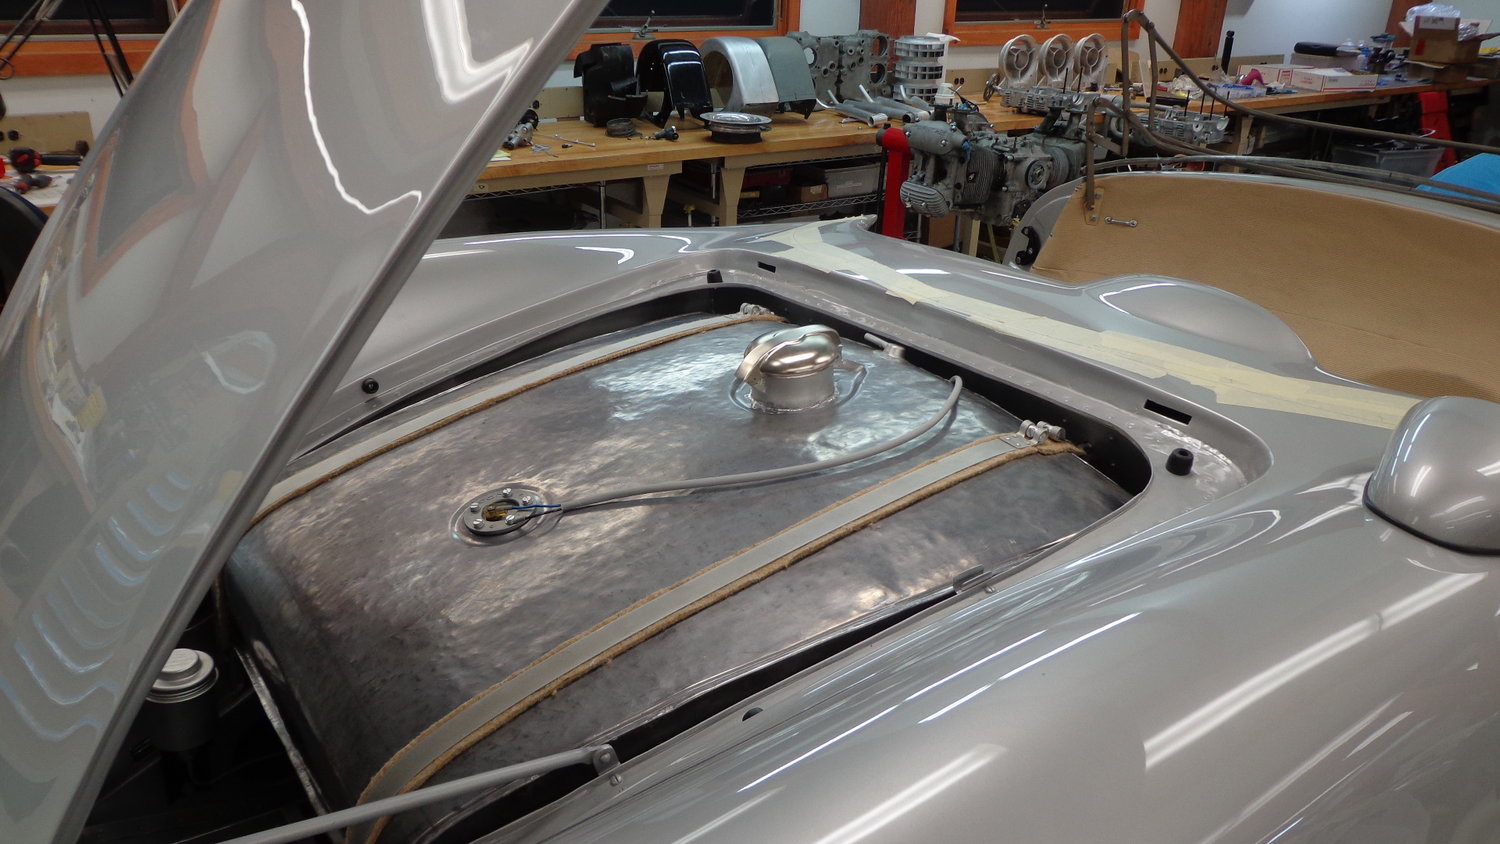 Hammer-tone paint is a start...
 ...but we'll see if there's something that can be made to make it look better.

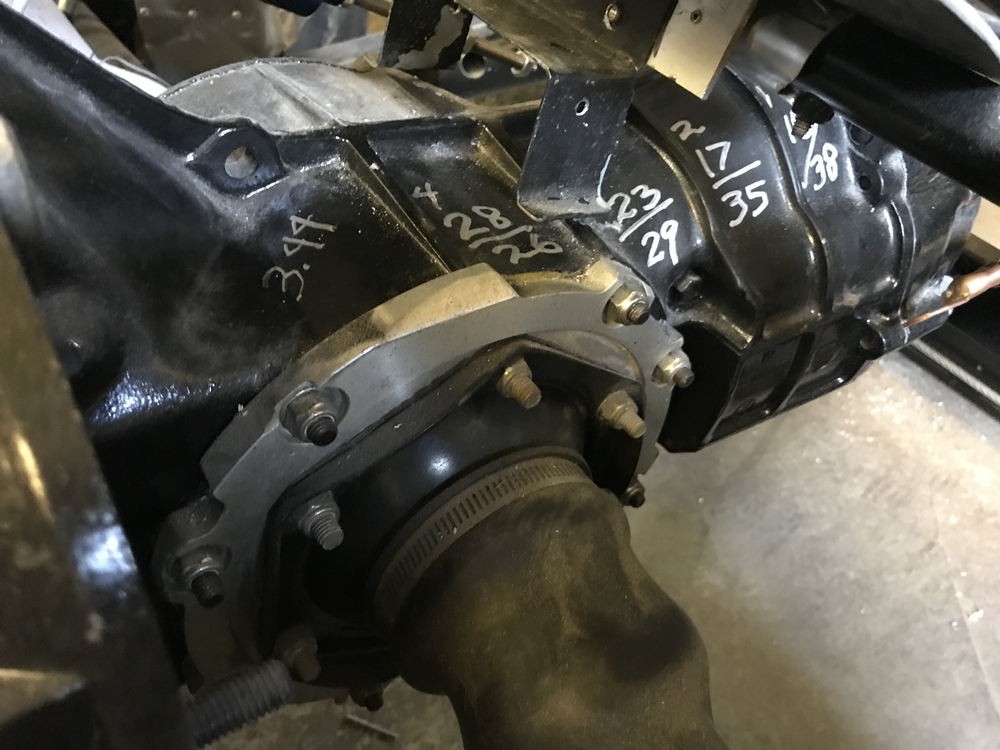
I like how they painted the gear ratios on the trans so the pit crew would always know what was what. That's an easy one!
Spraying primer tomorrow in the fender wells, and then maybe truck bed liner if things go OK. Will post after.
Access to this requires a premium membership.
Supporting members have donated about $4.00 a month ($49.00 US per year) paid annually.
AUTO RENEW: You membership will auto-renew after 12 months. If you prefer not to auto-renew, you can cancel your premium membership at any time and it will remain in effect until the end of the 12 months. To cancel, sign in at SpeedsterOwners.com and navigate to: (Your User Name) > Premium Membership.
PLEASE NOTE: Your credit card will receive a charge from CROWDSTACK PAY, the payment processor, not SpeedsterOwners.com.