
"The Racer's Group" (TRG Motorsports) uses the exact same Smart String method that Carey uses.  It's fast, it's accurate and it measures from the outside so body/internal chassis members are not a problem.  You can even have it pre-set-up and do a fast adjustment of the rod holders when the car pulls in.  I've see a car come in to the garages and three techs do a quick alignment check and adjust in under 5 minutes - on 4 wheels.  Besides - it requires zero power so you never have to regroup when a battery or something or other dies on the electronic versions.  I had a home-made one in Rhode Island that I made from Electrical tubing on 4X jack stands and a few 12" linoleum floor tiles - super cheap.

That garbage bag tip is great, Dan.  Wish I had known back then!

Carey, and his "Smart Strings" doing a field alignment at Carlisle.  There is a similar device on the rear bumper and monofilament fishing lines going from front horizontal bar to the rear one, then adjusted to a perfect "box" around the car vs the edges of the wheel rims.  That gives you your baseline, then measure from the line (string) to the same place on the rim both sides.

100_0496100_0497

Attachments

Images (2)
  • 100_0496
  • 100_0497
Last edited by Gordon Nichols

Ran the car round the block and re-checked toe. It was within 1/16th of the above. That was nice. Bought a big boy grease gun and filled the beam. 

IMG_5947

Got some nice goopy stuff to come out under the trailing arm bushings on the ends of the beam & figured good enough. Then noticed some thinner stuff dripping down off the middle of the beam, felt like brake fluid. Wha?

Checked and tightened the brake fluid reservoir lines. No issues there. Finally determined this AM that it was the Liquid Wrench I'd hosed into the center chuck a week and a half ago trying to get the torsion leaves loose. The new grease must've pushed some through the adjuster slots...

So this morning I made a test run through the S-turns about two-three miles from the house. Test the brakes and see if the temp gauge matches up with the fry thermometer I calibrated last month. I took it easy going out. Brakes stop straight. Steering wheel is now an eighth turn off center (sigh). Turned around in a gas station and ran back through the deserted road in second gear, joyfully revving it up to 5000 rpm for the first time. 

Boys, it sounds glorious.

Looked down at the tach and saw the GREEN LIGHT

!

Off the pedal. Pulled the accumulator switch. The green light stayed on. 

!!!

Shut her down. Coasted to the shoulder.

IMG_5955

Felt everything. Not too hot. No oil splashing out. Pulled the dipstick: low but that's how it reads when there's 2-3 quarts in the deep sump.

Jesus, did I break the oil pump tang? 

I read the gauge on the accumulator. I had pushed the switch back in before turning off the key while coasting at idle. The gauge read low. Looked at it more closely: 8-10 lbs. 

Wait, that's actually about right.  

There had been no weird sounds or smells.

Pondered. Nothing to do but give it a minute to collect its feelings and start her up again. 

Started right up. No oil light. Drove home slowly, without joy.

Noticed the temp gauge was now at just above 80—before, it had not really moved. 

No oil light as I pulled into the driveway. Pulled the dipstick with the car running and put the turkey fryer thermometer in. You have to bend it just a little to keep the thermometer face off the fan belt. Read 190F. So my oil temp sensor is accurate. 

So why did the pressure warning light go on?


Attachments

Images (2)
  • IMG_5955
  • IMG_5947

Slight possibility of air pocket in pressure switch that you lost when you shut it down then re-started it?

I'd plumb in a mechanical gauge temporarily. I bought one from Jeg's, Auto Meter I think about $40. Uses skinny plastic hose with 1/8" pipe thread fittings.

I also bought an AN-8 adapter fitting, male on one end, female on the other with an 1/8" female pipe thread in the middle.

I can test my oil pressure in any spot of my system now.

During early testing after I installed the external oil cooler, I saw low oil pressure during hard right hand turns (guess it would be left hand turns in your car). There was enough air burping in the system to lower the oil level in the sump and the pickup was starving in corners. Added oil and the problem went away. Short suggestion, make sure it's filled to the top, now.

Added a quart o' Brad Penn. I'll run the same esses some day soon and see what's what.

I suppose it's possible I had too little in the sump and too much in the accumulator. But typically when I pull that switch, usually when I turn the key on but before pressing the starter button, the oil light goes off immediately. It's the coolest thing to watch it happen. 

Anyway I also set the timer for 20 minutes after parking the car, then went out to start it back up, which it did. I hope to do a longer, hotter test drive soon and try the same thing, as a hedge against Dead Spyder Starter Syndrome. 

Totally agree, Eric. Extend those wires with a nice twist-wrap solder job and a couple marine heat-shrinks. Ed, extend whatever you wrapped that harness with. Anything to a) prevent going under the dash and b) NOT take anything/everything apart again.

I buy the $6 kit from Harbor Freight. Wired two trailers up so far with those, they are weather and waterproof.

The Spyder's gas gauge read halfway between 1/4 and empty so I drove to the gas station & added 8.8 gallons of 93 octane, which filled the tank, so I'm calling that gauge perfect. The car feels stable and stops straight. Shifting is still easy (though 4th was a bit hard to find the first time). 

Both doors rattle just a bit so I guess it's time to install the weatherstripping I bought.

There's 5 1/2 inches clearance under the floor just behind the front wheels, and 5 3/8 just ahead of the rears. Stance seems good.

IMG_6011

This headlight is aimed a little too far right and probably too high. I may have to pull it to get the adjustment right...

IMG_6018

Steering wheel needs to come off and get re-indexed to make it straight and get the turn signal cancelers to work. I made a thing to poke the horn button out from the inside but it didn't work the first try and I'm pretty gun-shy about damaging that part. Any advice appreciated.

Still trying to decide what to do about the firewall upholstery. The more I live with it the more I feel like we're gonna be able to live with it. . . .

IMG_6030

Cleaned and reinstalled the floating floor.

IMG_6037IMG_6039

I do think the interior turned out pretty realistic...

interior

Once again, thanks to all who have supported me in this foolishness.

Attachments

Images (6)
  • IMG_6037
  • IMG_6039
  • IMG_6011
  • IMG_6018
  • IMG_6030
  • interior

Got up nice and early yesterday to run some roads with the GoPro and get my buddy with his drone to do a few overhead/follow-on takes and it did not go entirely as planned.

The good news: The car handles stable and the engine runs strong and sounds good; no further oil pressure issues.

But also:

*When I got back I noticed the headlights were out.

*There's a small drip from the transaxle.

*Both front tires rub the fenders on turns.

*Trying on my new helmet for one of the runs, I just put it on on top of my flat cap like the dork I am and did not realize it until hours later when I reviewed the video, so that footage is now marked OUTAKES ONLY (I'll post it soon, don't worry).

*Aaaand:

IMG_6074

After about an hour and a half of farting around, idling and low/medium speed third gear runs on a nice suburban road on a sunny 75-degree morning, the temp gauge had crept up to about 105C (around 220F), so I curtailed the video project.

Spyder guys warned me this would happen when they learnt I was not installing, at least initially, an auxiliary oil cooler. Seems a simple enough thing to add one.

But for now I'm going to install the underpan I made and do the same futzy near-the-house test drive on a similar morning soon. Data, me boys!

Meanwhile, this morning I checked the headlights and found the high beams worked, so I pulled the relays and tried one then the other, and replaced the low beam one. All good now.

IMG_6080

I also tightened the clamps on the outer edges of the axle boots. Hopefully that stanches the transmission drip. 

And of course,IMG_6092

Hopefully I'll get this buttoned up and tested by week's end. And wouldn't it be something if the tins cure the problem?

Attachments

Images (3)
  • IMG_6074
  • IMG_6080
  • IMG_6092


75 degrees ambient is about when I usually need to turn the cooler fan on - and that's with the (wheel-well Setrab) cooler permanently plumbed inline.

With the fan off, the temp hovers around where your gauge is indicating in the photo once the ambient heads towards 80. Turning the fan on drops it to one-third to half gauge (no numbers on my gauge face).

Warmest indicated temps are usually idling in traffic after a spirited run. Sometimes, coolest temps are charging up a hill in a lower gear with revs over 3500.

At any rate, the cooler - with fan running - has been able to handle any situation encountered so far here in sunny California.

If I recall, the original Spyders didn't spend a lot of time puttering around in stop and go traffic, though.


Typical summer highs here are mid to upper 90s. This time of year, that means Speedster drives start around 7am, and I like to be off the road by about 10.

'All-day' driving weather usually doesn't get here until late September.

Warmest weather I've done any extended Speedster driving in was about 95. The cooler handled that OK, with the temp needle just slightly above half-way (maybe 205-210 degrees). It 'controlled' to that temp - the needle stayed there, without continuing to rise, on some pretty steep grades in the mountains.

So I buttoned up the underpan, and tried the car again the other day with ambient temps around 90F. There were several complications including a leak in my Filter King fuel regulator on startup and the detachment of the coil wire while underway.

Bottom line: Oil temps reached 220 in about 50 minutes driving the same roads as before. 

I went ahead and rechecked the valve clearances (they were good) and pulled the cover off the oil cooler on the off chance there was an obstruction (nope, all clean). I carefully arranged the spark plug booty thingies over the holes in the fan shroud and drove the car again today for an hour in ambient 80F.

Temp rose very slowly this time and ended up around 210F.

Oil pressure is about 45 lbs at 3000 RPM at that temp. 

I've not yet allowed the oil temp to plateau or stabilize at whatever its max is going to be, but after an hour of stop and go driving I think my readings should be getting close to what they'd be. I think this means I'll need to take them down 20-25F to make the car right.

Plan now is a Mocal sandwich adaptor with a 180F thermostat, AN 10 connectors on braided steel hose and a Mesa 48 plate cooler in the right rear corner of the car, mounted between the trans crossmember and the rear crossmember. At 6x11 inches and 1.5 inches thick, that's about the max of what should fit there, and I may have to re-route the small shifter cable. Looking at a 7-inch low profile fan and a 190F thermostat to put on top, under/next to the spare tire. 

Looking at the stock oil cooler in the fan shroud I'm thinking the Mesa 48, arranged in that way, ought to do the trick.

As always, any advice/wisdom appreciated. 

Ed, consider using #8AN.  I recently ditched the doghouse shroud and internal oil cooler (it was dumping hot air on my AC condenser). I've been running totally on the external oil cooler (with thermostat and thermostatically controlled fan) with absolutely no temperature creep. All of that's plumbed with #8AN braided steel. I suspect it's a lot easier to squeeze into your limited space than #10.

Mike

Agreed. The only reason to run 10-AN is if you put the cooler all the way up front.

The temperature was controlled perfectly in my old system, 1.5 qt. sump, full flow, Gene Berg pressure relief cover, thermostat, and cooler in the back in the spare tire area.

Ed, I think you know I've got a dry sump now.

8-AN works perfectly in short runs(within the engine bay), it's what I have on the cooler side of things. Pump to thermostat to cooler to oil tank. It's also what I have on the pressure side of the system, pump to filter to main oil galley.

In the dry sump system, there are two paths and two separate pumps. You have a scavenge pump and a pressure pump, and an external oil tank instead of a sump.

Engine running, the engine sump is dry, my dipstick shows no oil. 

My engine temps run a bit cooler now, I think the cooler is more efficient since it is on the scavenge side, plus I've got my home-made sled tins exiting that hot air rearward instead of down.

OK ordered all the junk. Went with AN10s mainly because I just inventoried my stuff and have the hose and fittings in stock (I probably also have enough 8s but I didn't check).

Mocal Sandwich with 180F therm and two BST 1/2" to AN10 adapters

Mesa 48 pass cooler

2 NPT to AN10 adaptors

190F inline AN10 electric thermostat to actuate fan

6-inch universal fan

I'll probably need a shorter oil filter but we'll worry about that at install time. Other than that it should all fit fine and I guess we'll find out in a week or two.

In other news, I also received like 10 yards of seatbelt material, so I guess it's time to make the rear suspension limiting straps ala @DannyP

I'll get after those and make further small adjustments to the front end while awaiting my oil parts.

It totally makes sense to use what you've got already. The only savings is -8 is cheaper for the fittings and hose than -10.

Like I said before, the -10 makes sense and works better for longer runs. Pressure and flow losses would occur if running oil to the front and back to the engine. You'd have about 20 feet of line to the front versus about 10 with the rear-mounted cooler.

I'm using -10 from the sump plate to the scavenge side of the 1st pump stage, and also feeding the pump from the tank to the pressure side of the 2nd pump stage. All my other lines are 8AN.

The only other thing I'll recommend is using sweep fittings where possible for 45 and 90 degrees. Don't use restrictive plumbing-type angles.


Dripping carbs:

Did you ever measure the actual fuel pressure with the engine running by Tee-ing in a pressure gauge to the supply side of the carburetors?

The number I've always heard for Weber IDF's was 3 psi max, but Anthony tells me 2.5 psi is better.

Starting maybe a year ago, I started getting more raw gas smell than normal, starting about 15 minutes after shutting down. I never saw raw gas dripping, but the outside of the carbs had gradually gotten dirty from gas seeping down the outsides.

Diagnosis was worn needle valve seats, and a rebuild fixed that. What happens is pressure in the fuel line may overwhelm the needle valves a little while the engine is running, but the normal draw of fuel keeps the level in the float bowls under control.

Once you shut down, the pressure is still in the line, the bowls fill and overflow, gas gets up into the top of the carb where it's not supposed to be, and then overflows out through any available orifice. So, dripping gas doesn't necessarily mean any seals or gaskets in the carb are shot.

In my case, worn needle valve seats were causing the bowls to fill, but even if they're OK, too much pressure in the line can do the same thing.

The problem was worse on hotter days.

If you've got an electric fuel pump (I don't), you could try shutting that off to stop the engine (letting the engine draw the bowls dry) to see if that stops the carbs from dripping.


Project Matching Helmet is coming along.

IMG_6130

The mid-50s crash helmets usually had detachable visors. As we have seen elsewhere, there's a guy in Costa Rica building painstaking replicas of those at an "Inquire" price point. 

Those are very, very nice but for both budget and practicality I decided to roll with a good, vented retro-looking bike helmet, repainted and modded for an extended visor or "rain visor." 

The one I chose has leather straps that could easily be used to frame the cloth ear and neck covering bits, and it even came with a carrying bag that feels like the right material. 

IMG_6132

After wet sanding and a few more coats of clear, I'll take a bit of leftover leather and belt weave material and finish this off in the proper style.


Attachments

Images (2)
  • IMG_6130
  • IMG_6132
@Sacto Mitch posted:


Dripping carbs:

Did you ever measure the actual fuel pressure with the engine running by Tee-ing in a pressure gauge to the supply side of the carburetors?

The number I've always heard for Weber IDF's was 3 psi max, but Anthony tells me 2.5 psi is better.


Mitch, I service a local sand rail, just recently repaired the brakes on it. Several years ago(6 or 7?) I put dual 35 Solexes on it for him. Mechanical pump was putting out about 7 pounds! After adding 8(yes, 8) gaskets to the pump I got it down to 1.5 pounds.

But the point is, I measured it with a vacuum/pressure gauge. Auto Zone or whatever no-name store has them. I have two, a new one and my Dad's ancient one, and they concur. 

My self-regulating Carter pump at 3 lbs.? It actually outputs 3.5 engine off, about 3.25 running. So when I say I KNOW my fuel pressure, I do.

I'm not just setting a regulator to "3" or taking the manufacturer's word. Cause they lie.

Ed: I'll never wear a helmet unless I'm on track and it's currently SA-rated, but yours looks nice!

We just keep at it over here.

IMG_6135IMG_6139IMG_6140IMG_6143IMG_6158

IMG_6136

Fan tested good; I also have the 190F thermostat to put on the outlet side.

I also put the car up and measured ground clearance: 4 3/4 inches at both ends and all corners. Currently cranking up the front a half inch (or three-quarters?) to try to cure tire rub & will turn the rear adjusters to match.

Re-checked toe and it's back to being a half inch out, which I figured from driving it. You can totally feel it in the curves. So will correct that.

Pondering whether to try to redo my center sway bar brackets. They're about half made... Probably do it.

Attachments

Images (6)
  • IMG_6135
  • IMG_6139
  • IMG_6140
  • IMG_6143
  • IMG_6158
  • IMG_6136

Update: I finished my improved sway bar brackets to move the bushings out to the ends of the beam where they rightly belong. Being me of course I made a complicated hash of these out of box stock instead of doing the efficient thing (like Danny) and just welding angle iron to the shock towers. I have no excuse.

Here is me at the beginning of the process. I mocked it up on a spare beam I had in the shop:

IMG_6173

At this point the box stock looks reasonable. It's near the edge of the beam and can be affixed with muffler U bolts. Much easier than clamping it up and trying to weld directly to the car...or so I thought.

IMG_6174

Ah but. In this position, the brackets would make it impossible to get a grease gun on the zerks, so I had to slice/grind a section out of the box to fit it closer up against the shock towers. Also, the U bolts are too short to account for the swaybar bushing carriers (and no one makes 2 1/8 inch J bolts, so they had to be extended.

IMG_6186

No U bolt on the bottom beam tube—won't fit with the frame gusset I already welded in. So just a bolt welded in as a stud for the carrier. And a bit of angle to fit up against the stock beam gusset on the frame, bolted through. Why am I not just welding this in place? I don't know! 

IMG_6202

IMG_6203

All test fitted. Center hole for the U bolt has reinforcement tubing to keep the cut box from deforming when the bushing carriers are tightened with "Chevy hands."

IMG_6197Studs are welded on the outside and the inside—same reason. Painted all the bare metal edges to discourage rust. In my defense: once these are installed all the ugliness of these cutaway edges will be invisible.

IMG_6204

Still. This little interlude well illustrates why "building cars for money" will not—cannot—be my second act in my life's career. Chuck Beck I ain't. Not Carey Hines either. 

Alan Merklin is a damn genius and I don't have enough years remaining on this planet to develop a tenth of his skills and ability.

Meanwhile, my oil cooler bits came. I got Karen to help me take the back section off the car today and started test fitting that stuff. 

IMG_6207

That little fan is going under the cooler as a puller. I need to make a bracket for the front of the cooler body, and cut and fold the aluminum underpan into a ductworks so all the fanned air gets pulled through the plates. 

I'll start on that tomorrow.

Attachments

Images (8)
  • IMG_6174
  • IMG_6186
  • IMG_6173
  • IMG_6202
  • IMG_6203
  • IMG_6204
  • IMG_6197
  • IMG_6207

Gordon I think you're looking at my spare tire mount/rear k-member. I made that three years ago out of some aluminized exhaust tubing. The oil cooler bracket is a bit more modest—if no less holy.IMG_6222

I did spend about 5 hours today finishing that part and cutting/forming the duct down and out the bottom of the car such that the fan will be drawing all it can through the oil cooler.

Getting the fan to lay down in there under that bracket was a trick. But we're down to a couple a speed nuts and some rivets now before moving on to plumbing. I also strung a wire through the holy tubing to run to the fan thermostat. I'll make that the hot lead with an inline fuse and take power right from the starter lug. 

Opening up that nice clean pan I put so many hours into took a deep breath.

IMG_6227

Initial fitment was too tight...

IMG_6231

Working it on the car like this was a bit fiddly as well. I ended up using a pry bar as a dolly to hammer the curve into the forward opening. Rough, but workable and good for airflow; I'll smooth it out later.

IMG_6236

Cut the sides out.

IMG_6240

Socked them in with screws for fitment...

IMG_6243

Holes seem to line up OKIMG_6245IMG_6246

Generally speaking this installation will not be a focal point of the engine bay.

IMG_6232

Attachments

Images (9)
  • IMG_6222
  • IMG_6232
  • IMG_6227
  • IMG_6231
  • IMG_6236
  • IMG_6240
  • IMG_6243
  • IMG_6245
  • IMG_6246

UPDATE: Oil cooler is installed and tested good. I ran the car on the same road as before, 50 minutes at 82F ambient. The gauge took about 10-15 minutes to get to 80C and then it just stayed there, finally peaking at about 85C (185F) while I futzed with the idle stop screws in the driveway.

The fan came on and stayed on until about 2-3 minutes after I shut the car off (it's wired straight from the battery lead at the starter). IMG_6283

No leaks in the oil cooler/filter system but driver's side valve cover is dripping again and there's a drip from the front which may be the crank seal or could be from the oil pump. 

Install looks pretty subtle, I think.

IMG_6287IMG_6289

With 5.5 inches ground clearance (about 3/4-inch more than last test drive) there is no rubbing of the front tires. The sway bar feels like it's working well. No body lean. Tracks straight. Very crisp changing direction still—enough so that I'm going to re-measure my toe and camber.

Attachments

Images (3)
  • IMG_6283
  • IMG_6287
  • IMG_6289
Last edited by edsnova

Ed, I found that I could run the front end lower when the swaybar was installed. 

I also have my cooling fan wired hot all the time, it comes on when needed and shuts off when cool enough, like it's supposed to.

Yeah, get it 150% sorted down in the mountains. It will be a real Spyder-fest, Carlos and I are Spydering.

Cheers. 

Yesterday I taped 3-inch lengths of yarn to the back deck and the grill openings and pointed my GoPro at them while driving at 30, 40, 50 and 60 mph. Looks like the yarn dives in at low speed, higher RPM but at about 30-35 mph airflow becomes neutral, and the yarn just kind of hangs there, popping up and down into and out of the grill. 

At 50 and up it looks like there's more pressure under the grill and the yarn blows out but sort of lays down across as the pressure above the deck acts on it. yarn test

This seems to explain my hot running in early testing: I was running roads on which I barely exceeded 40mph, and usually right around 30—just where the system seems to be moving the least air. 

I put a new gasket on the driver's side valve cover this a.m. to cure a drip, and folded over the edges of my exhaust junction covers to prevent their cutting into the axle boots. IMG_6310

Then I drove the car about 20 miles round the beltway today to the circuit court. It seems to like highway speeds: 3000-3200 RPM is like 70-75 and the temp was steady at 80C.

Fan went on as I pulled up and was off by the time I fed the meter.

IMG_6318

A guy in a Honda paced me with his phone for like a mile before I got off my exit.

Stopped for some refreshments on the way home and that caused a scene. Two other dudes just out of the frame, plus the counter guy. I lifted the clam and we noticed a little oil leaking round the filter—probably the sandwich plate needs to be tightened.

IMG_6319

Sorting continues.


Attachments

Images (4)
  • yarn test
  • IMG_6318
  • IMG_6319
  • IMG_6310
@edsnova posted:

With 5.5 inches ground clearance (about 3/4-inch more than last test drive) there is no rubbing of the front tires. The sway bar feels like it's working well. No body lean. Tracks straight. Very crisp changing direction still—enough so that I'm going to re-measure my toe and camber.

Ed, if you don't mind. Where did you measure from? I'd like to get a comparison before I start messing with my ride height. 


Some Day


What year is it?

It doesn't much matter, really. And I won't remember what you said ten minutes from now.

It's just that I had to connect. Let you know that I get it. So wish I weren't driving this POS Corolla.

This is how to roll. How I would roll if it weren't for all the stuff life makes you do. If I were really free to choose. Some day.

For now, I take the covers off the steelies on the Corolla. It's about all I can do. And the fart can on the exhaust.

Some day.


Attachments

Images (1)
  • Some Day
@edsnova posted:

@dlearl476 I put the car on the lift and measure from a piece of angle I lay flat across the ramps, up to the bottom of the floor just behind the front wheel wells and just ahead of the rear wheel wells.

Thanks Ed. I don't have a lift, but I've got the Spyder out where I normally store the 968 and it has a large concrete pad by the office. I'll check it there. TBH, I think I'm more concerned about L/R matching, but I've got to raise it. I'm tired of dragging bottom. 

@Sacto Mitch posted:


Some Day


What year is it?

It doesn't much matter, really. And I won't remember what you said ten minutes from now.

It's just that I had to connect. Let you know that I get it. So wish I weren't driving this POS Corolla.

This is how to roll. How I would roll if it weren't for all the stuff life makes you do. If I were really free to choose. Some day.

For now, I take the covers off the steelies on the Corolla. It's about all I can do. And the fart can on the exhaust.

Some day.


LOL. I think strangers asking questions added at least an hour to my initial trip home from Bremen to NYC. My gas gauge was working back-asswards so I was stopping every 100-150 miles because I didn't trust it. Never failed to draw a crowd. 

Last edited by dlearl476


Maybe more than the cars themselves, it's this shared experience that seems to pull us together.

The guy waving his cellphone out the window to get a photo as he drives past. The kid pulling at his mom's skirts and pointing. The questions at the gas pump.

Ed has taken a dusty hulk and transformed it into a machine that has The Magic.

Congratulations, Ed!

Welcome to the Madness...again.


@Sacto Mitch posted:


Some Day


What year is it?

It doesn't much matter, really. And I won't remember what you said ten minutes from now.

It's just that I had to connect. Let you know that I get it. So wish I weren't driving this POS Corolla.

This is how to roll. How I would roll if it weren't for all the stuff life makes you do. If I were really free to choose. Some day.

For now, I take the covers off the steelies on the Corolla. It's about all I can do. And the fart can on the exhaust.

Some day.


I can't tell you how much I connect with this little bit of prose, Mitch.

Grinding. Sleeping in my truck after the last call of the night, because starting time is only 3 hours away and I can't miss the shift. Holding my wife's hand as she delivers our son, knowing that I'll be taking both of them home in an hour or two because we can't afford a room in the hospital. Mowing my dad's lawn, because 10 bucks an hour doesn't pay for a wife and three kids.

Hustling. Taking every shift. Getting up 4 times a night to drive to a chemical plant to change vacuum pump oil. Getting 10 hours of sleep in an entire week. Working 36 hrs. straight. Borrowing money to buy a 8 year old sedan. Dragging a $50 car home, spending $500 on it, and abandoning it as a lost cause.

Getting subscriptions to car magazines as birthday and Christmas gifts. Looking at cars I couldn't dream of affording. Wondering how my kids were ever going to go to college, to reach their potential. Wondering how I was ever going to reach anything close to my potential.

Seeing an "older" guy at a gas station in his 'vette/911/Jag, and wondering how he got to that point-- asking myself what part of his soul he needed to sell to swing it.

... and then, having life change in a day. Stepping through a door into opportunity, grabbing the chance and running with it-- hard and fast. Working every bit as hard as before, but for 4x the money. Buying a modest toy, then a nicer one, then eventually not worrying about the money the toy cost at all.

Slowing. Coasting to some extent. Enjoying life (maybe for the first time, but probably not).

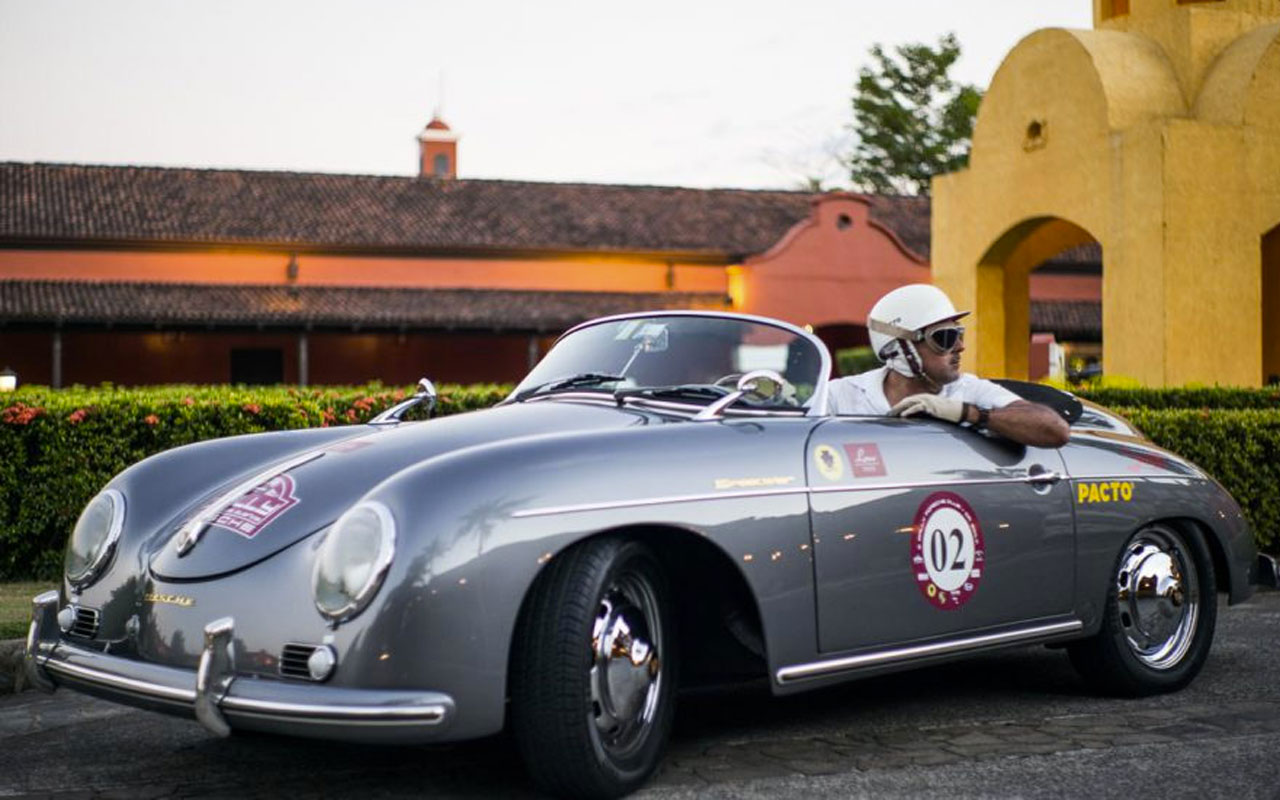
An 11 year old kid was riding his bike past my house Saturday. I was building some steps into the garage apartment, and the kid wheeled his bike in. He had not a shy bone in his body, and he was shooting questions rapid-fire. He started with the limo, then worked his way through all my stuff. I told him to browse the shop for as long as he wished. He asked about the set-up-- the benches, the tools, the lifts. He looked at the stuff I had on the walls. But mostly, he was just making conversation so he could get close to the Speedster-- to be pulled into it's orbit, to gaze longingly at every curve, every swath of leather, every mechanical bit.

I spent 20 minutes I didn't have, just talking to him like an adult. If the car hadn't been landlocked behind eleventy-billion tools and piles of lumber, I would have taken him for a ride. I invited him back "any time", for just such a thing.

That kid was me. That kid was me more than once in my life-- wondering how this grizzled old dude pulled this whole thing off, how he played his hand into perfection. I could see all of it in his eyes, in his wonderment that men could own such things.

I'll never forget where I've been, and I try to never take where I am for granted. 

We're blessed, gentlemen. Make no mistake about it.

Last edited by Stan Galat

So the oil leak turned out to be the valve cover. I've changed those gaskets twice now.

They weren't leaking before, but on the way home yesterday I revved the car up over 5k in 2nd and 3rd when getting on the highway. 

Looks like the gasket got sucked in a little and that caused the leak.IMG_6322

So that's interesting. Obviously the engine wants to go over 5k. We all want that. That's where the fun is. I have breathers on both valve covers and the breather feeds a big open tank. It's not positively vented into an air cleaner yet, but still. 

Now, also...I did pull this cover a few weeks ago to check the valve lash, and I just snapped it back on without changing the gasket. Maybe that was bad tradecraft?

This time I glued a new gasket on the pan with Permatex Ultra Grey and snapped it back on. Maybe it's fine. But wondering if there's a better valve cover system (or breather?)

Are the bolt-on C-channel ones any good? 

Attachments

Images (1)
  • IMG_6322
Post Content
×
×
×
×
Link copied to your clipboard.
×
×