Ah.
I knew I remembered Mr. Grznkrytzvtxwytz talking about a ghia light. Thanks for straightening me out, gentlemen.
 Speedster Owners - Automotive Enthusiast Community

Ah.
I knew I remembered Mr. Grznkrytzvtxwytz talking about a ghia light. Thanks for straightening me out, gentlemen.
I think the proper Spyder light looks great on Marty's car.
Ed, you should be able to bang and hammer one out of aluminum by now, eh?
I assume Marty got his rear licence plate light the same place I got mine - as part of his build - from Henry at Intermeccanica. It's a Spyder light. Gives a nice clean look.


I've moved on.
Block sanding now. On advice of the painter who showed up to look at the car (guy's doing a SEMA car now; says he's booked solid through July—can't wait for his estimate!) I'm blocking with 180 before moving back to 220 and spot-priming before wet-sanding.
Put about 10 hours in this weekend. Guide-coated with some black lacquer which is not ideal but so far so good. The car isn't going to need a lot more fill.
Given the responses (aka non-responses) I've got so far from the painters I contacted, I'm resigned to the idea that, most likely, I'll be shooting this thing myself.
Toward that end I ordered a couple of ceiling mounted 1500-watt electric heaters. With my little oil filled, plus the mouse-eared propane unit behind a couple of 22-inch box fans and two layers of plastic sheet on the open end I should be able to raise the temp inside my back bay high enough, with low enough humidity, to work with the paints I have. Obviously I'll start by 2k-priming the whole car again after the blocking's done.
I could hook you up with Randy my Speedster painter in PA you guys could hash out the particulars, you would get it back done in two (2) weeks :~) just a thought.
That would be the best idea Ed if the budget can handle it. A professional painter would take it up a notch for sure. Maybe you can volunteer to be a helper. ![]()
Holy crow, things are moving along. Were talking paint and that always comes toward the end, I think. If Ed does the deed, and he hates it, then maybe not much lost and a "real" painter could come back and make it right. I'd take Alan's advice, as I have seen that work, and it's top-drawer. as to schedule, could not venture a guess.
i have a license plate light for a bug, its your if you can use it.
https://www.thesamba.com/vw/cl...etail.php?id=2143323
Thanks guys. I was always going to prep it so we'll see how it looks/I feel after the primer goes on.
TJ: thanks, I've got the marker light sorted.

Your arms must be getting into pretty good shape about now.
"Primer on, Primer off "
He’ll have forearms like Popeye when we see him in May.
Should be pretty good at deflecting Ninja blows, too.
Gordon Nichols posted:Your arms must be getting into pretty good shape about now.
"Primer on, Primer off "
Gordon Nichols posted:Should be pretty good at deflecting Ninja blows, too.
Or those ruffians from Cobra Kai.
And he is ready to ward off the proponents of missing tin! lol!!!
Hey guys, block sanding is gentle sanding: more like massage than MMA. No doubt when I'm done I'll continue to have those pipe-cleaner arms you all so admire.
Are you using a long board sander on flat panel areas?
Yep.
Whelp, the doors are off the car and disassembled and filled, front and back for final smooving. I blocked the front third of the car as well with the short block @180 and we're down to the 220 work before the next primer.
The doors and edges needed more than I'd realized near the top edges, even after re-hanging them a couple times. That's about 3/32 there...
You can see how they taco'd a bit from the center to the edge.

Bottom line is they won't be perfectly perfect but they will be at least as straight as any of the real Spyders out there and that's the goal.
I'm sanding the interior bits now & will get after the inner clam and underside of the hood before I start to hang parts to paint.

My makeshift shop heat is not working: the little electric heaters snap the breaker at random intervals (and this only at half power)—apparently the numb-nuts PO ran just one 12awg onto the bay to feed all four overhead lights and nine outlets.
But I don't need much heat to sand, and I'll figure something out in the next few weeks as I try to make a paint booth.
Heat: Get yourself a Dyna Glo Propane heater for $69. Settings of 15, 20 and 25k BTU . I'm on my 2nd year with one, it's a multi task unit, heat the garage, dries painted parts quickly, softens vinyl for easy installation and........... keeps your lunch hot too~ f:0"target="_blank">https://www.ebay.com/itm/Propa...woZJcBecx:rk:11f:0
Alan Merklin posted:Heat: Get yourself a Dyna Glo Propane heater for $69. Settings of 15, 20 and 25k BTU . I'm on my 2nd year with one, it's a multi task unit, heat the garage, dries painted parts quickly, softens vinyl for easy installation and........... keeps your lunch hot too~ f:0"target="_blank">https://www.ebay.com/itm/Propa...woZJcBecx:rk:11f:0
What about propane exhaust fumes ? Any concerns there ?
There is no odor and I don't sense any ox depletion however I shut it off once it gets warm ( my large attached 2 -1/2 car garage is very well insulated) every couple of hours I open the garage door to change out the air. I probably should just leave the overhead door open an inch or so.
Alan Merklin posted:There is no odor and I don't sense any ox depletion however I shut it off once it gets warm ( my large attached 2 -1/2 car garage is very well insulated) every couple of hours I open the garage door to change out the air. I probably should just leave the overhead door open an inch or so.
I've stopped using my propane heater inside my 2.5 bay garage for fear of carbon monoxide. Two walls are against interior house walls, one wall is mostly insulated garage doors plus one man door and the front, South facing wall has two windows and 8" of insulation. I diverted one heat duct that I can shut off from the basement into the garage and I'll leave the man door into the house open and finally if necessary, start up a couple of 1500 watt electric heaters.
@ DAVID STROUD ... I did some reading on this and you are right, there can be some CO build up even with a properly burning propane heater. As mentioned, I do change out the garage air often and I've had no any ill effects, from now on I will keep the overhead door a few inches open from now on to be on the safe side......... Tnx David !
Carbon monoxide is heavier than air and therefore builds from the ground up which is why you plug a carbon monoxide detector in at ground level and a smoke detector on the ceiling. You're very likely safe in a large garage but in theory, more at risk if you are rolling around on a floor creeper working on cars!
I've been leery about propane use for many, many years. We lost a good Friend, his beautiful young Wife and their two toddlers to propane exhaust exposure overnight in their home one winter after having the propane furnace and chimney worked on. All four went to sleep and never woke up. Worst funeral I've ever been too.
David, so sorry to hear of this ~
I have not sanded a complete car for painting in a long while. I don't know if I would have the patient Ed, my hats off to you on this one. ![]()
David Stroud posted:I've been leery about propane use for many, many years. We lost a good Friend, his beautiful young Wife and their two toddlers to propane exhaust exposure overnight in their home one winter after having the propane furnace and chimney worked on. All four went to sleep and never woke up. Worst funeral I've ever been too.
That's why smoke and carbon monoxide detectors are mandatory for insurance up here as of 2014:
"Working CO alarms now mandatory in Ontario. A new Ontario law requires a working carbon monoxide alarm outside all sleeping areas if you have a fireplace, any fuel-burning appliance, or a garage attached to your home."
I just replaced mine a few weeks ago, having both a wood burning insert and an older furnace.
I'm so sorry to hear your funeral story David.
Local code here now requires CO detectors when any type of permit is pulled.
We had a plumber install a new main water supply valve for the house. All the work was done outside in our yard. Before the county inspector would sign off, we had to add CO detectors in every bedroom.
The way I see it, you have 2 choices.
You can either heat with electricity or natural gas (or propane, if NG is unavailable). The first step is to size the load. In the Midwest, the rule of thumb is 40- 50 btu/ sq ft depending on the windows and insulation, etc., but a garage doesn't need to be 73* all winter long, so it's OK to downsize a bit (assuming you know there will be days the garage won't be 73*). OTOH, there's no point in spending money and not getting enough heat. It stinks to work in the cold.
The average one car garage is about 13' x 24', or 312 sq ft. If it isn't insulated, nothing you throw at it is going to seem like enough. By insulated I mean at least R11 in the walls, at least R25 in the ceiling, double pane windows, and insulated doors.
Assuming it's insulated, 30 btu/ sq ft is going to be adequate the vast majority of the time, and that attached one stall garage is going to take about 9,400 btu/hr to heat. If you have a 2 car garage, it'd be something in the neighborhood of 17,250 btu/hr, and a 3 car garage would need about 23,000 btu/hr. If the building is not attached, it's going to take more.
Electric heat is rated in watts or Kw. 10 btu/hr= 2.93 watts, so that single car garage is going to need 2754-ish watts. A readily available 2500 watt 8 ft electric baseboard heater (which puts out 8533 btu/hr) would probably do it, assuming you're OK with 60* on a sub-zero night. It would take 2 of the 8 ft 2500 watt heaters to do a well insulated 2 stall garage, and two 2500 watt 8 ft heaters and a 1500 watt 6 ft heater or three 2500 watt 8 ft heaters to do a 3 car garage. (All of this is very rough, and depends on your desires and climate).
The bottom line is that heating with electricity is the opposite of "buy once, cry once". It's dirt cheap to put in (wire and $90 heaters), but costs a fortune over the long haul. The difficulty with gas is that anything with a heat exchanger and flue is going to be at least 40,000 btu/hr, and cost at least $800. Then you have to run gas, electric, and a flue.
Enter the 99.9% efficient catalytic garage heaters. They need no power, and they run on gas. They come in small sizes, and lots of them run on propane, so all you need is a bottle.
My advice? DON'T DO IT.
Let's assume that your space is well ventilated (it's not, unless you are uninsulated, and then you are just peeing in the wind), and that you are one of the people who tell themselves, "that smell's not so bad". You'll think it's a cheap way to go. I was one of those guys. I had a 20,000 btu NG catalytic ventless heater in my 2-stall garage once. It was a huge mistake.
If you ever paint anything, that open flame with no flue is going to react with the thinner and overspray and put out some unbelievably noxious fumes. You'd be surprised how often you want to paint something, or clean parts with a distillate. If the garage is attached, the entire house will smell like a chemical dump for a couple of days. Worse, you'll likely be hacking up some pretty nasty stuff for a few days, assuming you aren't overcome by the fumes and don't die in the garage. It's just bad.
Please don't do it.
On a cold evening many years ago, I sprayed two coats of primer on a Beetle in my friends repair shop, I wore wear a decent mask but other than leaving the overhead door open an few inches there was no decent ventilation . We had just finished and a heavy primer grey cloud hung in the shop, as we walked into the office for a beer the oil fired hot air furnace decided to come on, that was followed by a somewhat muffled " Boom " that rattled the shop the air was suddenly crystal clean .........we were lucky.
Alan - is that where the term "allowing the paint to flash" came from?
Most of us have taken foolish chances over the years. This is not from laziness, but from being industrious, wanting to get results, finish the job, go on to the next item on the list, etc. We say to ourselves: oh man, I really should get that (ladder, extension cord, floor jack, correct tool, whatever), but my neighbor/friend/kid hasn't returned it yet. This substitution will work just fine for this little job.
I've done the above in the past, but I (mostly) stopped.
An added incentive to use caution is that, when a serious accident occurs in the home or garage, family members are often onsite. A serious accident harms more than the victim, as loved ones will usually witness the results, then call the local fire department. Those tragedies change more than the victim's life. His survivors never forget it.
So, think of your wife/partner/friend/kids before you take that shortcut. You'll be helping them as much as yourself.

It’s a 19 page thread. We’re drifting...
I bought a 5000watt overhead fan based heater and my two car garage, that is well insulated is nice and warm whenever I want to go visit Sabrina. ![]()
Yes it costs more than the NG to run, but I ran the cost of doing the NG install and it was prohibitive so I have many winters before I just get even with the NG install so I am happy with it at this time.
Bread, eggs and milk.... it's going to be a doozie !
Anybody have a good barbecue sauce recipe?
Panhandle Bob posted:Anybody have a good barbecue sauce recipe?
I don't have a made from scratch recipe, but adding a little concentrated orange juice and a splash of rum (or 2, and then a splash for yourself) will improve any bought sauce immensely!
IaM-Ray posted:I bought a 5000watt overhead fan based heater and my two car garage, that is well insulated is nice and warm whenever I want to go visit Sabrina.

Yes it costs more than the NG to run, but I ran the cost of doing the NG install and it was prohibitive so I have many winters before I just get even with the NG install so I am happy with it at this time.
See the numbers above. I’d bet your heater keeps that garage nice and warm.
Yes Stan, @Stan GalatI appreciated you posting those numbers, the garage is so nice to work in with the heater and the man cave is a nice retreat center. ![]()
It also holds smaller cars ...


I don't know about natural gas (I don't think it is but I'm not 100% sure) but I know burning propane produces water vapor, and I don't think most people want the extra moisture in their garages. In winter here construction job sites, if they're at the drywall stage, are sometimes heated by propane 'jet' heaters (the electrical not being far enough along that the building heat can be turned on), and (especially with wood studs) nothing is really dry when it's sanded out and painted. When everything finally dries out (after painting, everything else is finished and the owner/client has moved in) there are sometimes problems with the the drywall finish.
I wouldn't want put propane in my garage.
CH4 + 2 O2 --> CO2 + 2 H2O
This is the basic equation for combustion of NG.... but the usual product is always
CO2 + 2 H2O for a complete burn. Just saying ....
hot air always has steam in it...aka H2O if it comes from a combustion chamber or a body orifice ![]() )
)
Water is always a byproduct of combustion.
In my line of work, we can’t wear gloves that are very warm, due to the need to grab screws and small parts. When we are on a rooftop working on something in really cold weather, it’s very tempting to warm our hands under the flue of a running rooftop unit.
It’s also a great way to end up with thin, soaking wet gloves, all ready to freeze your hands once you have to go back to working on the unit.
Water in the exhaust is why the tailpipe always rusts out first on your car’s exhaust. It’s why the fluecap rusts out first on your water heater vent – that moisture is entrained in the exhaust as steam, but as the exhaust cools the moisture condenses.
In addition to carbon monoxide buildup, a catalytic natural gas or LP heater dumps all that moisture straight into the space it heats. It is a super great way to grow mold.
Thanks guys. I guess I'd forgotten some basic chemistry.
ALB posted:Thanks guys. I guess I'd forgotten some basic chemistry.
That’s OK. I often get to my truck, only to forget what I was after.
Don't feel too bad Stan , working on Speedster projects, I have to compile daily work and parts lists, lay out a majority of the usual tools on a work bench replacing them exactly where got them from so they don't suddenly part company . For my hardware and auto parts runs, I can't take a chance on not having a list for that too ~
I have not forgotten my basic chemistry.
I never learned that weird shtuff in the first place!
Except, as it relates to food.
Or the Alton Brown “Eat your Science” tour...
Stan Galat posted:ALB posted:Thanks guys. I guess I'd forgotten some basic chemistry.
That’s OK. I often get to my truck, only to forget what I was after.
Sometimes I can't find my truck. Then I get there and can't remember what I was after.
Sometimes I have to go back to the original place where I had the original thought of what I needed to get. ONLY then, do I remember what it was !!!!!.........Bruce
I don't remember what we were talking about. ![]()
This always seems to happen when I heat the garage with unvented propane burners...
Stan Galat posted:I thought Marty's was from a Karmann Ghia.
I thought Marty's WAS a Karmann Ghia. Could not resist. Don't fire me.
Ed, you're doing yeoman's work, sir. Brilliant.
Late to the party here, it was a tough work week.
I have two 5000 watt 220v electric wall heaters, with fans. They are diagonally opposite, so they circulate the air clockwise as they heat. They are both hooked up to the same thermostat, but I can select one or the other. They were nearly free, they came out of a building that was being torn down.
If I spend a LOT of winter weekends in the garage, it costs about $100 extra in electricity over a few months. Maybe $200 in 2016 when we built the new car. No fuel, no CO, no moisture, and no maintenance. I'm OK with all of it.
It's still cold on the floor on a creeper, but great if you're standing. Concrete block, 19 foot square building with an insulated(R30) ceiling and a foam insulated garage door. About 360 square feet. The 8000 BTU window AC unit works perfectly in the summer.
I'll have a radiant heated slab when we move, though.
I have used a cylinder propane style heater in my garage for years. It uses a large propane tank that I typically refill every 30 days . I also open the doors occasionally for ventilation and it seems to work very well, and cheap to use. I understand the concern for the fumes as my appearance has changed over the years, hence my picture below. Not to mention that I'm only 30..
Reddy1 posted:I have used a cylinder propane style heater in my garage for years. It uses a large propane tank that I typically refill every 30 days . I also open the doors occasionally for ventilation and it seems to work very well, and cheap to use. I understand the concern for the fumes as my appearance has changed over the years, hence my picture below. Not to mention that I'm only 30..
@Reddy1 No photo
Sanded the interior and floor today, and set up my "slave saver" thing for the clutch. Of course the bolt that came with it wouldn't thread into the hole, so I got another one and that didn't work either. Ended up cutting the aft adjustment rod from the cylinder—that threaded in perfectly and it was replaced by the heim joint anyway. Still...much more PITA than should've been. (Pic below is before the final stuff was done).

With that sorted I turned to the trunk. Still have to make brackets for the fluid reservoirs. Ended up making the brake fluid one first. The it was on to the cover panels for the beam adjusters and steering box.

Supposedly another painter is coming by on Thursday to have a look.
Hopefully, you won’t get a “painter in training”, whatever that is.
And that pretty much sums up our cars.
Nothing ever, EVER, fits (Goddammit!)
Reddy1 posted:I have used a cylinder propane style heater in my garage for years. It uses a large propane tank that I typically refill every 30 days . I also open the doors occasionally for ventilation and it seems to work very well, and cheap to use. I understand the concern for the fumes as my appearance has changed over the years, hence my picture below. Not to mention that I'm only 30..


Took a break from sanding this weekend and spent a few hours with the cardboard and the scrap pile and the welder.

Hopefully, making the receivers for these won't be too hideous.
I see you use a double burner propane heater..........Bruce
Yes, on occasion. Usually only one burner on low, with a box fan behind it. That picks up the bay about 15 degrees above ambient. This weekend I only used the electrics.


Ready for final dry fit and then paint.
Update. Thought I had a painter but he seems to have flaked. I might just put the damn thing together and get it titled and registered for Carlisle and paint it after.
While waiting for the painter to call back I started yet another fake authenticity project.

Ed Call me tomorrow I have another guy near Chambersburg PA that has painted a few of mine( reasonable ) when my regular painter was not available.
Progress today. I talked to Alan's painter and sent him some pics. Waiting to hear back.
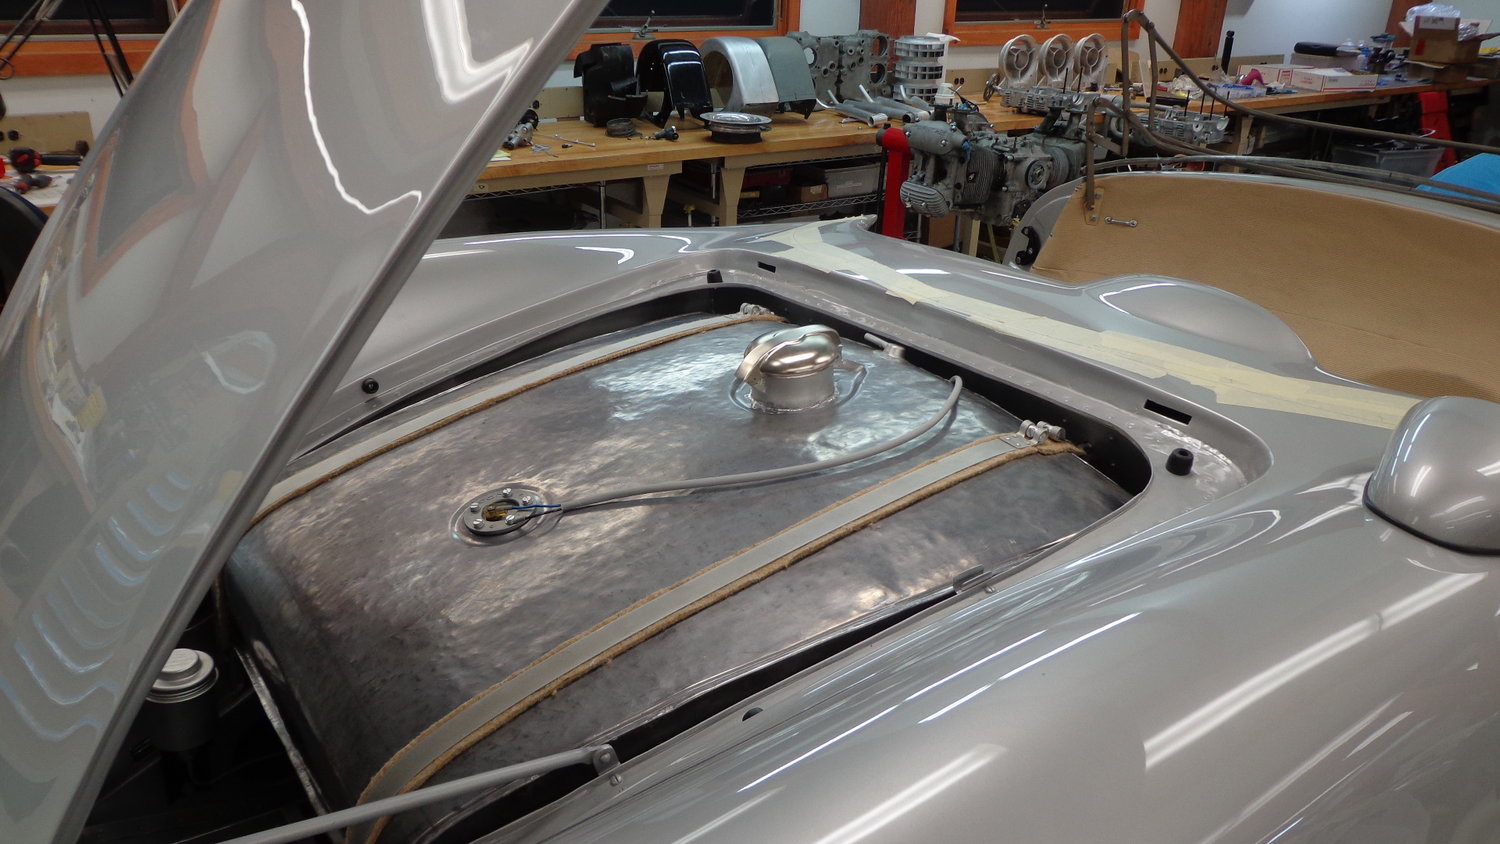
Spent about 4 hours in the garage, working on the tank cover. It's coming along without much trouble so far.


Tomorrow I'll get into the side covers, and they could be a bit tricky.
Got the side covers roughed-in today. It's really fun and almost easy to work this steel, compared to the thin aluminum in the clam.

Ordered my hold down straps and a couple of weave belts to complete the look. Which is
In my case the hold down straps will be attached to the outside panels, to cover the seams. The panels will be hinged low in front to give access to what I hope will be useable storage compartments.

Of course, after I cinch this down tight, weld all the corners and get it really fitting well I will also beat the crap out of it from the backside with a ball peen hammer to give it that extra dram of legitimacy.
“I might just put the damn thing together and get it titled and registered for Carlisle and paint it after.”
I kinda wish you would. Since you plan to sell it I might otherwise never get to see it in the flesh.
Blogged the tank work in case anyone wants to follow along.
You have become quite the Craftsman......impressive !
Fettling.
Bolted the center bit down, narrowed about an inch and got the side covers below the frunk "lip" so the hood closes without hitting them.
Next up are the hinges, and a bit more hammering to make everything lay down relaxed and snug along the seams.


What's the dent for about a foot in front of the gas cap? EDIT: Never mind. I saw the picture of the original.
Lane Anderson posted:What's the dent for about a foot in front of the gas cap? EDIT: Never mind. I saw the picture of the original.
Ed’s handmade fauxtina.
“FAUXTINA”
Would make a great license plate.
Plan on the bogus sender will be hooked up to the real sender underneath, so you just wire the gas gauge to it like it's legit.
edsnova posted:Plan on the bogus sender will be hooked up to the real sender underneath, so you just wire the gas gauge to it like it's legit.
Wouldn't that make it legit in some sort of bizarre replica world sort of way?
As long as it's not too legit to fit.
And yeah this is all a bizarre exercise. The percentage of even 911 guys who would know to look for the big hand-hammered tank is vanishingly small—low single digits percentage, I'm sure—and the major "tell" is that the car is present, having been driven on the street.
Everyone knows it can't be a "real" 550 just based on context.
But I absolutely get off on making things look right, even if they can never truly be right.
I had such a fun time doing every last thing to put Bridget through the uncanny valley and out the other side, I figured I'd just do that to every Plastic Clown Car (TM) I can get. And so here we are.
Thanks to Cory Drake, who generously lent me his Hoopty All Weather Transport System(TM), and Alan, who knows several painters who will deign to paint these fiberglass monstrosities, Projeckt Spyder is now with the painter.

That's a big milestone. Congrats, Ed.
That is for sure a big milestone... a lot of work on that car... I don't think I could pull off such a build I might just run out of gaz. ![]()
This one is going to be magnificent when complete. I probably already asked this but is there any chance of it making it to Carlisle?
Trying like hell to get it ready for the big C, old man. It's been a journey.
Gonna spend the next couple weeks gettin' Bridget ready for the season, and maybe put the Spyder's engine on a bench and do the heim joint linkage mods and the dizzy lock-out.
I need to hem my tonneau cover too. Or get it hemmed.
Fingers crossed this paint job makes my cheesy-ass alumi-cobbling look like it's supposed to.
When the car comes back I plan to press Cory into service to get the drive train situated.
After that it's wires and finaling hydraulics and getting the state of Maryland to title it as a legal road-going vehicle of some sort.
So I took a minute this am to blog-out the failed/shelved fan shroud project. A lot of things in a car build don't work out the way you planned. This is one such thing.

For now I plan to back away from modding the Raby shroud. I may return to it later.
There are all sorts of reasons why a build becomes a moving target... mostly the budget ![]()
"A lot of things in a car build don't work out the way you planned."
Now, THAT was funny!
And whatever my car build is throwing at me, my staircase project throws triple. It took me 4 tries to build half of the curved maple handrail. And I'm still not satisfied, but I think I may have a mutiny on my hands if I started the handrail over; again.

Todd M posted:"A lot of things in a car build don't work out the way you planned."
Now, THAT was funny!
And whatever my car build is throwing at me, my staircase project throws triple. It took me 4 tries to build half of the curved maple handrail. And I'm still not satisfied, but I think I may have a mutiny on my hands if I started the handrail over; again.
Having bent wood a few times (shelves, barreled tin ceiling) let me just say that a helix maple hand railing like that is some major league stylings and not at all suited for the beginner with two bread boards and a tool box under his belt.
I tip my hat.
edsnova posted:Todd M posted:"A lot of things in a car build don't work out the way you planned."
Now, THAT was funny!
And whatever my car build is throwing at me, my staircase project throws triple. It took me 4 tries to build half of the curved maple handrail. And I'm still not satisfied, but I think I may have a mutiny on my hands if I started the handrail over; again.
Having bent wood a few times (shelves, barreled tin ceiling) let me just say that a helix maple hand railing like that is some major league stylings and not at all suited for the beginner with two bread boards and a tool box under his belt.
I tip my hat.
Looks like a tricky project. Do you steam the wood first and how to you calculate for spring back ?
Nice job. I bought a harvest style table from them years ago and I took a tour of a mennonite, St-Jacobs chair bending operation from Abraham Martin, now there are many with that name in that area :") BTW they are experts at chair bending.
The steam channel I saw they had made to bend the wood was very basic but very impressive.
Hats off to that skill.
David Stroud posted:edsnova posted:Todd M posted:"A lot of things in a car build don't work out the way you planned."
Now, THAT was funny!
And whatever my car build is throwing at me, my staircase project throws triple. It took me 4 tries to build half of the curved maple handrail. And I'm still not satisfied, but I think I may have a mutiny on my hands if I started the handrail over; again.
Having bent wood a few times (shelves, barreled tin ceiling) let me just say that a helix maple hand railing like that is some major league stylings and not at all suited for the beginner with two bread boards and a tool box under his belt.
I tip my hat.
Looks like a tricky project. Do you steam the wood first and how to you calculate for spring back ?
I am so glad that someone asked about this, cuz everyone in my circle of family and friends is tired of hearing about it.
It may have not been so difficult, but the manufacturers of the laminations kits for making curved handrails recommend a radius of no less than four feet, and the inner radius of my design is two feet. Plus, the hand rail kits that you can buy to make your curved handrail are expensive, so I had the bright idea of cutting the laminations and profiled pieces myself. Yes, I steam bent, (compressed), the sticks, and glued them once they were partially compressed. I say compressed because it turns out that if you try to steam bend maple into a helical curve with a radius of two feet, it will break. Instead, you have to make a bendable metal jig to keep the outside of the sticks from stretching with the intent of all the bending compressing the fibers. I didn't account for the spring back because I did not want to build a extra form with an even smaller radius, and when I first started I did not know how the maple would react to a two foot radius curve. The compressed sticks sprung back, a lot, but when three or four sticks are glued, the spring back becomes negligible.
Anywhooz, after one test lamination and two concerted tries with my own pieces, I broke down and bought the sticks from a kit manufacturer which have a lengthwise keyway to keep the laminations in line during glue up. And I bought the plastic outside forms which match the profile and keep the profile from being damaged from the clamps. Yeah, I found that out from experience also.
This is way off topic, but the point is that y'all are helping me tremendously with my coupe build, and if anyone has a question about repairing or improving something on their house, please feel free to ask me.
You also have an impressive clamp collection!
Todd M posted:"A lot of things in a car build don't work out the way you planned."
Now, THAT was funny!
And whatever my car build is throwing at me, my staircase project throws triple. It took me 4 tries to build half of the curved maple handrail. And I'm still not satisfied, but I think I may have a mutiny on my hands if I started the handrail over; again.
I'm a painter in construction, and in a rather high end new house my brother and I were painting 25 years ago we watched the finish carpenters lay up the railing for a curved stairway with a landing in the middle. It was made of oak- they cut the material into 1/4 x 1/4" strips and laid/glued 1 layer at a time to deal with the multiple curves. They would do a layer in the morning and then another in the afternoon before quitting time- took 3 or 4 days. After it was machined, installed, stained and clear coated it was stunning!
My dad built a very impressive compound curve rail for his last house by building his own 12 ft long steam pipe, and putting a single piece of oak (no laminated strips) in it for 12 hrs or so, then bending and clamping the rail to a pre-made form.
It was an amazing bit of work.
U need to join the club E Clampus Vitus
I find this wood bending fun and interesting. I have plans to make a steering wheel for my Spyder. I'd like to have a "banjo" type that's a little smaller and not flexible like the one we all can buy. The following is a Helm wheel I made for a binnacle/helm I restored. The oak part of this wheel is laminated strips 1/8" X 1.25" in size. I used two sheets of 3/4" x 3' X 3' glued together with a 32' hole band-sawed out of the center. This was my form and laminated the strips from outside in. The " spring" of the unsteamed wood created it's own pressure without having to clamp it. The butt joints are end to end and staggered so no fuss was necessary to get tight joints. I made it oversize both inside and out so it could be trammel router trimmed once the average center was found again.
I can't imagine what thought had to go into building that hand rail but I'm sure it was a lot ! The end result being a work of art for sure. The suggestion of using 1/4" X 1/4 " strips makes a lot of sense. I really like that suggestion and it went into my permenent memory bank


Geez..... And I thought building a Speedster was a lot of work!
Gordon Nichols posted:Geez..... And I thought building a Speedster was a lot of work!
Geesh I read somewhere it would take just 40 hours ....
Access to this requires a premium membership.
Supporting members have donated about $4.00 a month ($49.00 US per year) paid annually.
AUTO RENEW: You membership will auto-renew after 12 months. If you prefer not to auto-renew, you can cancel your premium membership at any time and it will remain in effect until the end of the 12 months. To cancel, sign in at SpeedsterOwners.com and navigate to: (Your User Name) > Premium Membership.
PLEASE NOTE: Your credit card will receive a charge from CROWDSTACK PAY, the payment processor, not SpeedsterOwners.com.


