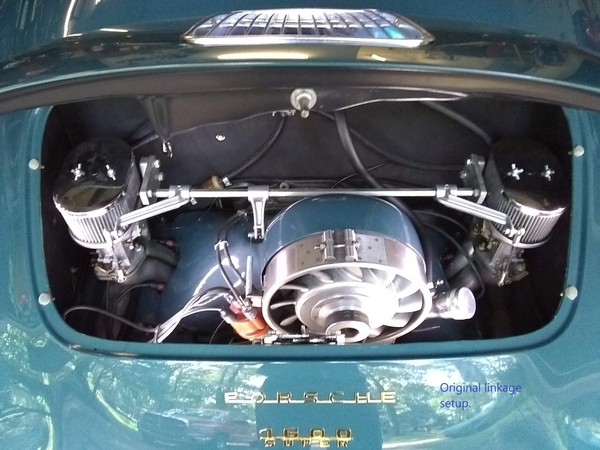
Turning the Carburetors around…

 This post applies to engines with 911 fan shrouds. If you have the doghouse shroud please disregard.

What I thought would be an easy project turned out to be much more difficult. There is more to the job than replacing the intake manifolds with Space Saver manifolds. It always surprises me when the obvious jumps and bites you.

 I suspect that blocked idle jets will always be a problem with these carburetors. On the Spyder it was an aggravation, but the carburetors were totally accessible…on the Speedster they are not. I could clean all of the idle jets on the Spyder in 5 minutes. To clean 1 on the Speedster was at least an hour. I have large hands and needed to remove the air filters and top of the carburetors to get access to the idle jets on the number 1 and 3 cylinders.

 Something better was required, so I asked the group if there were intake manifolds that allowed the carburetors to be turned around. Several answered that CB Performance had such a manifold, so I ordered a pair. They were surprisingly inexpensive…there was a reason for that. What a piece of junk! While my Chineseium manifolds were smooth and polished, the CB Performance manifolds (made in the USA) were rough and poorly machined. The head flange was too thick for a proper bolt up. The thickness of the flange was different on both sides! I had to mill off .100” (1/10) of an inch from the face to get a bolt on properly.

That wasn’t all! The bolt spacing for the carburetors was not correct for my Italian Weber’s. I had to ream the carburetors to get them to fit the studs provided with the manifolds.

Finally, the new manifolds and carburetors were installed. All that remained was to reinstall the filters and linkage and go for a test ride.

No. This is where the not so obvious got me.

I have the CB Performance 3143 Filter and linkage package. 

The linkage, as originally installed, operated from the front of the engine. That means that the operating arms were turned toward the front of the engine. When the carburetors are reversed the linkage must be turned toward the fire wall. The filter base is part of the linkage mount. What that means is that you cannot just turn the filter base around. The cast linkage mount, that is part of the air filter base, is now near the front of the engine and the linkage could not be mounted.

The filter bases had to have new mounting holes drilled to match the new position of the carburetors and move the linkage mount toward the back of the engine.

At the same time I was reversing the carburetors I wanted to upgrade the linkage. The ball end adjustment that is common to all of these linkages is very poor engineering done to save a buck. In a very short time they wear out and the carburetors cannot be properly balanced. I made two simple aluminum mounts that have a 8mm heim joint bearings pressed in place. They are attached to the two ears on the modified filter mounts with 4mm bolts into new tapped holes on each filter base. They adjust just like the original ball mounts, but the wear is gone.

On the original installation the throttle cable was a straight pull to the operating arm. That won’t work here. As the cable enters the engine compartment it now has to make a near 90 degree turn up to the arm. The linkage cable arm must be in the same plane as the linkage arms.

As much trouble as I had with this “simple project”, it is very worth doing. Now all of the carburetor adjustments are in the open except the heim joint links from the linkage to the carburetors, which are now at the rear of the engine. Once properly set up they shouldn’t need much attention. Everything is working well and I’m pleased with the installation.

This may not be the only way to do the job, but it was my way. Feel free to do it your way.

Naturally, since doing this I have had no need to clean the idle jets.

ENGINE-1Modified Liknage


Attachments

Images (2)
  • ENGINE-1
  • Modified Liknage
Original Post

Replies sorted oldest to newest

Jim, nice work!

Please be aware that these manifolds also bring the carbs closer together, necessitating a shorter hexbar. Also, if you have a regular shroud, the carbs will be VERY close, especially on #1 cylinder.

Jim, I think CB sells a carb top that already comes drilled for a reversed mounting.

I was lucky, my manifolds came from 2001, and were welded up, match ported, and machined by Jake Raby.

DannyP posted:

Jim, nice work!

Please be aware that these manifolds also bring the carbs closer together, necessitating a shorter hexbar. Also, if you have a regular shroud, the carbs will be VERY close, especially on #1 cylinder.

I did not need to shorten the bar. The 8mm ball ends were removed and the end of the bar was threaded for helicoils to accept an 8mm stainless steel stud, not threaded on one end. The adjustment in length is made up with a lock nut at the bar ends.

I really couldn't tell that there was any change in the spacing between the carbs. I didn't measure it, but the blocks that I made to hold the heim bearings were cut from the  same adjustment plates that were with the original linkage.

Jim....It looks like you like to have a clean and simple looking engine compartment. I had my breather box in the same place as yours. I goy rid of the hoses by drilling two new holes in the back side (on the side facing towards the firewall) and installing 2 each, 6 " long 1/4 " pipes to those holes with corresponding holes through the firewall. Those two holes were slightly larger than the breather hoses. I ran the two breather hoses from the valve covers up into that void between the firewall and the rear seat wall and out through the two holes in the firewall. They connect to the 6" stubs and are clamped from the back side (in the void) once you push them back into the firewall  This gets rid of seeing those two hoses in the engine compartment and all you have is the breather box sitting there (accessible to periodically service) The other hose to the crank case is removed, the hole plugged in the breather box, a small paper element breather filter (from EMPI) installed an inch away from the fillet neck and out of site pretty much.  Now all that is visible is the Breather Box with no hose connections.

Of course you will still have the two holes in your heat aprons where you brought up the two hoses from the valve covers so you will have to plug them up some way..............Bruce

Art posted:

Jim;

Who manufactured your 911 shroud?  Was it difficult to install?  And lastly, any cooling issues?  Thanks, Art

Art,

The 911 shroud was on the engine when I bought the car. I've seen the kit for $1,200 from the Sierra Collection...I think.

I've looked at what it would take to remove the shroud. Carburetors and manifolds have to come off. I think the easiest way would be to drop the engine. 

No cooling issues. I don't have a CHT gauge but the oil temp runs mid gauge. I did a parade two weeks ago and it did get hotter, but never in the caution range. It was a 95 degree day at noon.

Looks great! Great project.

- Could be a bergmann shrowd.  http://www.bergmannvw.net/index.htm

- noticed you have the plastic fuel filter in the engine compartment.  You may want to consider moving it to the other side of the firewall and installing a metal one.  Better safe than sorry :-)  attached one example of the many out there available at local auto stores... https://www.autozone.com/filte.../830809_166242_17720

- also... if you have one installed, don’t trust the Chinese repo gauges for accurate  temperature readings.  You may want to baseline the gauge needle positioning with what the engine oil is running at by means of a dip stick thermometer, or install one of these Berg designed dip stick temp warning devices—- .. I actually have been using this one for 3 years in summer and on road trips... easy on/off., 35$... great extra visual warning in addition to the gauge.   flickers oil pressure light in speedometer if oil hits 225, solid light if it hits 235.   Great visual aid.   https://www.thesamba.com/vw/cl...etail.php?id=2180658.  

http://savemybug.com/index.htm

And if you are up to the challenge, run one wire in a series from the oil pressure light  in the speedometer gauge to one of the unused warning light on the temp/com I gauge.  ( 10min project, and you will have two oil temp warning lights in you gauge cluster.)

- also, have you considered this mod?  As long as you are in their, may as well...   https://www.thesamba.com/vw/cl...etail.php?id=1725307


Last edited by Lfepardo

Lepardo,

Thanks for your post.

There are several upgrades I will be making during the winter. the fuel lines is one of those and the filter will be replaced with a metal filter, regulator and pressure gauge at that time.

I have 914 instruments in my car. I guess they'll be ok.

In my post I mentioned that I had upgraded the ball end adjustment with heim joint bearings. I really like the bearing fix your guy used. I haven't priced the bearing but $110 seems really high for what he is providing. I have machine tools in my garage and can make most things I want. If the hiem joints don't hold up I'll try his solution.


The 914 instruments are just that, instruments. They aren't the toy instruments made in China crap that so many Speedsters have. You'll be fine, Jim.

That Samba mod is neat, but I see no provision for springs at all to compensate for engine widening. The engine widens about 1/4" when fully warmed up. My heim mod has springs between the rod ends and the hexbar on both sides to compensate. Jim, I like how you did yours, it looks great.

My heims and steel rod lasted 40,000 miles. I just replaced it all, for a paltry $20 bill. The steel rod I used was soft, and eventually wore a little to create some minor slop. This time I tapped the end of the hexbar after drilling it deeper and tapping for 5/16" x 18 thread. Loctited some grade 8 bolts in there, and wacked off the heads with a die grinder.

Here's the original post from 2006:

http://atszxzj.spyderclub.com/...f5dbc48371668936100c

And with respect to the fuel pump, just get the Carter 3 to 3.5psi self-regulated rotary pump. It even comes with a pre-installed metal can pre-filter. No regulator, no pressure gauge needed. Simpler is better in this case. Run your metal line to the back and Tee to the carbs. My fuel line is all metal except for the tank to pump, pump to metl line, and a short piece to each carb. Done.

The only caution with the 914 gauges is that the drive gears are nylon (maybe just plastic) so never hit the ODO reset while the car is moving as that often destroys the gears. On most 914 fuel gauges you can add an oil temp gauge to replace the upper no longer used red flashing emergency brake ON light.  If the gauge has a D shaped plate held on with four screws then the light can be swapped for a temp gauge.  You do need to add a compatible temp sender on the engine.

Image result for porsche 914 oil temperature gaugeImage result for porsche 914 oil temperature gauge

Image result for porsche 914 oil temperature gaugeImage result for porsche 914 oil temperature gauge

Attachments

Images (1)
  • blobid0
Last edited by WOLFGANG
Lfepardo posted:
cool... sorry i must have missed rhe heim joint reference i your note.
thats all i was proposing, as his upgrade is just that. baring inside a
custi. machined holder with springs to keep things in place. a home made
heim join. ;-)

sounds like an awesome shop you have at home!

Not a fancy shop. I work out of a 2 car garage that houses the Speedster, 6 motorcycles, a motorcycle lift, a 30 gallon air compressor, a very old 6" Atlas lathe and a Enco Bench top mill. There is still room to work. Sometimes have to move things around. I layout all of my machining projects in Autocad and try to get the layout right before I start. It's surprising how much time it takes to make  just one single small part.


I have a Grizzly Lathe and an Atlas/Clausing mill. Not anywhere near a CNC but truly valuable for one-off stuff for myself and small production stuff.  They are no brainer's to operate for anyone who can read a mic. or caliper. Highly recommend to anyone who is even remotely interested in these kinds of machines to bite the bullet and buy them.  Occasionally I see them for sale for the same price as a floor hoist (for both too) and of course they would be used at that price. I had them a long time before I bought a hoist !!  Now I don't know why I didn't get a hoist years ago.  Probably something to do with stooping , crawling, twisting, doing sit-ups, bending ??       Benchwork Rules ! ..........Bruce

Bruce,

I've been thinking about adding CNC to my mill for years. I bought the materials, but after even further consideration opted for a DRO (digital read out). CNC would be great if I had 100 of the same thing to make, but I don't. A 2 axis DRO can be had for about $200. I used a 6" battery powered DRO for the quill. It's been the best money I've ever spent on tools. Also have a rotary table and rotary index  These allow you to make splined shafts and inside splines.

ED/Gordon...You guys always make me laugh !  I wish I was as fast with the humor !

Jim...I'm envious of your DRO attachment. I friend offered to give me his and I turned it down because I didn't know what/how to use it. I do have a nice  rotary table and index though. Ya can't live without them for certain things !  If we ever move I'd like to have a 6  double car garage. Each one with a 16' roll-up door. For a machine shop, welding  and metal bending shop, wood shop, and paint shop. The two others for cars. Right now I have all that in one 26X28' garage. Needless to say...it's pretty tight.  I just built a really nice 72" X 2" belt grinder that swivels 90 degrees. It has a 2 HP 3 ph 220v motor with a variable frequency speed control and is wonderful to use. My old 1 HP Baldor 8" bench grinder just got repurposed.  If you go on Youtube you can see what I built. I followed Jeremy Schmidt's video of the one he designed and built. It's built like a TANK !!   Title is "building my 72" belt grinder by Jeremy Schmidt"  Check it out.  I was shopping for one and just couldn't hack spending $4700.00 for one from Burr-King.....Bruce

There are so many tools that I wish I had, and so many more that I’ve had in the past and had to get rid of because of limited space.  I tossed a 24” articulating bench sander in the dump for lack of space and no one else who wanted it.  Not to mention a 12” Heald Machine miller and a Knopsworth 16” metal lathe.

As an alternative, I have found local friends who have a lot of those tools (and more), and they are more than happy to let me use them (once I demonstrate that I know how to use them) so I can go that route.

My garage is a 24’ square and half of that is my wife’s parking, the other half my Speedster, so space for big tools is at a premium.  Still, I manage with what’s left and have the only Oxy/Acytelene torch, MIG welder and 150# anvil in the neighborhood.    

Bruce:  Heald Machine Works was a company in Worcester, MA, that made machine tools.  Very high quality, but poor management and changing economies left them behind.  A Heald  milling machine was similar to a Bridgeport - a vertical milling machine with various jaw heights, depending on model.  You probably have different tool builders on the left coast.  Many machine tools builders were regional and served the OEMs in their areas.

Here’s a Heald vertical miller:

https://www.practicalmachinist...ertical-mill-286778/

Post Content
×
×
×
×
Link copied to your clipboard.
×
×