Joel, thanks for starting this maintenance thread.  We should all keep it going so that we have these tips and instructions all in one place.  

I will add one — check that the top bolts on the front shocks are tight every X miles.  I plan to add lock nuts to mine because they seem to come loose more frequently than they should.

How often are we supposed to be cleaning our air filters, and what do we do to clean them?

@JoelP posted:

I’ve never heard of using thread sealant on a transmission. What’s the reasoning there?

Obviously I'm not Gordon.

But applying a thread sealant to a thread-interference connection is a good idea and I always do so.  If the drain plug on the transaxle is a pipe thread I would recommend Teflon tape, starting two threads back, or a Teflon "paste".

Having said that, you can probably get a seal without sealant if you apply enough torque to the connection, but you run the risk of damaging the threads or even cracking the surrounding metal.

Jason 

You don't have to tighten the plugs more than 14-18 ft. lbs. to seal them. You won't break anything unless you OVER-tighten the crap out of them. The plugs are steel, into a softer aluminum or magnesium. They seal all by themselves, and have for 70 years.

@Teammccalla Every 2-3 years depending on dusty conditions and mileage. I used to clean mine every spring when I put 5-6k a season on the car.

Also, shock nuts should either be nylocs or have a jam nut doubling it up.

Last edited by DannyP
@JoelP posted:

Yeah. Just fixed. The retaining nut had shaken loose and the plunger was approximately 1/2”  more extended than a pic I took when I first got the car. Used that pic as a reference by zooming in and counting the exposed threads. I’d use Loctite to keep the retaining nut in place, but first need to align hood gaps. The gap on the right of the hood has been killing me since I got it. Wondering if a couple of shims on the left side would do the trick? Especially since it’s pretty clear the gap is uniform.  IMG_5134

If you shim it on the left what happens on the right?

The way my late father (30-year body man) would adjust that is by bending the hinges ever so slightly. Over the years I watched him do it on a bunch of cars. It was a little like watching Arthur Fiedler conduct the Boston Pops.

But I'd for sure ask Greg what he'd do.

@JoelP

I had a slight leak at the drain plug when I first installed the transaxle (1997-ish). Re-tightening the plug didn't seem to help.   At the 400-500 mile mark when I drained it to put in the regular trans oil I put teflon tape on the plugs and never had a leak since.   Had the same transaxle rebuilt @ around 20K miles (it developed a noisy 3'rd gear howl ) and did the same routine with the tape and no leaks.

Works for me, but you do you.   Whatever works.

Last edited by Gordon Nichols

My reasoning went like this: you can skimp on many tools and never experience the downside because you may not use them often, but this the opposite case with a high quality 3/8” torque wrench that torques from 5 to 100 foot pounds. I’ll be able to use this on 95% of the fasteners on my car. For instance, I chose to buy an $8-dollar Craftsman 17mm hex socket instead of a $56-dollar Snap-On 17mm hex socket because I’ll use this maybe 5 or 6 times; whereas, I’ll torque fasteners from 5 to 100 foot pounds hundreds of times. The value proposition was clear to me. Maybe that’s just me.

Last edited by JoelP

Adjusted clutch and wow was it loose! Also took the opportunity to install Porsche headlight brackets with proper hardware. Thanks to all who helped me. I’ll say this, if you want a simple install, the VW bar grilles are a million times easier. Replaced hood handle emblem too (had to drill it out). Lastly, used a 2.5lbs dead blow mallet to adjust the hood to almost perfect alignment. That’s it for the little, short-fuse projects for now.


Next weekend will be my first service!!!!


IMG_5225

IMG_5228IMG_5227

Attachments

Images (3)
  • IMG_5225
  • IMG_5228
  • IMG_5227
Last edited by JoelP

Update: I did my first oil change and valve adjustment this morning. All went relatively smoothly.


For all the new VMC 2332 owners out there, I'll be a bit specific:

Oil Change

  1. I've been noticing an increase in oil leakage from the drain plug and a few of the retaining nuts on the sump plate lately. I noted that before the oil to determine whether my prophylactic measures (discussed below) yield any positive results.
  2. Oil sump plate consists of 6 x 10mm retaining nuts, requiring 5 ft lbs of torque and 6 new crush washers
  3. Drain plug is 21mm, requiring 25 ft lbs of torque and one new crush washer: NOTE: VMC used a sealant on the drain plug that left an extremely hard residue on the sump plate, requiring me to scrape it off with a razor blade to ensure a good seal going forward.
  4. I used JB Weld Ultimate Grey RTV on the sump plate studs and the drain plug.
  5. Instead of cleaning the strainer, I simply replaced it.
  6. I ordered the paper gaskets and crush washers from JBUGS as a kit
  7. I tried to remember to use a cross-tightening pattern for torquing all the retaining nuts, but working on the ground in a 90-degree hot garage at 6am is just not that conducive to memory recall.
  8. That said, I used a Snap-On digital torque wrench to ensure all fasteners were torqued to spec.
  9. I used the recommended VR1 oil. Having spoken with another new VMC 2332 owner, we reasoned that our cars require approximately 3.5 quarts of oil.
  10. During the oil change, I confirmed this by adding 2.75 quarts in initially, running the motor, checking the level. It was low. I added 0.5 more quarts, repeated the process, but the oil level was only barely over the minimum line. Lastly, I added another 0.25 quarts and called it good. When I drive the car to warm it up for the transmission fluid change, I will check to ensure the motor doesn't require a bit more oil.


Valve Adjustment

  1. Each valve cover is held on with 2 x 13mm retaining nuts, each with a metal washer and a rubber grommet that's recessed into the case.
  2. NOTE: the retaining nuts are nyloc nuts, so you should buy four new nuts before starting a valve adjustment.
  3. I was surprised at how loose the retaining nuts were; this is not necessarily bad, as I never had any oil leaks from the valve covers.
  4. The covers would no pull off, so I used a 2-lb rubber, dead blow mallet to gently tap either side of the valve cover. It pulled off easily thereafter.
  5. Being alone, I used a 19mm wrench to rock the motor while my phone rested against my toolbox recording the valves. Because the valves for cylinder 1 were moving at TDC, I knew the motor was on cylinder 3. Once full revolution and I was on number 1 cylinder.
  6. Using a .005 feeler gauge, I determined that the intake and exhaust valves were loose.
  7. I used a 12mm, offset, crows foot wrench to loosen the valve nuts. Holding nut static, I lightly tightened the valve, using a standard screwdriver.
  8. Once the feeler gauge passed through with a bit of resistance, I moved on.
  9. I turned the motor COUNTERCLOCKWISE to then service cylinder 2; I did this for all the cylinders and valves (starting with 1 and turning the motor counterclockwise 1/2 revolution allows you to service valves in numberical order: 1, 2, 3, 4. NOTE: only the valves for cylinders 1 and 3 needed adjusting. Even then, it was de minimis.
  10. I cleaned the valve covers with contact cleaner and used a small bit of RTV to keep the new cork valve cover gaskets in place.
  11. I slid the valve covers on and used my mallet to gently tap them into place. I replaced the rubber grommets, washers, and nyloc nuts (I will be purchasing 4 new nyloc nuts to replace the used ones I had to use again).
  12. Again, I used a small amount of JB Weld Ultimate Grey RTV on the threads to ensure no leaks.


Additionally, I took a few minutes to ensure the 11mm retaining nut on my clutch cable had not come loose. It was firm, but not tight. So, I checked the play in my clutch pedal - 0.5 inches. Then removed the retaining nut and applied BLUE (non-permanent) Locktite to the clutch cable threads before replacing the retaining nut. Note, there is no easy way to reach the retaining nut. Prepare for scraped knuckles and bruised forearms.


Lastly, I bought some lithium grease for the door hinges and applied it to both doors. Not good! They started to squeak like I've never heard. So, I wiped it off and applied some - you guessed it - WD-40; all's well.


All this took me about 2 hours (including setup and cleanup), as I was being very careful with each step to take notes. I know this is all overkill. That said, tomorrow will be my transmission fluid change and a front to back inspection.

@JoelP posted:
Lastly, I bought some lithium grease for the door hinges and applied it to both doors. Not good! They started to squeak like I've never heard. So, I wiped it off and applied some - you guessed it - WD-40.

The problem with WD-40 is that it evaporates. My Smart gets door squeaks like no car I’ve ever owned. (Lubing them is actually in the service schedule!) Nothing beats Triflow. Lasts a couple of years. And the squeeze bottle/tube* make it easy to get into the tight space to put a drop or two on the top of the hinge and it seeps down on its own.
mceclip0

Alternatively, I like Super Lube, comes in a handy pin oiler.
IMG_1616


* If you get some triflow, mind that tube. It’s a different size from every other tube I’ve used and the others don’t fit.

Attachments

Images (2)
  • mceclip0
  • IMG_1616
Last edited by dlearl476

Joel, great write up.  Thank you.

@LI-Rick We do not have oil filters on our VMC machines.  I have put a lot of thought into it, and decided to go without.  I was planning on using one of those devices that keeps oil running without the filter until it’s warm, and then starts the flow into the filter.

So after doing the research, I talked it over with several experts and they thought frequent oil changes would do it.  It goes against my nature not to have a filter, but i am assured that a magnetic plug and oil changes every 1500 to 3000, depending on how hard I push it, will be adequate.  I don’t want my engine to wear out too soon, but it wouldn’t break my heart either.  I can imagine making, or having someone make, something a little different.  The new motor, years in the future, I hope, will have a full flow filter.

@Teammccalla posted:

Joel, great write up.  Thank you.

@LI-Rick We do not have oil filters on our VMC machines.  I have put a lot of thought into it, and decided to go without.  I was planning on using one of those devices that keeps oil running without the filter until it’s warm, and then starts the flow into the filter.

So after doing the research, I talked it over with several experts and they thought frequent oil changes would do it.  It goes against my nature not to have a filter, but i am assured that a magnetic plug and oil changes every 1500 to 3000, depending on how hard I push it, will be adequate.  I don’t want my engine to wear out too soon, but it wouldn’t break my heart either.  I can imagine making, or having someone make, something a little different.  The new motor, years in the future, I hope, will have a full flow filter.

Thanks. Do they have an external oil cooler?  

@JoelP posted:

Thanks, @dlearl476. I’ll pick some up tomorrow.

Re: oil level. I was skeptical when a lot of guys said the top mark is “too full” but sure enough, I quickly noticed that my oil level would drop to just over half liter low and stay there. As I don’t have a deep sump like a lot of guys, I just top it up and let my breather/catch can deal with it. 3/4-7/8 between the mark is about right, especially if you have an oil cooler.

btw: Does that fancy SnapOn torque wrench have selectable units of measure? That would be sweet. I bought a separate 1/4” in/lbs torque wrench after the Triumph dealer stripped half of the threads for the valve cover bolts on my Sprint ST and I had to have them helicoiled. The torque is 7.5 ft/lbs and I knew my 3/8” drive wrench wasn’t accurate that low. 90 in/lbs is right in the middle of the scale on my 1/4” drive. But I have to have 2 torque wrenches. (I actually have 3, a 1/4”, 3/8”, and 1/2”)

Last edited by dlearl476
@Teammccalla posted:

Yes, @LI-Rick. The oil cooler is mounted on the firewall on the other side of where back seats would be.  

The oil filter bypass valve would route the existing oil flow from the engine to the cooler once a certain temp is achieved.  Before the temp is reached, the oil would flow through the cooler.  As such, the oil would be filtered for awhile each drive.

Thanks.  I don’t think you need to bypass oil until warm. Years ago I daily drove an oval window Beetle with a 1776, dual Kadron, 26 mm oil pump with full flow oiling motor in New York.  Morning temps in the teens wasn’t uncommon. I just used a lighter weight oil in the winter and just took it easy for the first few minutes until it warmed up.

As a side note, my grandfather sailed on the USS McCalla in the Pacific during WWII.

@JoelP Thanks.  You know my preference for European bike parts.  It sure would have been nice to have the speedster in the Scottish Highlands last week.  The roads are exceptional.  It would be tricky to dodge raindrops but we didn’t have many, actually.

@LI-Rick. The purpose for using the bypass is to make use of the existing oil lines to feed both.  I don’t want to add another port on the block.  Less spaghetti too.

That’s fascinating regarding the USS McCalla.  My dad was in Honolulu as a boy on Dec 7th.  He has a small piece of a zero he picked up.  He was a boy, of course.

Last edited by Teammccalla

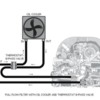
@Stan Galat. I’m sure that is true, but using something like the Mocal Thermostatic Sandwich Adapter could be a good choice to add a filter.   I can imagine running the existing source from the engine to a new filter mount.  Then the sandwich adapter would sit between the new mount and the filter.  Meanwhile, the sandwich adapter hoses would flow out and back to the oil cooler.

https://vwparts.aircooled.net/.../moc-sp1tm18-8an.htm

To give credit where credit is due, here is where I got interested in the bypass idea. https://www.speedsterowners.co...is-oil-cooler-bypass

When I did this research months ago I found some partial bypass units that allow some filtering even when most of the oil is going to the cooler.  I am not sure if the Mocal one does that.

Last edited by Teammccalla

@Teammccalla, that sandwich adapter works for a type 4 because they already have a screw on oil filter.  On a type 1, the diagram I posted is what everyone has been doing for decades.  Too little oil pressure isn’t the problem in full flow oil systems, too much pressure when cold can be, that is why some install a bypass oil pump cover.  
Like Stan says, do what makes you feel comfortable.  

@dlearl476 I used to use triflow quite a bit.  It lubricates well; however, I never liked that it stayed kind of greasy.  A few years ago, I found boron nitride ceramic lubricants for my bike.  They become dry after a short while and the lubrication data is similar to Teflon lubes.  I used that on my Speedster door hinges and no squeaks!  It does evaporate like WD-40 but on purpose.  It leaves the boron nitride ceramic lubricant behind for a dry non-greasy solution.  I used Muc-Off C3, but I’m sure there are many others.  https://road.cc/content/review...-c3-dry-ceramic-lube

VMC PARKING BRAKE STRIKES AGAIN!

Since the first day I got this car this has been an issue and everyone I spoke to assumed I was too incompetant to work a parking brake. Not anymore. I gently pulled the parking break to jack up my car for my service today, and this is what happened (see pic below).

This is the second time in six weeks. I will be contacting VMC to find a fix, as it's still under warranty. Just wanted to give an update because what's the F*CKING point of doing a careful service if I don't get to drive the damn thing! I honestly believe these types of 100% avoidable issues are what cause car owner to neglect their cars: they get worn down by little things and start avoiding important things because they hope to avoid encountering yet another problem.

On a diagnostic note, it appears that the bracket holding the handle and the shaft are not aligned; hence, the "bolt" isn't being fully inserted into the firewall. This is so frustrating because it's such a simple mechanism and I've avoided using the parking brake because of my first day delivery issues with it.

VintageMotorcars_Parking_Break_Malfunction1VintageMotorcars_Parking_Break_Malfunction2VintageMotorcars_Parking_Break_Malfunction3

Attachments

Images (3)
  • VintageMotorcars_Parking_Break_Malfunction1
  • VintageMotorcars_Parking_Break_Malfunction2
  • VintageMotorcars_Parking_Break_Malfunction3
Last edited by JoelP

I have an umbrella e-brake. Mine is an original 356 arrangement inside the cabin, adapted to the car from there. This is a horribly expensive way to go about doing it, because there are only so many old 356 e-brake handles not attached to a 356 still in circulation. I'd suspect yours is a generic version of the pull handle.

If I understand what's going on, it looks like the inner shaft (which the handle pulls) popped out of the "barrel" (the fixed portion of the program) which is probably just a rolled piece of sheetmetal, not welded along the seam. At the end of the inner shaft there is likely a cable that goes down to a bell-crank (probably mounted to your beam), which in turn pulls the e-brake cables.

There's not an infinite amount of real estate under your dash or on your beam, which is probably why you are noticing the alignment issue. I'd suspect that if the pieces were in alignment, the relationship of the handle to the steering column would not be right. Regardless, this is why there's a cable - to make up for any misalignment.

As frustrating as it's been for you, it looks like a very easy fix, at least if the pictures are showing me what I think they're showing me.

If the problem is that the inner shaft keeps popping out of the seam of the barrel, you just need to keep it in there, and everything will work. I'd try a couple of worm-gear hose clamps around the outer barrel - one high and one low - to keep things where they need to be.

It'd cost $3, and would save you a lot in increased BP.

Welcome to the Madness.

Last edited by Stan Galat
@JoelP posted:

@Stan Galat Thanks! I’ll go get some today. Do you have any advice about releasing the tension on the brake so I can realign? The tension on the brake doesn’t allow me to make any adjustments because I it won’t lock out. Sadly, they did away with the wing nut setup on the rear brakes for easy adjustments. I know I can fix is all, I just need to loosen the tension.

I'd suspect the inner shaft is being held in place (in the pulled position) by the barrel. Once you pop the inner shaft into that barrel, it should release. Keep the teeth on the inner shaft from hooking on the outer barrel.

Good luck.

Thanks, Stan. At this point, I’m planning on disassembling so I can implement a proper, permanent fix - not as swanky as yours though.


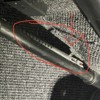
Can anyone with a 2023 VMC please post a pic of your under dash handbrake shaft? I would like to know what a proper one looks like, as mine has not worked once I took delivery of it. Because I’m on the East Coast, I can’t drop it at VMC to correct, I must do this myself.


Specifically, I’m wondering if mine is spun upside down. I’ve circled in red the reason I’m asking this.

IMG_5316

Attachments

Images (1)
  • IMG_5316
Post Content
×
×
×
×
Link copied to your clipboard.
×
×