Sure thing, but my bleeder is over at Rich MacKoul's right now.

I used a 1/8" ID quick connect typically used on an airbrush.  There are all sorts of kits of these available, some with hose, some without.

Here's a kit of the connector:

https://www.amazon.com/Airbrus...aps%2C89&sr=8-33

And another with an integral valve (that comes in handy) and a hose thrown in.

https://www.amazon.com/Hseng-A...aps%2C89&sr=8-64

You get the idea.  Search on Amazon for "Airbrush Air Connectors

Here are the adapters I "made". I didn't really make anything, just put some stuff together. The large one is from a Wilwood/Girling MC. Make sure you drill and tap it, and go THROUGH the inner plastic or cut a hole in the rubber seal. It will also fit VW/Porsche/Audi and Tilton. The plastic seals nicely, no Teflon tape needed.

The small one is from a gear oil quart container, specifically Valvoline. It has the tapered end that you cut for whatever size hole you wish, just like a tube of caulk. The plastic is very soft, which is why the ty-rap is around it, giving the threads a good squeeze. No tap needed on this one.

The fittings are 1/8" pipe thread to Schrader valve, available here:

https://www.google.com/search?...=chrome&ie=UTF-8

We used these fittings to check and put air pressure on telephone cables(to keep them dry) at my job.20221221_18305720221221_183105
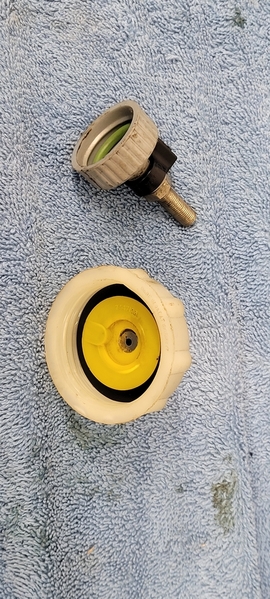
I put a green Viton O-ring in the gear oil/small VW-style adapter, keeps leaks to a minimum.

Again, no more than 10-15 psi, and check your reservoir OFTEN and refill. Make sure you release the pressure from the valve before unscrewing. Ask me how I know LOL!

This method works VERY VERY well for fluid replacement. If you're filling a new system, the tried and true 2-person pump/bleed method may be needed.

Attachments

Images (2)
  • 20221221_183057
  • 20221221_183105

@DannyP  -  Help me here, I'm a little confused.....   Why do you put a valve in the Schrader stem?  Can't you release the pressure back at the pump container?

I added a small piece of copper tubing (it could be vinyl, if that's what you have) under the fitting inside of the cap, that extends down just to the "full" mark on the reservoir.

Then, when you're done with the brake bleed job and release the pressure at the bleeder tank, the excess fluid will drain back by gravity into the bleeder tank (if it is lower than the reservoir) right to the "full" mark and stop.

I can chime in Gordon I have heard of some people using a vacuum but I never have seen it.
i used an air quick fitting on my Motiv and it worked but the cap has to be the right solid fit!

https://www.amazon.com/Motive-...Caps%2C84&sr=8-9


btw while it is a one man job two people make the work light and can catch mistakes and with brakes spills are dangerous!!  I also found that pumping the brake pedal helped when suddenly it seemed the flow was stopped.

Last edited by IaM-Ray

Oh, OK.....  If you empty the car's brake reservoir and then re-fill it with new fluid, put Danny's spiffy cap on and then pressurize the car's reservoir then it all makes sense.  Why that didn't occur to me I don't know - Blame it on the Holiday Edd Nog.

My original bleeder is shown below, much like a Motiv, I think.  I've added the quick connector since then but never needed a pressure gauge.  I, too, use the turkey baster to empty the car's reservoir, then put a quart of new fluid into my bleeder sitting on the floor, then spin on MY spiffy cap, connect the hose and give it 2-4 pumps to pressurize it and start bleeding.  

I was still thinking my way and never thought about pressurizing just the reservoir.  

My bleeder keeps the car reservoir full all the time so I don't have to keep checking it but Danny's method is certainly simpler.  Considering that you might use a pressure bleeder every 2 to 5 years, then a simple method makes a lot of sense.

Mercí, Ray!


blobid0

Attachments

Images (1)
  • blobid0
@DannyP posted:

Here are the adapters I "made". I didn't really make anything, just put some stuff together. The large one is from a Wilwood/Girling MC. Make sure you drill and tap it, and go THROUGH the inner plastic or cut a hole in the rubber seal. It will also fit VW/Porsche/Audi and Tilton. The plastic seals nicely, no Teflon tape needed.

The small one is from a gear oil quart container, specifically Valvoline. It has the tapered end that you cut for whatever size hole you wish, just like a tube of caulk. The plastic is very soft, which is why the ty-rap is around it, giving the threads a good squeeze. No tap needed on this one.

The fittings are 1/8" pipe thread to Schrader valve, available here:

https://www.google.com/search?...=chrome&ie=UTF-8

We used these fittings to check and put air pressure on telephone cables(to keep them dry) at my job.20221221_18305720221221_183105

I put a green Viton O-ring in the gear oil/small VW-style adapter, keeps leaks to a minimum.

Again, no more than 10-15 psi, and check your reservoir OFTEN and refill. Make sure you release the pressure from the valve before unscrewing. Ask me how I know LOL!

This method works VERY VERY well for fluid replacement. If you're filling a new system, the tried and true 2-person pump/bleed method may be needed.

Pardon my ignorance but should I remove the valve stem in the schrader valve?  Seems like it would prevent flow?

Most air chucks have a protruding piece that both opens the Schrader valve and allows air to pass through the chuck, which is why you need the Schrader valve. Otherwise, no air will flow through SOME chucks. @Cartod

Gordon, I do as exactly as you describe. The Motive bleeder bottle is key as you can see exactly when you've got all the air out, and not make a mess.

@IaM-Ray No tank, just fill the master cylinder reservoir, apply air, and bleed. I find that I can do one or two corners, depending on the system. The Cayman has inner and outer bleeders and 4 piston calipers, so I refill after each caliper. The Vee has drums and short brake lines so I can do two wheels then refill. Wheel cylinders have a much smaller volume in comparison to calipers, especially during a flush/fluid replacement.

I've had absolutely ZERO good luck with vacuum bleeders of all types, brands, and settings. You can't see when all the bubbles are out of the system, so you're always guessing. I don't want to take a test drive and guess with the brakes, even on the street. I REALLY don't want to guess on the track.

Last edited by DannyP

I get it, you use a bleeder bottle at the calliper itself and have old fluid in it (bleeding line kept in the fluid). so that no backflow air goes back in the line BUT you do not use a motive PUMP with fresh fluid, like we do…  but rather you fill the brake fluid reservoir with new fluid and put the cap on that has a Schaefer valve … then pressurize the whole system with a small amount of compressed air which drives the fluid in ….when you open the bleeder at the calliper.


You then refill or keep topping Up the brake fluid reservoir as needed per wheel or two wheels making sure it does not get low so that no air goes into the system…. Brilliant

Last edited by IaM-Ray
@Cartod posted:

I don’t like the idea of continually filling the fluid reservoir for fear of spilling onto the paint.  Why not just put the fluid in the pump bottle?  I’m going to flush the lines and want to pump a lot through.  
like this;

https://youtube.com/watch?v=2M...o&feature=shares

What I do not like about this video is that they have a mile long hose.  This introduces all that air into the system.  To me they need a shut off valve near the end of the hose close to the brakefluid reservoir and then have the quick connect to the adapter to the reservoir.  This way you can prime the line up to the shutoff valve, then hook up the quick connect near the brake fluid reservoir then pump to 20psi and go for it. Making sure you have enough new brake fluid in the Motive reservoir will alleviate all issues as well as covering everything up near the reservoir in case you screw up.


Their idea of testing the hook up DRY is good though.

I Got the new front pads on and finished now decided to put new pads on the back.  These are the empi with the e brake cable  

I’ve compressed my caliper as far back as it will go but new pads still won’t fit.  I assume this is because this caliper is also attached to the ebrake.  How do I get the caliper to go back in farther?  My head hurts!  I’ve searched our site and can’t find the answers.  I think I’m going to have to flip the car upside down to get the new pads on  

D7EA0150-1EB2-4801-9B09-386DCC84C326

Attachments

Images (1)
  • D7EA0150-1EB2-4801-9B09-386DCC84C326
Last edited by Cartod

I love that video - That's what you should follow.  

I have something similar to the Motiv, but i made my "el Cheapo" version from an ACE hardware 1/2 gallon garden bug sprayer.  I went with the smaller sprayer because it takes just less than a quart to replace all of the fluid in a typical speedster (just the brakes ).  I can pour a quart into it and still have a little left when done, which I dispose of.  Using that, I can bleed all four corners in 30 minutes or so.

As Ray mentioned, I added a shut-off at the car end of the hose (it's part of the quick-connector).  The 1/8" quick connector is really handy at the car end just to let you screw the cap onto the reservoir.  If you at least have that, you may not need a valve out there.

My hose is probably 6 ft long and the length has never been a problem and lets me put the pump/tank on the floor well away from the paint.  I can also release the pressure at the pump/tank end just by un-screwing the pump from the tank (or pulling the pressure release valve, if so equipped).  Once I do that and have the tank lower than the reservoir, the fluid drains back to the bottom of the cap's extension (see post above) and it settles at "full" on the reservoir.  

Like @DannyP, I have had zero luck with vacuum bleeders.  I know some people swear by them, Danny and I swear AT them.  They suck.  A decent pressure bleeder is the way to go and I have never had residual bubbles in the system with a pressure bleeder.  I started using a 2 gallon pressure bleeder when I worked on my Dad's school bus fleet when I was a kid.  The fluid has to flow downhill from the master cylinder to get to the wheels and the only way to force air out was with a pressure bleeder set at 20 psi.  The one I used would accept an air hose line from a compressor so we could keep 20 lbs. pressure at the tank while bleeding the rear wheels sitting about a mile back from the master cylinder.  Those long brake lines are the reason we got a 2 gallon bleeder tank system.  Most school buses back then (1970's - 1980's) had vacuum-assist hydraulic brakes.  Now, most that are cruising my neighborhood have air brakes.

Last edited by Gordon Nichols
@Cartod posted:

I don’t like the idea of continually filling the fluid reservoir for fear of spilling onto the paint.  Why not just put the fluid in the pump bottle?  I’m going to flush the lines and want to pump a lot through.  
like this;

https://youtube.com/watch?v=2M...o&feature=shares

Dude, seriously? Protect your car with a plastic drop cloth or bag. Hell, even use a tarp. Or a mechanic's fender cover. Something. Anything.

I ALWAYS protect my paint whenever I'm working with brake fluid. You won't need to "pump a lot through". You just empty the reservoir, fill with new, and bleed. You might go through a pint which is two small 8 oz. bottles.

The rear caliper pistons need to be screwed back in, that is how the e-brake stays in adjustment as the pads wear. They are VERY fine threads, it takes many turns to get the piston all the way back. They screw in the OPPOSITE direction that the cable pulls the lever. It can sometimes help to push against the piston as it is being turned in.

Lacking the proper tools, a small pair of slip joint or water pump pliers can grab the piston so it can be turned. Even Harbor Freight sells the tool for this.

Last edited by DannyP

Thanks Danny.  I appreciate all your advice and help with this.  I pulled as much fluid as I could out of the brake reservoir with a turkey baster.  I protected the paint but I still don’t trust myself with two quarts of fluid a funnel and that tiny mouth on the reservoir.   I’m using the pressure method in the video, dude.  😀

edit:  got the rear caliper turned all the way in using channel locks and  the  rear brake reassembled.  

Another stupid newby question:  how does the screw in caliper adjust itself, in other words what screws it back out as brakes wear????

Last edited by Cartod
@IaM-Ray posted:

What I do not like about this video is that they have a mile long hose.  This introduces all that air into the system.  To me they need a shut off valve near the end of the hose close to the brakefluid reservoir and then have the quick connect to the adapter to the reservoir.  This way you can prime the line up to the shutoff valve, then hook up the quick connect near the brake fluid reservoir then pump to 20psi and go for it. Making sure you have enough new brake fluid in the Motive reservoir will alleviate all issues as well as covering everything up near the reservoir in case you screw up.


Their idea of testing the hook up DRY is good though.

The air clears inside the reservoir before it gets into the system.

Post Content
×
×
×
×
Link copied to your clipboard.
×
×