I thought about this but I thought I would have to drill through the hole in the u-joint and I would risk damaging the threads for the set screw. I think my little aluminum piece prevents the set screw from moving.
The right way to do it would be to take the rack off the car. You could leave the tie rods adjusted though so you wouldn't have to adjust the toe.
Put the rack into a large drill press vice and countersink away.
If it were me, I’d stick a spring loaded center punch down the hole on both U joints. Remove them, then put a couple of divets in the shafts. As long as you have a steady hand, a good drill, and a sharp bit, it should be fine.
OTOH, with a flat surface on the shafts, your little aluminum piece, and a hardened set screw, I doubt you’ll have any problem. It’s not there’s a ton of force working to break that connection.
But I’d locktite the set screw for sure.
I FINALLY received my parts from Alex.
Three weeks and one day to ship from Finland. I unpacked it all, it looks great. I'll take pictures and post them when I get into it.
The rack and the mounting bracket look fine. I have to paint all the fabricated parts, it's bare metal. It includes a machined, billet steel bracket for the tierods which looks super sturdy. The tierods are custom made and for my 2" shortened beam. There are also two bent steel straps to hold the rack to the bracket. All grade 8.8 bolts are included.
Great! I look forward to following your installation and experience with it.
Wow!
Good for you Danny.
Very interested. Bye bye worm gear. Exciting.
"Three weeks and one day to ship from Finland. I unpacked it all, it looks great. I'll take pictures and post them when I get into it."
Vince could have pictures of racks in just a few seconds...
Very funny, Bob!
I cleaned all the mill scale off the parts today, but it's very humid and a little rainy. They are sitting in my dry garage with A/C on to keep them dry.
I'll paint tomorrow and do before/after photos.
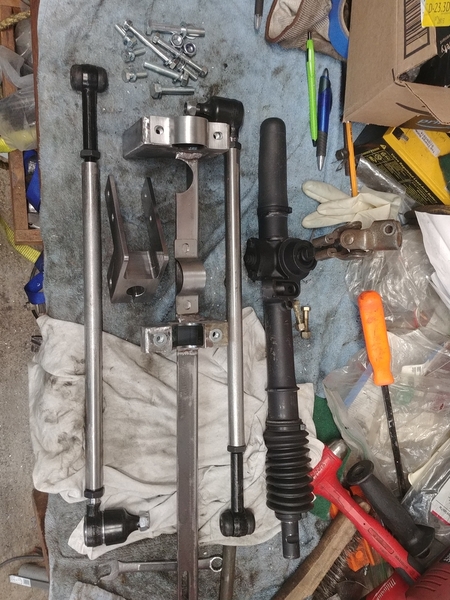
Here are the parts as I received them, but after cleaning all the packing tape adhesive and mill-scale:
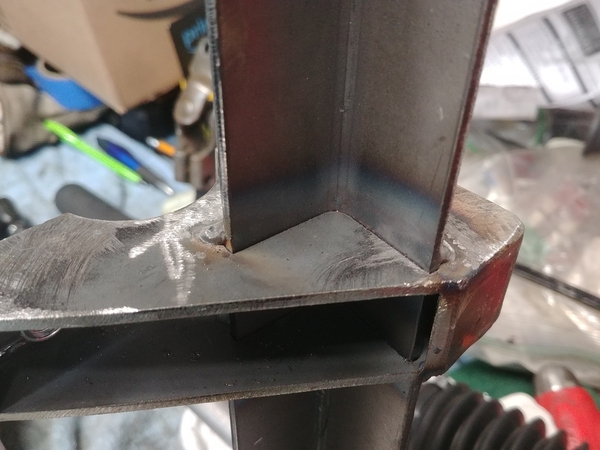
These welds penetrated well, you can see the bluing. Parts are all laser or water jet cut and fit well:
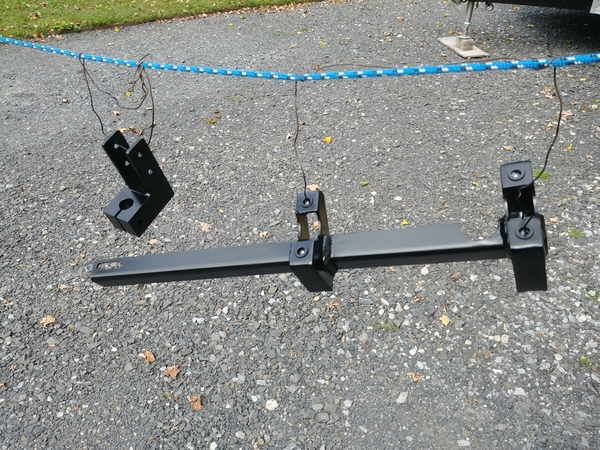
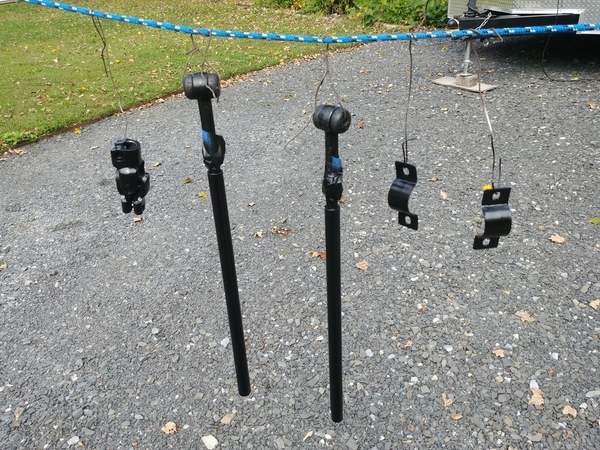
I was able to get the paint sprayed on today. Tierod bracket is machined from one billet 50mm piece. I like the use of the nutserts on the rack bracket. Rack bracket and tierod bracket:
Left to right: 911 steering U-joint, custom fabricated SOLID tie rods with Polo inner tierod ends, and rack clamps to hold the rack on the rack bracket:
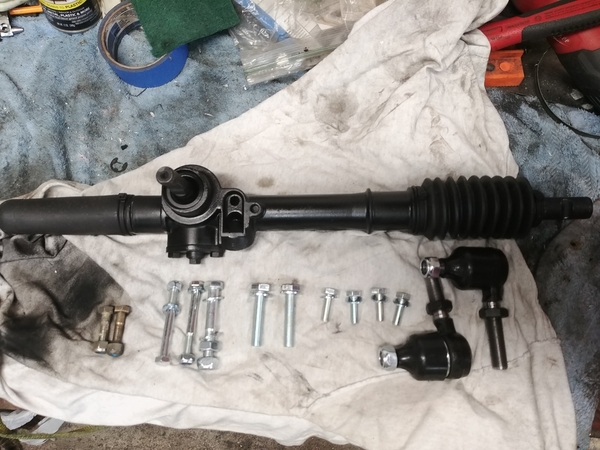
The rack and the rest of the hardware. L-R: 911 U-joint bolts, inner tierod bolts, beam clamp bolts, rack clamp bolts, and outer tierod ends:
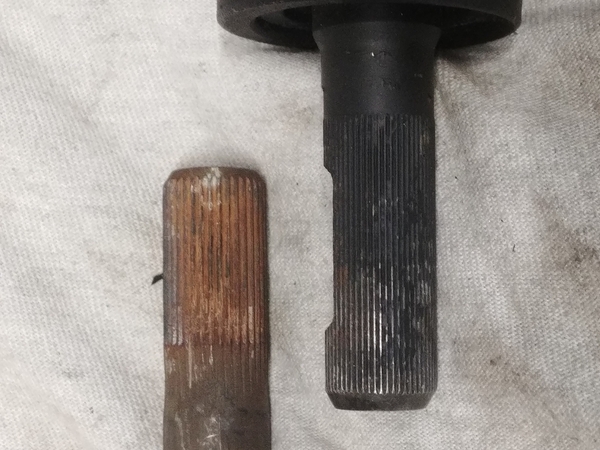
The rack does indeed have a 60 spline 16mm D-shaft(R). The 911 U-joint has a 36 spline 16mm size(L):
I partially removed the splines with a 5/8" bit on one end of the 911 joint so it could slip onto the rack. The 36 splines are MUCH deeper cut than the 60:
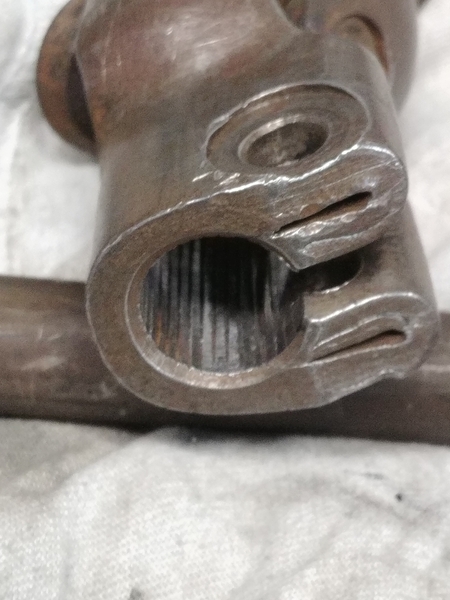
This is the other end left alone:
It slips on, but will need to be tapped with a mallet to go all the way on:
The single 8mm bolt has a clamping force of almost 5000 pounds when torqued. I'm not worried about slippage in the least.
But just to hedge my bets, a Kia U-joint is on the way via ebay. I'll know exactly which way to go once I start to actually mount this stuff.
Also, I told Alex I had a 2" narrowed beam so the tierods should each be 1" shorter. I'll see if that was done. The tierods have right hand threads on the outers and left-hand on the inners. The locknuts are 22mm and the tierods themselves have an 18mm wrench flat on the outer end.
I'll take the tank out next week after the Kia U-joint arrives. That way it will be minimal down-time for the Spyder.
The rack is 3.5 turns lock-to-lock(I think my steering box is about 3 turns), and I may be installing stops on the rack bracket so my tires don't hit the wheel wells. I didn't measure the travel distance of the rack. It appears to be plenty, so 3.5 turns should be more than enough.
It's amazing how many Speedsters and Spyders don't have the steering stop bolts in the factory locations on the beam. I remember Michael commenting that the metal stop needs to be trimmed/removed.
Attachments
Attachments
@DannyP Cool stuff, do any of you guys know a guy called Lanner Khan he is a mech Eng, and he is very active up here in the west coast and can machine a lot of stuff for the hobby he made me some aluminum rings for hub centricity, which I need to install but he has a lathe etc. Anyway, just saying.

Attachments
Thanks Ray. Never heard of Lanner. Since I am using my existing column, I won't need any rings or adapters. I'm good. FYI, I have a really nice hub adapter that Carey Hines has made. I love it.
Bob, the only 911 part in the whole system is the U-joint. The Polo rack will use the VW column, the rack is offset to the left centered on the column. Both tierods pick up off the right side of the rack, just like in the VW Polo. I think it's very innovative and cheap engineering for packaging and rack precision.
@DannyP, what Kia u-joint did you order? The Sedona joints I have don't seem to have 60 splines after all. I will count again.
It's the last one they had, a dismantler on ebay from MICHIGAN! From a Kia Rio early 2000s. That was a real POS econobox if I remember.
My Kia u-joints are new from a place in Canada, also on eBay.
Nice!
My car came (from Intermeccanica) with a Golf rack and pinion setup adapted to the beam, so I'm really looking at this for the first time. It's a really cool little bit of kit. It isn't just that the rack is a much more precise way to move the tie-rods, it's that the tie-rods are equal length (left and right) with it. It's got a lot of the advantages of a center-mounted rack (which I don't have), without the need for the attendant u-joints and articulation needed to get the rack in the center of the car, when the column is off to the side.
I've long been interested in the Red-9 coil-over setup for a beam (where the torsion springs are eliminated as in an air-bagged car, and the shocks are replaced with coil-overs). If an AirKewld beam was used (with the robust shock towers), and that suspension setup was used, and this rack was installed, I wonder how it would perform in relation to an A-arm setup?
As Bruce has found, the packaging of a beam (especially in a Spyder) is very hard to work around. Look at a Mendeola front suspension, and you'll understand what I mean - it's obviously an adapted part. I know @DannyP has thought of a work-around, but if a beam can get even close to an A-arm/rack and pinion set-up with a beam, it'd open a world of possibility for guys with beams already installed.
@DannyP, for my installation I didn't remove the tank. Maybe the situation is different on a Spyder.
Michael, I don't have to remove the tank. I could go from underneath, there is an 18" wide removable aluminum plate that is the width of the beam under the car. But, my EFI pump, filters, Webasto pump, and horns are all under there. And don't forget the master cylinders for brakes and clutch and my custom-made swaybar(in front of the beam).
The tank is right over the beam and column. Easy access without getting under the car. I hope.
Stan, that is my thinking. With a Spyder, the packaging is tight. I hadn't thought of a workaround for the front suspension yet. Rear IRS though, that I actually bought the steel for. I'll need IRS bearing housings and stub axles, and eight heim joints and four lateral "tierods".
As for the front, a 2" narrowed beam gives me room for my 4-piston brakes(track increase of 3/4" per side). The spring rate feels good, whatever leaves Greg used are OK. The NOS Koni adjustable oil shocks make the ride supple but firm.
I'm really hoping the on-center feel and overall rack precision finish this off, as this is as far as I'm willing to go in this car.
Surely the rack will help on center feel and steering precision just off center.
You're out of luck on the beam, though, Stan. The beam can be made to work reasonably well, but it has a major design limitation that cannot be overcome sufficiently to rival a double A-arm design. To wit, the camber of the wheel on a beam front end remains constant to the car throughout the travel of the suspension. That would be fine if the car was parallel with the road at all times, but it isn't. The car rolls around its roll center during cornering (we won't even get into roll center issues). That means that if you had set -1.5 degrees of camber, and the car rolled 5 degrees in a corner, the outside front tire is now at +3.5 degrees camber. The only way to avoid this is to avoid body roll by stiffening the ride and anti roll bar rates. That solution has its obvious limits. Caster can also effect camber as the wheel is steered, but nothing like the amount needed to compensate for body roll.
The double A-arm system has a camber increase relative to the car built into the travel which keeps the camber of the tire relative to the road constant as the suspension compresses (or increases it, or does whatever the designer has in mind within the limits of packaging and geometry).
My reserve Kia U-joint was supposed to arrive last Saturday. It finally showed up today. USPS is a little slow these days, eh?
Anyway, the Kia joint is 16mm but it's 36 spline like VW and Porsche. I don't know what out there would be 60 spline except for maybe an OE VW Polo joint.
It is 1/4" shorter than the 911 joint, which may be useful once I get into it. We'll see.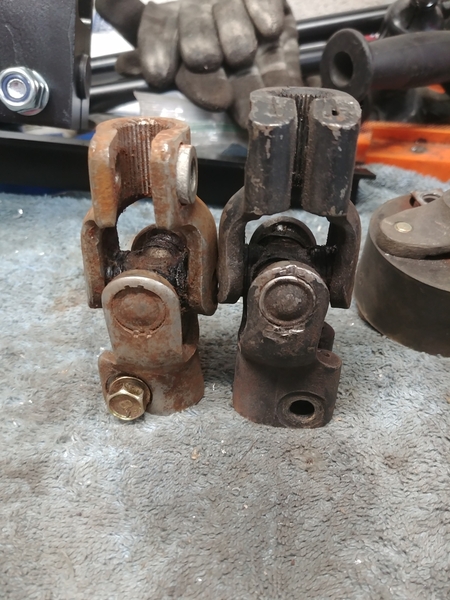

Attachments
If you would rather have a new KIA joint instead of a used one, I will send you one.
If so, tell me the length of yours so I can check if mine is the same.
I'll measure the length if you like, but I'm probably not going to use it.
It's in perfect condition functionally, it just has surface rust on it.
In the event that I use it, I'll de-rust and paint.
Don't measure it if you don't want me to send a new one.
It was good to see an update. I've been wondering what's happening.
I can now start the install.
I've got the Spyder in the garage right now, but I have a couple events I still want to attend with it in October.
I believe that you have that "winter" thing up there, don't you? Perhaps that would be a suitable time for this project. ![]()
I'll bet I used my car more than you did this year, Mr. Broken Bushing LOL!
![]()
Ah, Mister Rusty Rack Parts, I've only had mine since late June.
So there! THBFFT!!!
Attachments
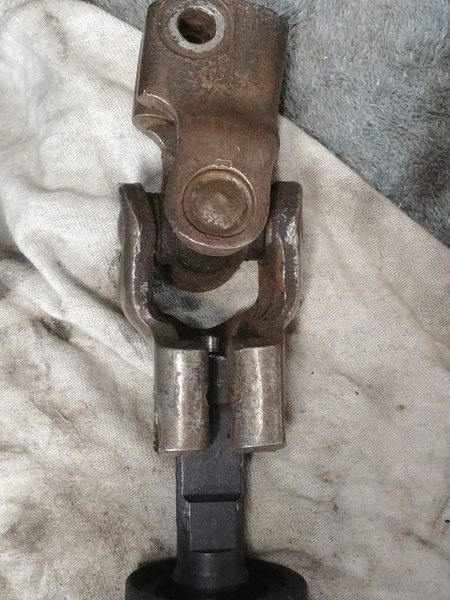
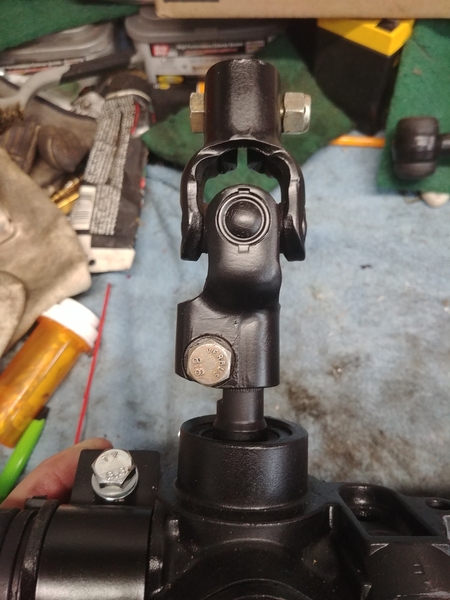
It looks like the 911 joint, right?
I love the bottle of pills in your picture, Danny. Prescribed by Dr. Goodwrench?
Yes, de-rusted and painted 911 U-joint.
Mike: those are extra Weber mains, emulsions, airs, and idles. Could come in handy for some poor soul. I just put them away! They're in my tune-up box: tach/dwell, timing light, vac/pressure gauge, spark plug gapper, points file, feeler gauges.
All stuff I don't need. Any. More. LOL!
I was going to start the rack today, but I changed the oil instead. Also swapping out the leaking oil tank. Speedway Motors brand, not impressed. I bought a new Saldana, the same model I used on my customer 2276 Spyder.
Did you find that filter top?
I was under the front of my car resetting the FR camber and tightening all of the ball joint bolts that weren't. Then doing an alignment. Laying there staring up into the limited space behind the front beam, I was fantasizing about rack and pinion steering. I even know exactly the area that you have to cut away to make room for the left tie rod.
Hopefully it'll stop raining in the next couple of days so I can go out for a test drive. Then maybe I'll change my oil.
Can't you repair the leaking oil tank?
No, I didn't find it yet. I have several places to look still.
The Speedway oil neck leaks a little, or the cap leaks onto the neck. It's not designed well.
However, the Saldana tank doesn't leak, it has O-rings to seal the bolt-on top, threaded filler cap, and threaded drain cap. The fittings are AN12 welded right on. The Speedway tank required pipe thread adapters(with LONG tubes on the tank, and bulky and longer fittings. Even though I need AN adapters, the overall look is cleaner and the tank physically fits nicer. It's just a better design. I'll use it on any future Spyder builds, too. It's the same price as the no-longer-available Speedway tank. Hmmmm, wonder why it's NLA?
https://www.speedwaymotors.com...DEAQYASABEgIxIvD_BwE
There aren't any 3/8" pipe thread fittings as it says in the description. There are four AN12 fittings, I adapt to AN10 on the bottom to feed the pressure stage and the two returns to AN8 up top. The top fitting is also adapted to AN8 for the breather.
There is a skinny O-ring just inside the bolt circle on top of the tank. First, I took the tank apart and cleaned it, there were a couple aluminum chips inside. When I put it back together I used Permatex thread sealant on the bolts. Very well made stuff.
Attachments
Not yet.
My Cayman is in the garage, waiting for a new voltage regulator to show up. 15.3 volts at idle. I'm REALLY glad I installed a multi-gauge: oil press. and temp, water temp, and voltage.
I guess 110k is as long as a regulator will last. Alternator is on the bench.
After that is fixed I'll get into it.


