I took my pitted and slightly rusted chrome wheels to the powder coater and he called back today with some bad news. Three of four behaved well in chrome etching but one did not. It looks buggered. The shop says it may have had two coats and the inside coat started to peel in many places and we can't get that coat off to get down to bare steel so new wheels may be in order. I need to check my offset numbers please. 

The damaged wheel is a rear wheel which measures 8" across outside to outside. One half of that is 4" and if I measure from the outer surface on the back side of the wheel to the bolt mounting flange we get 6" so I think that would be a 2" or 50 mm positive offset. And that would leave 2" from the outside of the mount flange to the outside of the wheel. Right ? For sake of simplicity I've ignored the thickness of the mount flange here and below. 

I see that Carey has some very nice wheels already powder coated in the correct silver ( aluminum ) colour with a four bolt pattern but with the preferred 10 hole pattern which is period correct too. His rims are called 5 1/5" so they will measure 6 1/2" wide and therefore the center will be 3 1/4" inward. Careys wheels have a 25mm or 1" positive offset. Therefore if one measures from the back side of the wheel to the mount flange we'd get 4 1/4" on that one. If the overall wheel is 6 1/2" wide, we'd have 2 1/4" from the mount flange to the outside of the wheel near the fender. 

In a nutshell, Careys wheel would stick the tire out towards the fender about 1/4" more than Henry's wheel and I've just got room for that. I don't know if Henry carries spare wheels in stock and if he does, I don't think they'll be the 10 hole type but I'll find out tomorrow.

Could you please check my math and logic above and confirm if I'm on the right track? Thanks.

Tom Blankenship....I think you mentioned a little while back that you bought four of these wheels from Carey. If you read this, any chance you could post a pic and let me know close your tires are to the fender ? Thanks.

My car is IRS but I don't know if it is some custom width or not. 

David Stroud

 '92 IM Roadster D 2.3 L Air Cooled

Ottawa, Canada


Original Post

Replies sorted oldest to newest

Assume replica Fuchs are not your style?  CIP1 has a huge selection with from 3.5" back spacing to 5" (on a 5.5" wheel).  From classic black/silver to my preference polished to chrome. Prices are $99 to $159 plus caps and bolts.  You will also need replacement rotors/drum. It is a Madness indeed!

https://www2.cip1.com/SearchResults.asp?Cat=1931

Image result for wheel backspacing explained
The easiest way to measure backspace is to lay the wheel face down onto the ground so the backside of the wheel is facing up. ... This measurement is backspaceBackspacing, similar to offset, is the distance from the hub mounting surface to the inside lip of the wheel (measured in inches).

Attachments

Images (1)
  • blobid0

David,

I just bought a set of those rims from @Tom Williams for my VS built swing axle car. I REALLY like them. With the silver/grey color and the flat 912 style hubcap it gives it a very vintage look. I can slip the top of my finger between the wheel and the body. I'm running Vredestein Sprint Classics on the car. FWIW, I ordered the hubcaps without a Beck/Special Edition crest thinking the hubcap would have three holes for some Porsche crests and I was wrong. I could not find any single post Porsche crests so I had to make my own. The first thing I did was break off all of the mounting studs that were on the three post crests, I used a Dremel and circular sanding disc to rough up the back of the crest. I used a Sharpie to mark the center of the crest, and I epoxied a flat headed bolt to the back of the crest. After the epoxy dried I applied a dollop of silicone to the back of the crest, mounted it to the hubcap, put on a small washer, added a standard nut, and a small amount of silicone to keep the nut in place.

Of course if you use the Beck/Special Edition crest you can avoid all that work.

IMG_8643 2

EAkrRyHNT1++48vdqbl9qw

PYQSILZFQtGAXIuKe9Bc9A


Attachments

Images (3)
  • IMG_8643 2
  • EAkrRyHNT1++48vdqbl9qw
  • PYQSILZFQtGAXIuKe9Bc9A

Thanks for that, Robert. That's the look I'm going for. What size tires have you got there, please ? 

My hubcaps are already on the way from Pelican Parts with separate crests. They were ordered to fit my existing wheels so we'll have to see where all this leads me. June one wheel is setting off quite a chain reaction.   

I think I see you have the slightly smaller diameter hubcaps and I did note that Beck's wheels will take either type of hubcap...with the clips like yours or the four nubs on the wheels. 

Last edited by David Stroud IM Roadster D
David Stroud posted:

Thanks for that, Robert. That's the look I'm going for. What size tires have you got there, please ? 

My hubcaps are already on the way from Pelican Parts with separate crests. They were ordered to fit my existing wheels so we'll have to see where all this leads me. June one wheel is setting off quite a chain reaction.   

I think I see you have the slightly smaller diameter hubcaps and I did note that Beck's wheels will take either type of hubcap...with the clips like yours or the four nubs on the wheels. 

I was told that the baby moons or what is a slightly more round hubcap w/o crests wouldn't fit. I do like his vintage look the whole combination gives. The tire size is 165 HR15 86H.

Michael B (aka bluespeedster SoCal) posted:

I need to dig into the wheel scene some day soon.

It can be an interesting process and seems to require a lot of thought considering what angle you want to pursue. 

I'm on round two of Speedster ownership. My previous ride was a low budget older IM with lots of patina. I quite liked it and my Wife and I traveled around the US putting maybe about 50, 000 miles in the last seven years. Opportunity knocked and I recently bought a pretty nice 1992 IM Roadster replete with roll up windows, a very substantial convertible roof in a burgundy colour which would not be my first colour choice but I got a pretty nice car with a decent motor at a very good price. The older Speedster got sold soon after and I lost my comfort of patina. 

So with Meguiars products and a decent buffer in hand I got into colour correcting and compound / polish / wax with some pretty good results.  Not my main forte but I like to learn things. 

Having made a good deal on the Roadster buy and then the Speedster sale, I figured I might take a serious look at some nice tires. Several experts on the list concluded that the Vred Sportrac 5's might be a good choice for summer driving and I bought them even though I'm more of a cruiser than a sporty type driver. 

Now the wheel saga. My chrome ( now I learn they are the good Mangles says IM ) needed refinishing. The chrome is pitted / peeling here and there so off to the powder coaters they go for blasting and powder coat in the correct RAL 9006 colour typical of Porsche in the day. My front rims are 5.5 and the rears ar 7.0. The two fronts and one rear rim took to the etching just fine and one rear failed to cooperate. Double layer of chrome or something or poor chrome quality but it would not blast off...just kind of bent and peeled in various sections. I have the rim at home and have struggled a bit to find a remedy but right now it's looking troublesome. Beck has beautiful custom made rims at a very good price which are tempting. I've now got 3 1/2  rims already blasted to pay for minimum and that will be waste if I buy new rims. IM can sell me a set of four rims painted only but apparently they are of Chinese mfg and may not exactly match what I have now. More clarification may arrive on that late next week. 

Further....my new So Cal Nipple hubcaps will arrive tomorrow ( just trying hard to coordinate stuff, eh ? ) and Carey told me they won't fit his rims and I'd have to buy his caps ( another fair deal / price from Beck ) if I bought his rims. So Cal will refund. 

I'm trying to stick with what I've got for wheels and get them redone in a correct colour but one wheel has got me buggered right now. 

So Michael...dig slow and dig deep.  One thing can lead to another. Robert M has pics above which show the traditional Porsche wheel "white aluminum" colour and hubcap combo that I'm looking for. 

Shyt...when my first car and I both had patina together we'd never have this conversation.

Last edited by David Stroud IM Roadster D

Hi David- I didn't comment earlier as I thought that you had it covered, but upon re-reading your original post I noticed that you were taking measurements from the outside edge of the wheel (and ignoring the flange thickness), whereas I thought (as per Greg's comment) that backspacing was measured from the inside of the mounting flange. You've realized that your 8" wheels are really 7's, so as long as you've figured this all into your calculations you'll be ok. With the offset it doesn't matter, as you're looking for the mounting flange distance from the middle of the wheel, and whether you're going from the outside edge or the tire mounting surface doesn't matter as long as it's consistent from side to side.

If you've got it all figured out and I'm not adding anything here then feel free to ignore my drivel, but I thought it worth mentioning just in case. Al 

I suspect the powder coater used fairly gentle media blasting.  Wonder if more aggressive sandblasting or a sanding disc followed by a flapper sanding wheel would remove the flaking remaining chrome?  It might leave pits and scratches that powder coating won't smooth out though. There has to be some nasty chemical out there that would remove it too.  Try muriatic acid used to clean paint/cement from bricks (protect eyes and don't breath fumes).   Suspect you only need to do the front.

https://www.jalopyjournal.com/...hrome-plating.41152/

WOLFGANG posted:

I suspect the powder coater used fairly gentle media blasting.  Wonder if more aggressive sandblasting or a sanding disc followed by a flapper sanding wheel would remove the flaking remaining chrome?  It might leave pits and scratches that powder coating won't smooth out though. There has to be some nasty chemical out there that would remove it too.  Try muriatic acid used to clean paint/cement from bricks (protect eyes and don't breath fumes).   Suspect you only need to do the front.

https://www.jalopyjournal.com/...hrome-plating.41152/

Thanks for the ideas Guys. Greg most of what's in those links are now legally banned for pollution and personal safety reasons now. I had thought about some bootleg, homebrew chemical process but decided against it. I used electrolysis years ago to remove minor rust from inside the whole length of steel aircraft lift strut tubes. The process was excellent and I could see the date stamp on the outside of the tubes when done, no sanding required. Summerhill Tube Company April 1947. 

Flapper abrading would remove the flaking chrome if you could get a flapper wheel deep down into the crevices of the wheel but you can't reach it all. The powder coat shop and I came to some compromise / agreement yesterday and they said they'd       "make it work " so i'll get my wheels back early next week. The tires are on hand and the hubcaps are somewhere in the city so I should have all bolted up by next weekend to show off to our flying club friends. Annual party at my place for about 40 people...always a good time. 

@David Stroud IM Roadster D

David, I just saw this thread and want to share my experience with powder coating a chrome piece (I guess it may be a little late).

I have a Reuter luggage rack that I originally had on my '57 1600S Coupe. I have since put that rack on my previous silver VS (keeping it chrome with all its patina).

Click on pics to enlarge...

IMG_0586IMG_0584

Eventually I then wanted to powder-coat it to color match my current black VS. The shop tried using several types of media-blast to remove the chrome, with marginal results. They powder-coated the rack (black), but the results were terrible. The finished product looked like a terrible paint job with major orange-peel effect. The black color highlighted the dimpling from the media blast.

Long story short, they removed the powder-coat and sent the rack to a shop that did chrome plating. They essentially put the rack through a reverse chemical process of chrome-plating. Instead of dipping in chemical #1 then chemical # 2 then final chemical #3 resulting in chrome, they put the rack in chemical #3 (to de-chrome), then chemical #2 (to remove brass/copper coating) , then chemical #1). The rack was completely stripped of all chrome plating.

The rack was then powder-coated and the result was a beautiful rich & deep look in powder coat black.

IMG_0728

This info may be late for your use, maybe it will give some insight to others looking to powder-coat a piece that is chrome. 

Attachments

Images (3)
  • IMG_0586
  • IMG_0584
  • IMG_0728
MusbJim posted:

@David Stroud IM Roadster D

David, I just saw this thread and want to share my experience with powder coating a chrome piece (I guess it may be a little late).

I have a Reuter luggage rack that I originally had on my '57 1600S Coupe. I have since put that rack on my previous silver VS (keeping it chrome with all its patina).

Click on pics to enlarge...

IMG_0586IMG_0584

Eventually I then wanted to powder-coat it to color match my current black VS. The shop tried using several types of media-blast to remove the chrome, with marginal results. They powder-coated the rack (black), but the results were terrible. The finished product looked like a terrible paint job with major orange-peel effect. The black color highlighted the dimpling from the media blast.

Long story short, they removed the powder-coat and sent the rack to a shop that did chrome plating. They essentially put the rack through a reverse chemical process of chrome-plating. Instead of dipping in chemical #1 then chemical # 2 then final chemical #3 resulting in chrome, they put the rack in chemical #3 (to de-chrome), then chemical #2 (to remove brass/copper coating) , then chemical #1). The rack was completely stripped of all chrome plating.

The rack was then powder-coated and the result was a beautiful rich & deep look in powder coat black.

IMG_0728

This info may be late for your use, maybe it will give some insight to others looking to powder-coat a piece that is chrome. 

Thanks, Jim. That would be the correct process but many calls to the local wheel experts provided nothing. You sure did a nice job on your rack and it looks great. What has my attention now is that nice 100,000 km badge on your rear grill. Not many of us on the list could sport one of those with a straight face but I may start looking for one. Any leads appreciated. I hope your badge is a replica though...I just saw the price of a real one.....OUCH !!

David Stroud posted:
Bob: IM S6 posted:

David.  You are one of the few who certainly could put that badge on your car.  Just count all the kms you racked up with your old IM, and extrapolate into the future with your new one.  

A loose estimate puts me at about 95,600 km right now. 

So, is it the car or the driver that counts?  Consider that Ron would have put lots of kms on that car, add your total, and you are way over 100,000 kms.  But,  in 4,400 kms, you personally earn the badge, but don’t affix it to yourself permanently.  ;-)

@IaM-Ray process wasn't too complicated. The shop where I took my rack is fairly busy so pricing is very competitive.

They told me that all the chrome had to be removed in order for best powder coat results, so they would try media blast first. They did the powder coat ($100) after media blast but result was less than satisfactory (orange peel look). They recommended the chrome shop to de-chrome then afterwards powder-coated again. They didn't charge me for the 2nd powder-coating. De-chroming cost $75, so total cost was $175. Pretty fair price for the great results I got.

I think that David's goal of powder-coated wheels with chrome-nipple hubcap will be a great look on his car. 

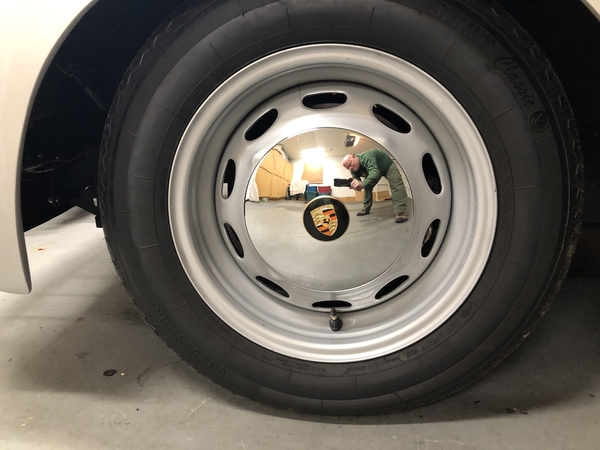
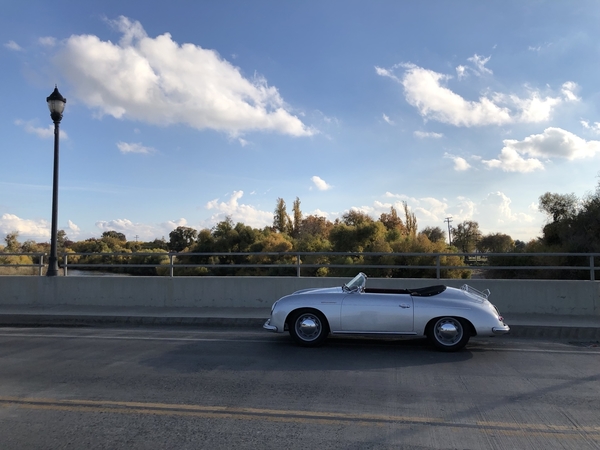
I finally got the rims finished, tires mounted and everything installed on the car. Here's some pics of before and after. Before is the pic with the bra. Tired chromed rims with older tires and moon style hubcaps. After pics are in the snow today ( just briefly) with the rims powder coated the period correct silver, new Vreds and nipple hubcaps. This is the look I was going for but right now I'm not sure I actually like the look. The Roadster is a bulkier looking car than a Speedster for sure and now I think the wheels are looking rather bulky too. Anyone care to comment and offer an opinion on the visual ? 

The nipple hubcaps and crests came from from So Cal Parts and they fit the refinished Mangles perfectly. The caps appear to be a very good value for about $20 each with two pairs of holes for the removal tool and the crests are an extremely good value for about $7 each. Heavily built, well finished and an excellent fit too. The little clips supplied to secure the posts of the crests to the cap were a bit lacking. They are intended to be pushed down on the posts with a friction fit to secure the crest to the hubcap but four of the twelve just slid down the post and held nothing. All got the JB Weld treatment anyway. 

I've done a bit of rebadging and added some new scripts too. So..comments on the before and after look please ?

Attachments

Images (5)
  • BC Roadster 002
  • New Tires and Caps 027
  • New Tires and Caps 029
  • New Tires and Caps 028
  • New Tires and Caps 022

David.  I think captured just the right look for a Convertible D.  They are a heavier looking car than a Speedster, but what you have done is just right.  You're probably focusing too much on the wheels because now you can't figure out what to do next with the car.    They look just right painted silver, with the hub caps.

Seriously, the car looks so much better than before.  So, go work on an airplane or something until driving weather comes along.

It looks great.  Even Ray likes it.  

IaM-Ray posted:
Gordon Nichols posted:

"It looks great.  Even Ray likes it. "

"Mr. Picky-Pants."    

OCD is the word... lol   


Ray...I lined up the pointy end of the hubcap crests with the valve stems just for YOU !   And check the position of the front and rear valve stems in the middle pic. You make me do shyt like this.....I'm losing ground ( and possibly any earlier level of respect however earned ) rapidly.

Last edited by David Stroud IM Roadster D
David Stroud posted:
IaM-Ray posted:
Gordon Nichols posted:

"It looks great.  Even Ray likes it. "

"Mr. Picky-Pants."    

OCD is the word... lol   


Ray...I lined up the pointy end of the hubcap crests with the valve stems just for YOU !   And check the position of the front and rear valve stems in the middle pic. You make me do shyt like this.....I'm losing ground ( and possibly any earlier level of respect however earned ) rapidly.

Sure thing David you now qualify for the New IM Club if we ever make one ...

Post Content
×
×
×
×
Link copied to your clipboard.
×
×